Officine Bitcoin
Lezioni online Bitcoin-only
This project is maintained by valerio-vaccaro
Officine Bitcoin Bitcoin-only lesson This project is maintained by valerio-vaccaro
🌍 Traduzioni
🇨🇳 中文 🇬🇧 English 🇪🇸 Español 🇵🇹 Português 🇷🇺 Русский 🇫🇷 Français 🇩🇪 Deutsch 🇮🇹 Italiano 🇭🇺 Magyar 🏳️ Milanés 🏳️ Veneto
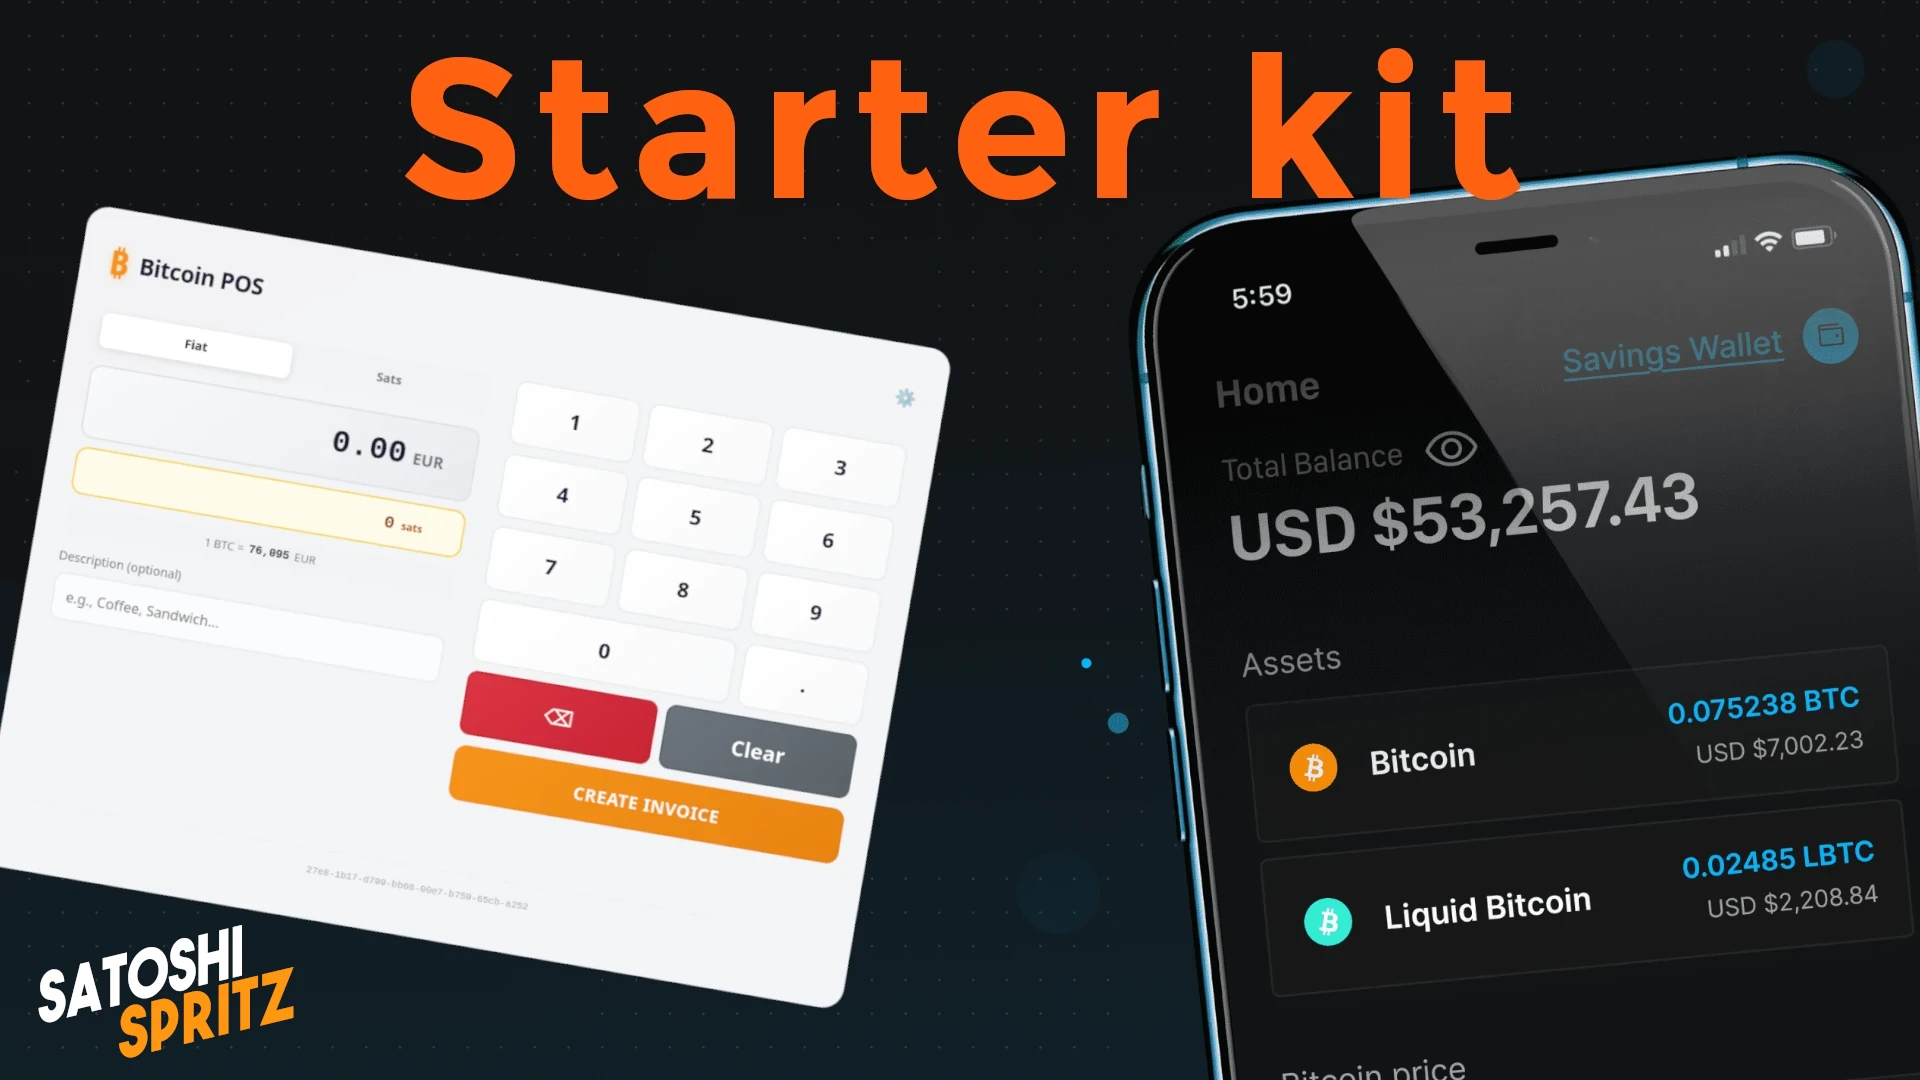
Here’s a great way to start using Bitcoin in the most correct way possible. What follows is a suggestion for a very lean and easy-to-implement starter kit that you can set up independently.
Whether you’re a curious user, a professional who wants to accept Bitcoin as a payment method, or an experienced user looking for solutions for friends and family, this guide will allow you to:
- download and install a mobile wallet for using Bitcoin at every level (onchain for long-term storage; or Liquid and Lightning for instant payments);
- configure a POS to generate payment requests starting from the price of your goods/services in Euros;
- learn about advanced wallet settings. We’ve left this part at the end of the guide to simplify the initial approach, but always take a look at this part, because it’s important.
Let’s first clarify what we mean at the beginning when talking about using Bitcoin in the correct way.
Initial Glossary
-
Not your keys, not your coinsIf you’re approaching Bitcoin for the first time, the phraseNot your keys, not your coinsis new to you and its meaning is reduced to the mere literal translation. Bitcoin works on the principle of asymmetric cryptography, based on a series of pairs of public and private keys. It is with the unique possession and individual management of private keys that you can say you have control over your Bitcoin.Therefore, you must be the only one to know the private keys, the secret that will allow you to own and eventually spend the bitcoin associated with these keys.
Not your keys, not your coinsis practically a mantra for bitcoiners around the world and it will become one for you too. -
Recovery phraseDuring its brief history, the Bitcoin protocol has evolved to make secret management simpler, i.e., private keys. Today these are represented in the form of a sequence of 12 or 24 words in English, a simpler way to transcribe and verify them. The words are the main secret to keep. They must be transcribed on paper and kept in a very safe place, such as a safe. They must never be photographed, transferred to a computer, or - even less - shared with others. -
WalletThe wallet is the tool that will allow you to view your balance, as well as accept or spend Bitcoin. During this tutorial we’ll download one on your phone. The wallet on the phone is called ahot wallet, as it’s hosted on a device always connected to the internet. If you’re just starting out, that’s perfectly fine; you’ll learn other methods through study to perfect wallet usage. -
Non CustodialIt’s fundamentally important to start using Bitcoin throughnon-custodialwallets, i.e., those that give you complete control over private keys. Always be wary of anyone who pushes you to use different tools, so-called custodial ones, to approach Bitcoin. Custodial wallets are tools whose keys you don’t own. It’s not a question of if, but of when they will permanently prevent you from accessing your funds.
Blockstream App (ex Green Wallet)
For the starter kit we’ll download Blockstream App, an open source wallet whose code you can verify. The application has a long development tradition and a decent history behind it; the wallet has proven reliable in the past.
⚠️ The following instructions are for downloading and installing the app for Android. For iOS, you must use the official store.
🌍 Traduzioni
🇨🇳 中文 🇬🇧 English 🇪🇸 Español 🇵🇹 Português 🇷🇺 Русский 🇫🇷 Français 🇩🇪 Deutsch 🇮🇹 Italiano 🇭🇺 Magyar 🏳️ Milanés 🏳️ Veneto
Go to the link https://github.com/Blockstream/green_android which is the official Github repository of the developer.
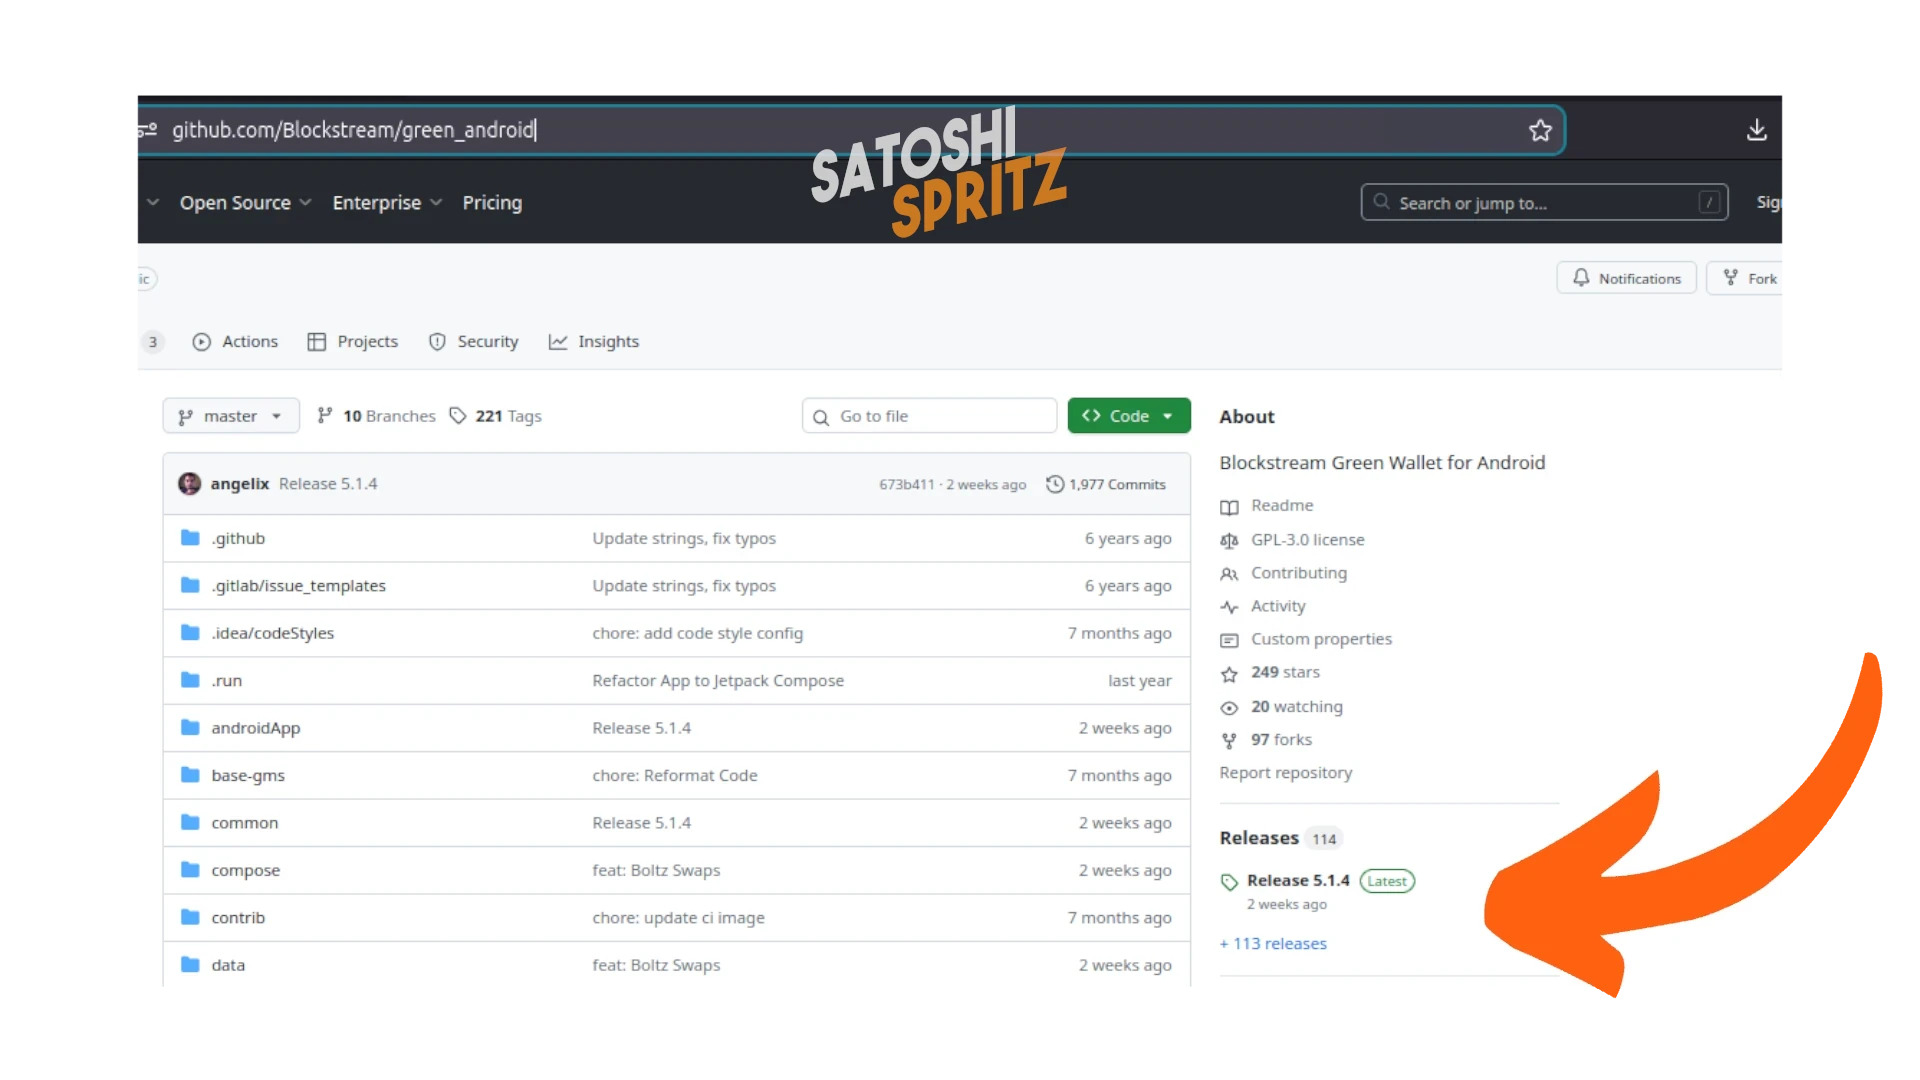
In the middle of the page, on the right, select Latest in the space dedicated to Releases, to go download the most updated version.
You’ll arrive on a page that will show you the latest release, 5.1.4 at the time of writing this tutorial in December 2025. On the same page select what you can download:
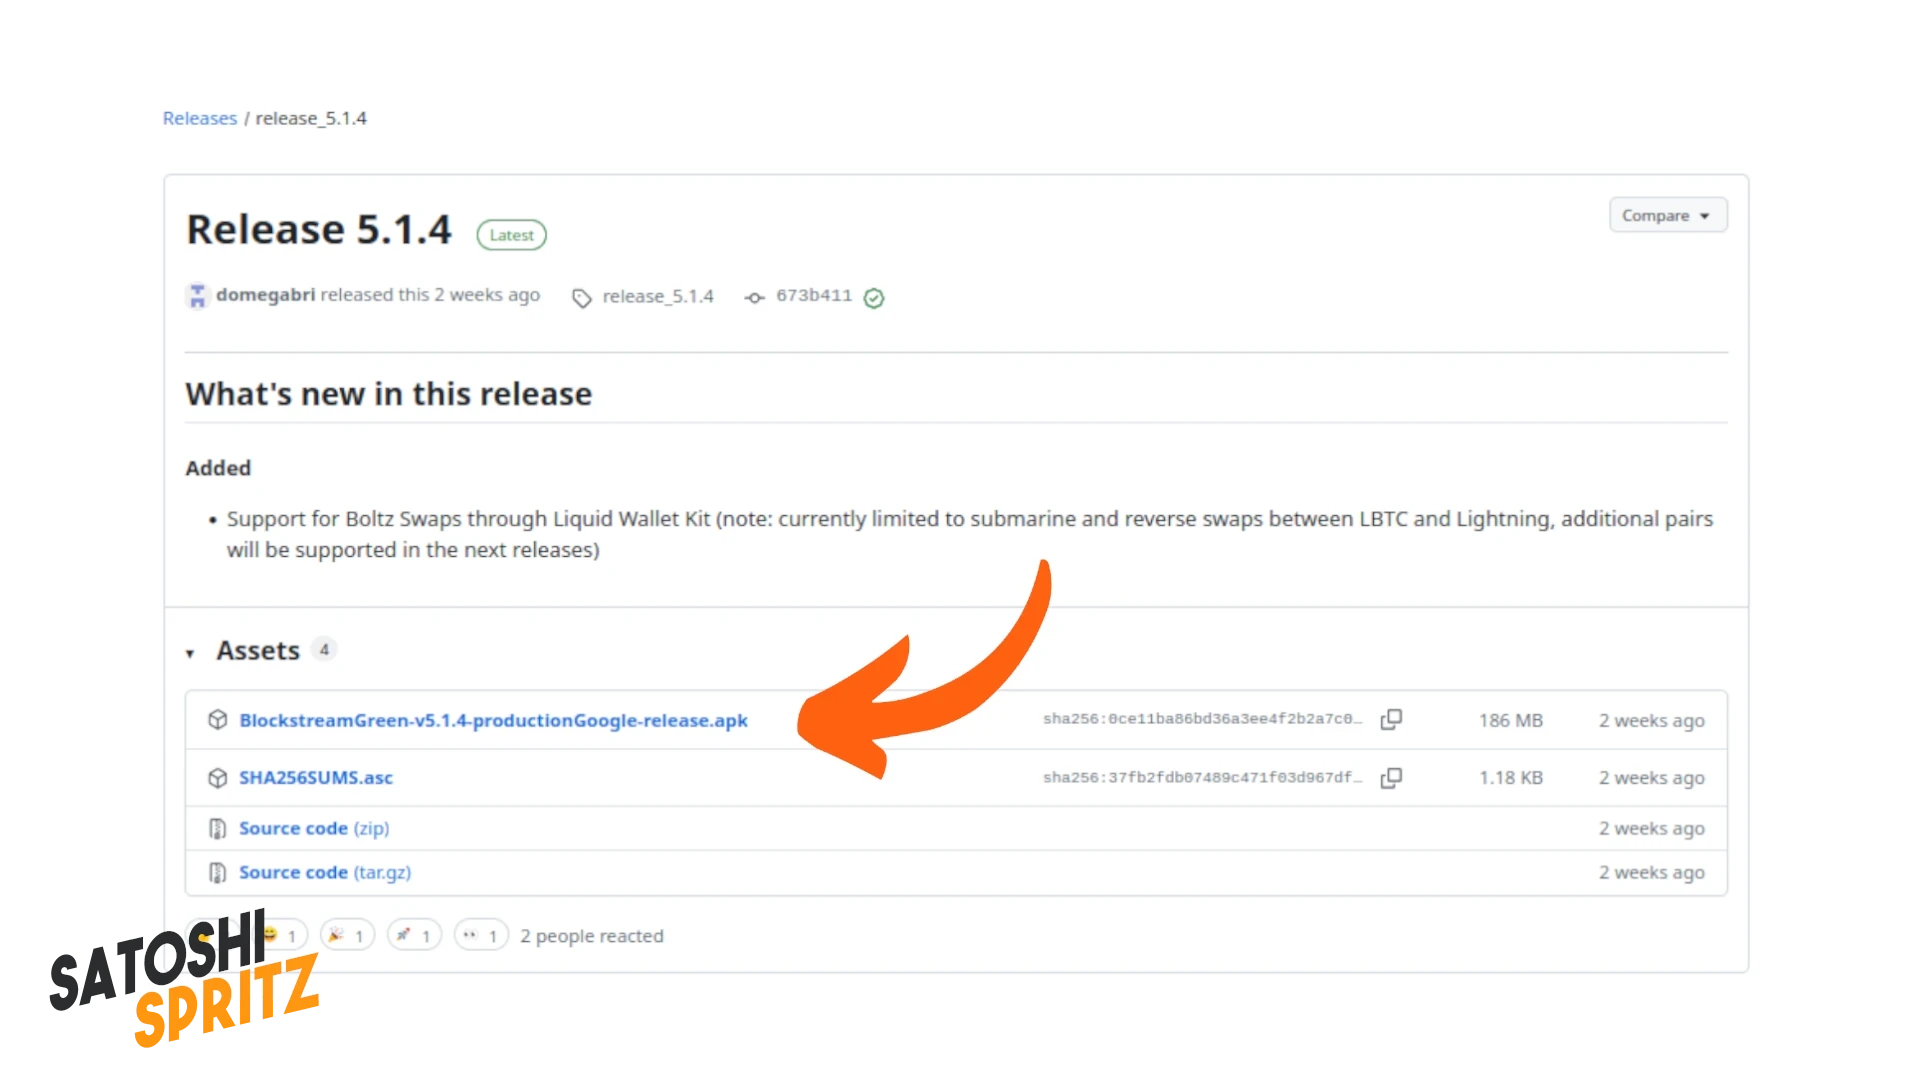
Download the .apk file without having to go through the Play Store and install it on your Android phone.
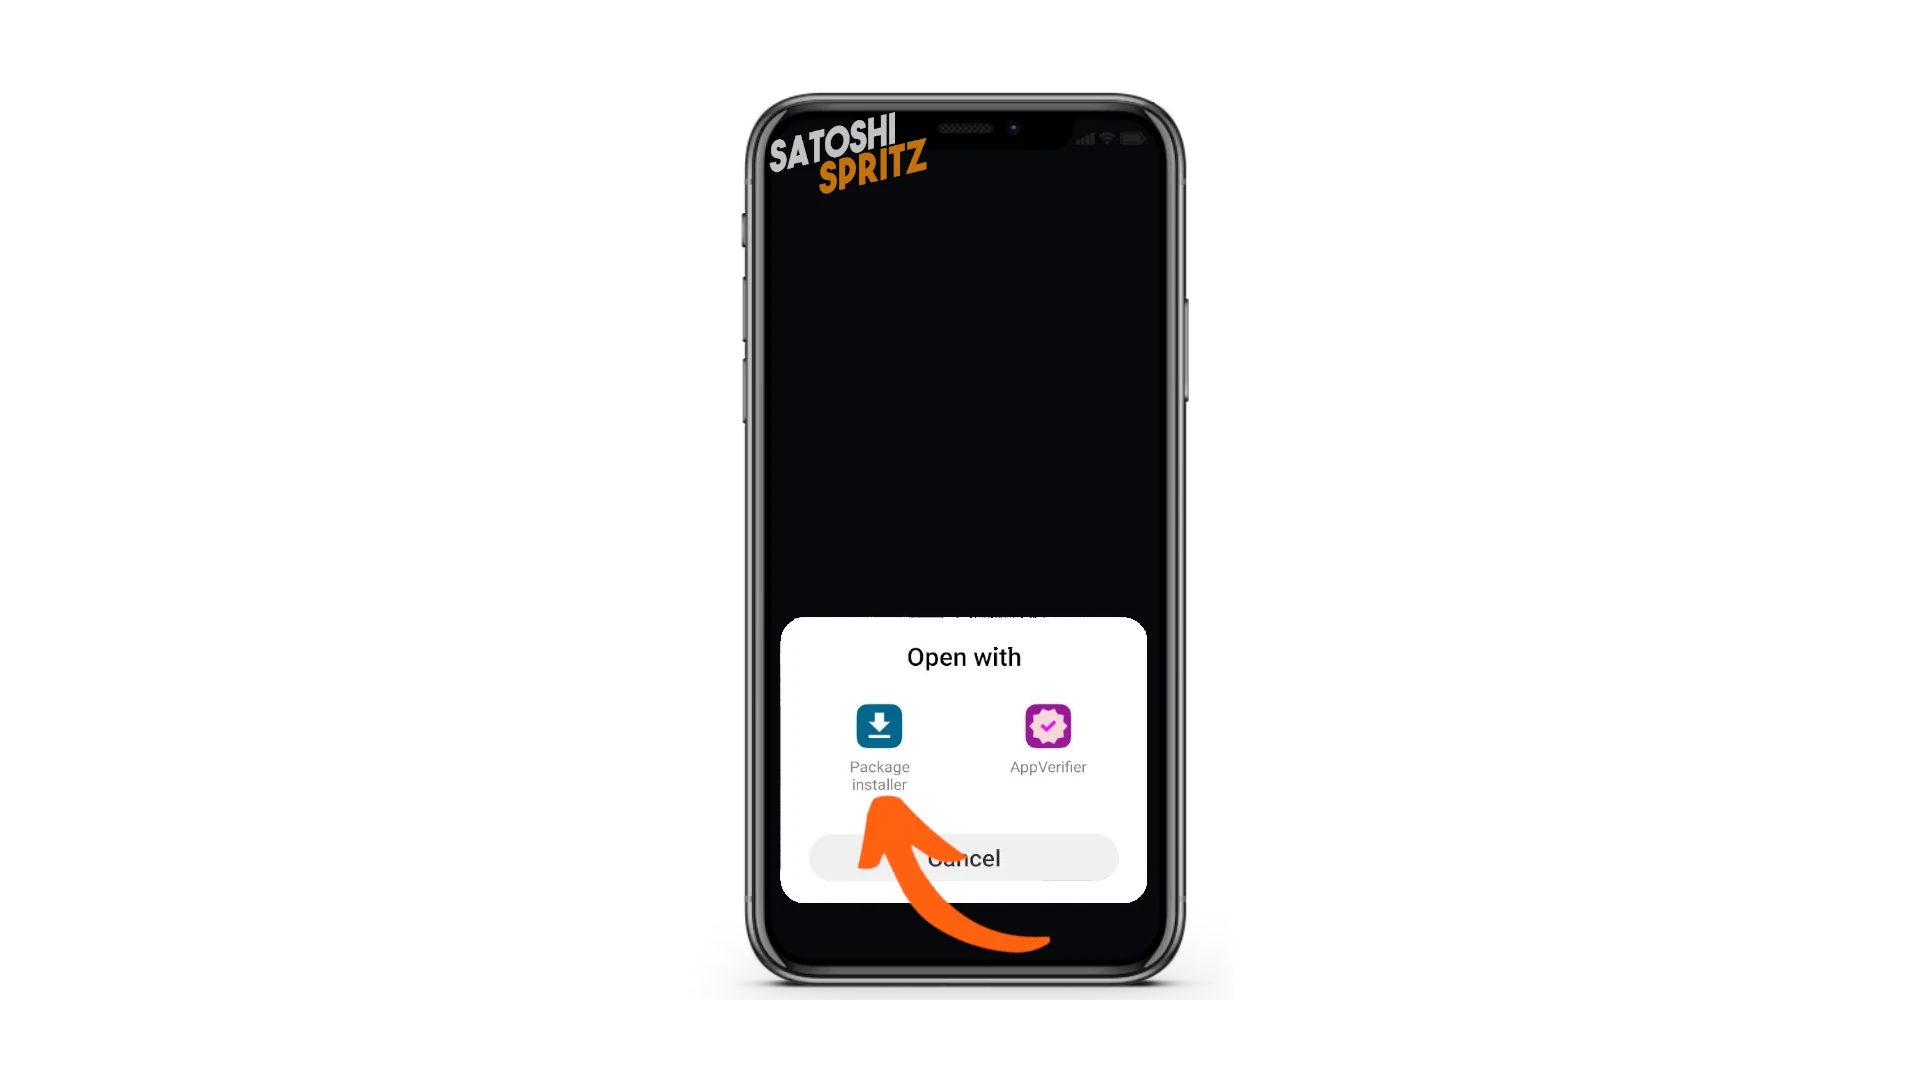
⚠️ Your phone may require special permissions to download apps from uncertified sources. Grant these permissions to continue.
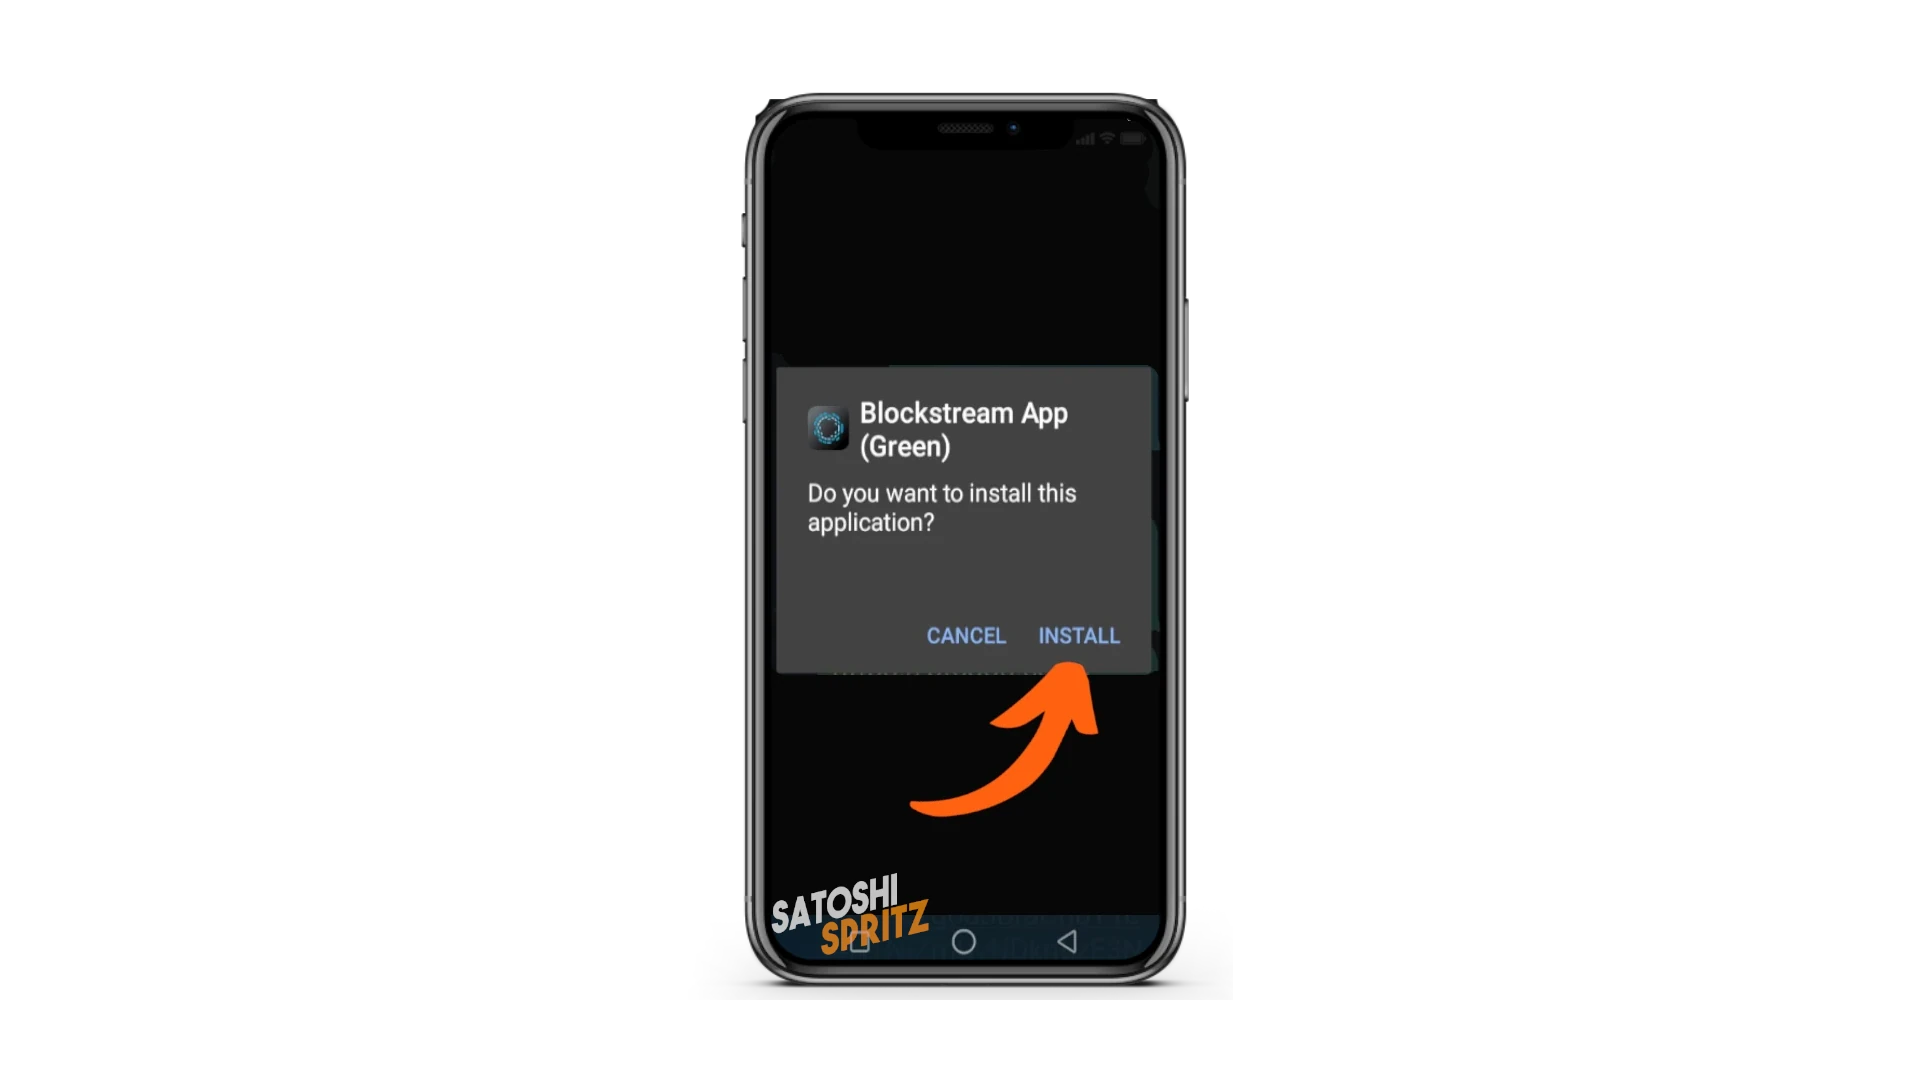
When Android asks you to install Blockstream App, click Install.
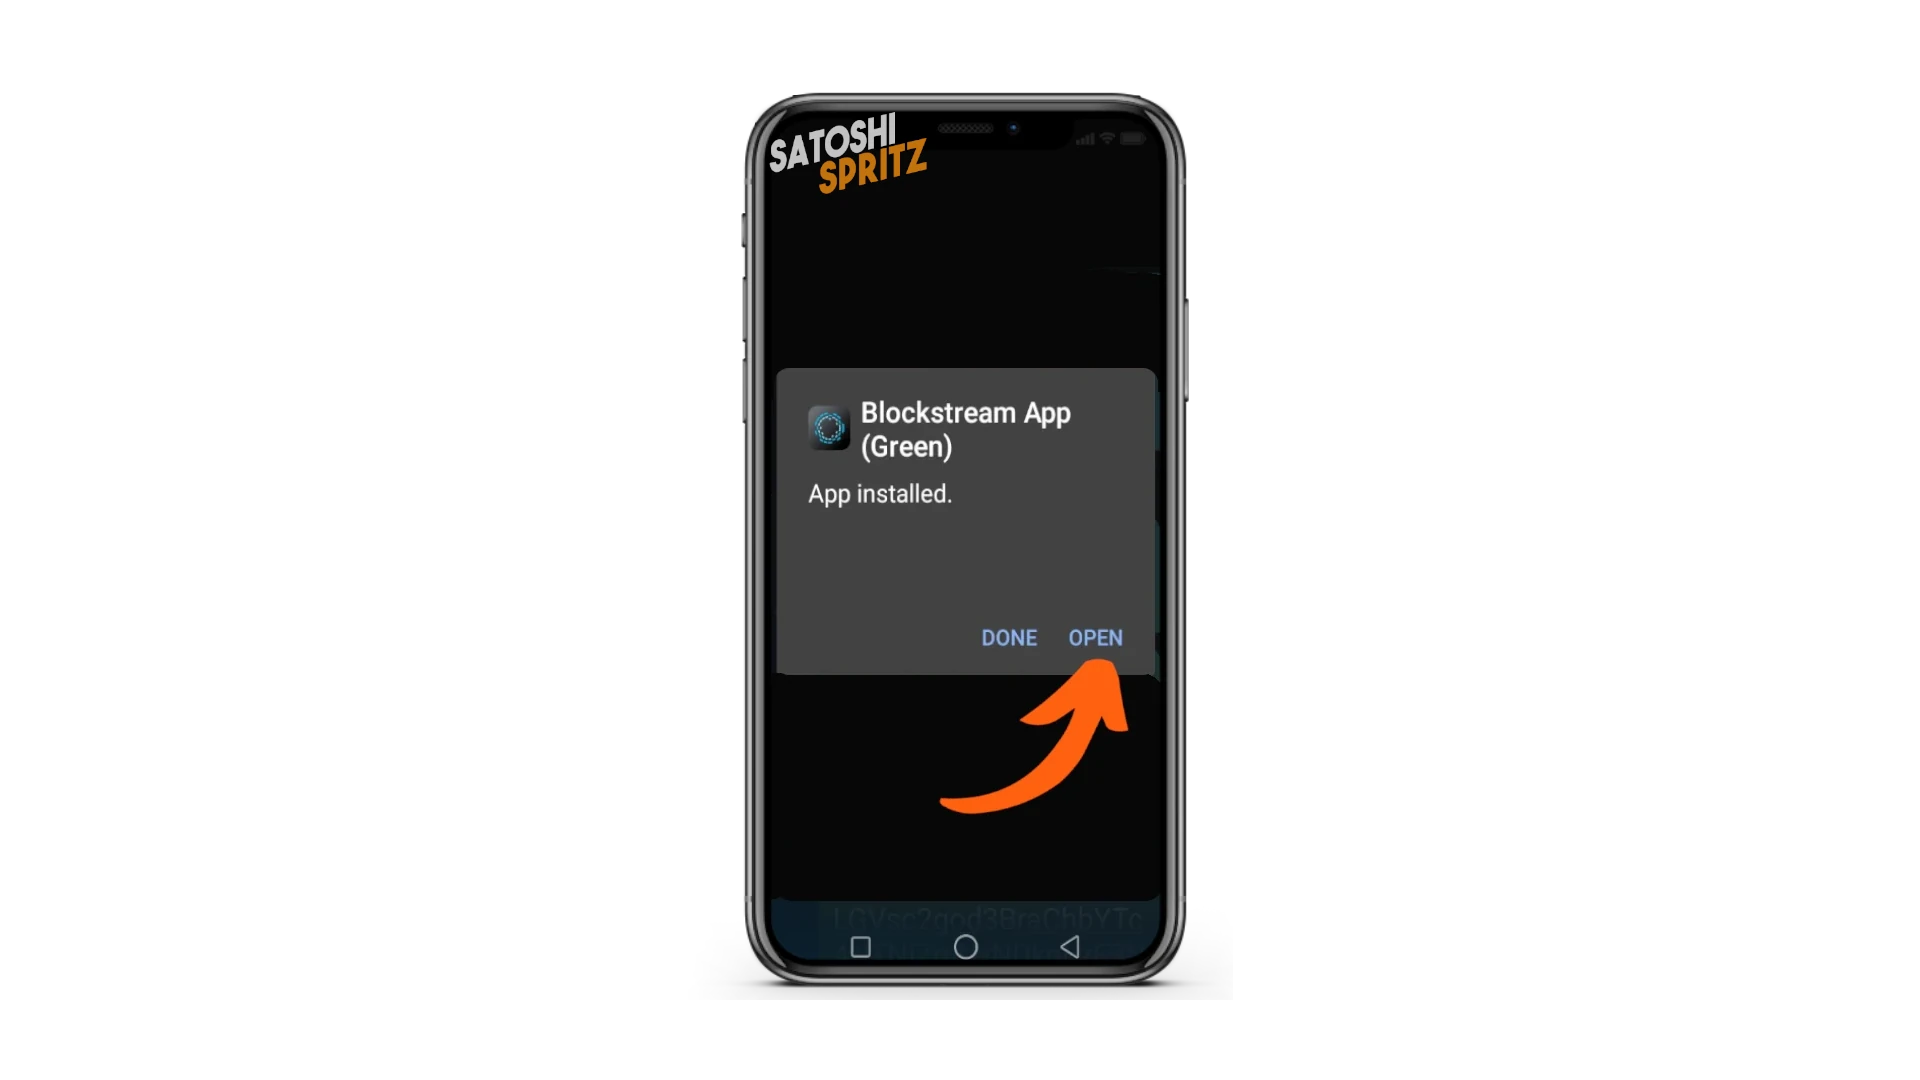
At the end of the installation, choose Open.
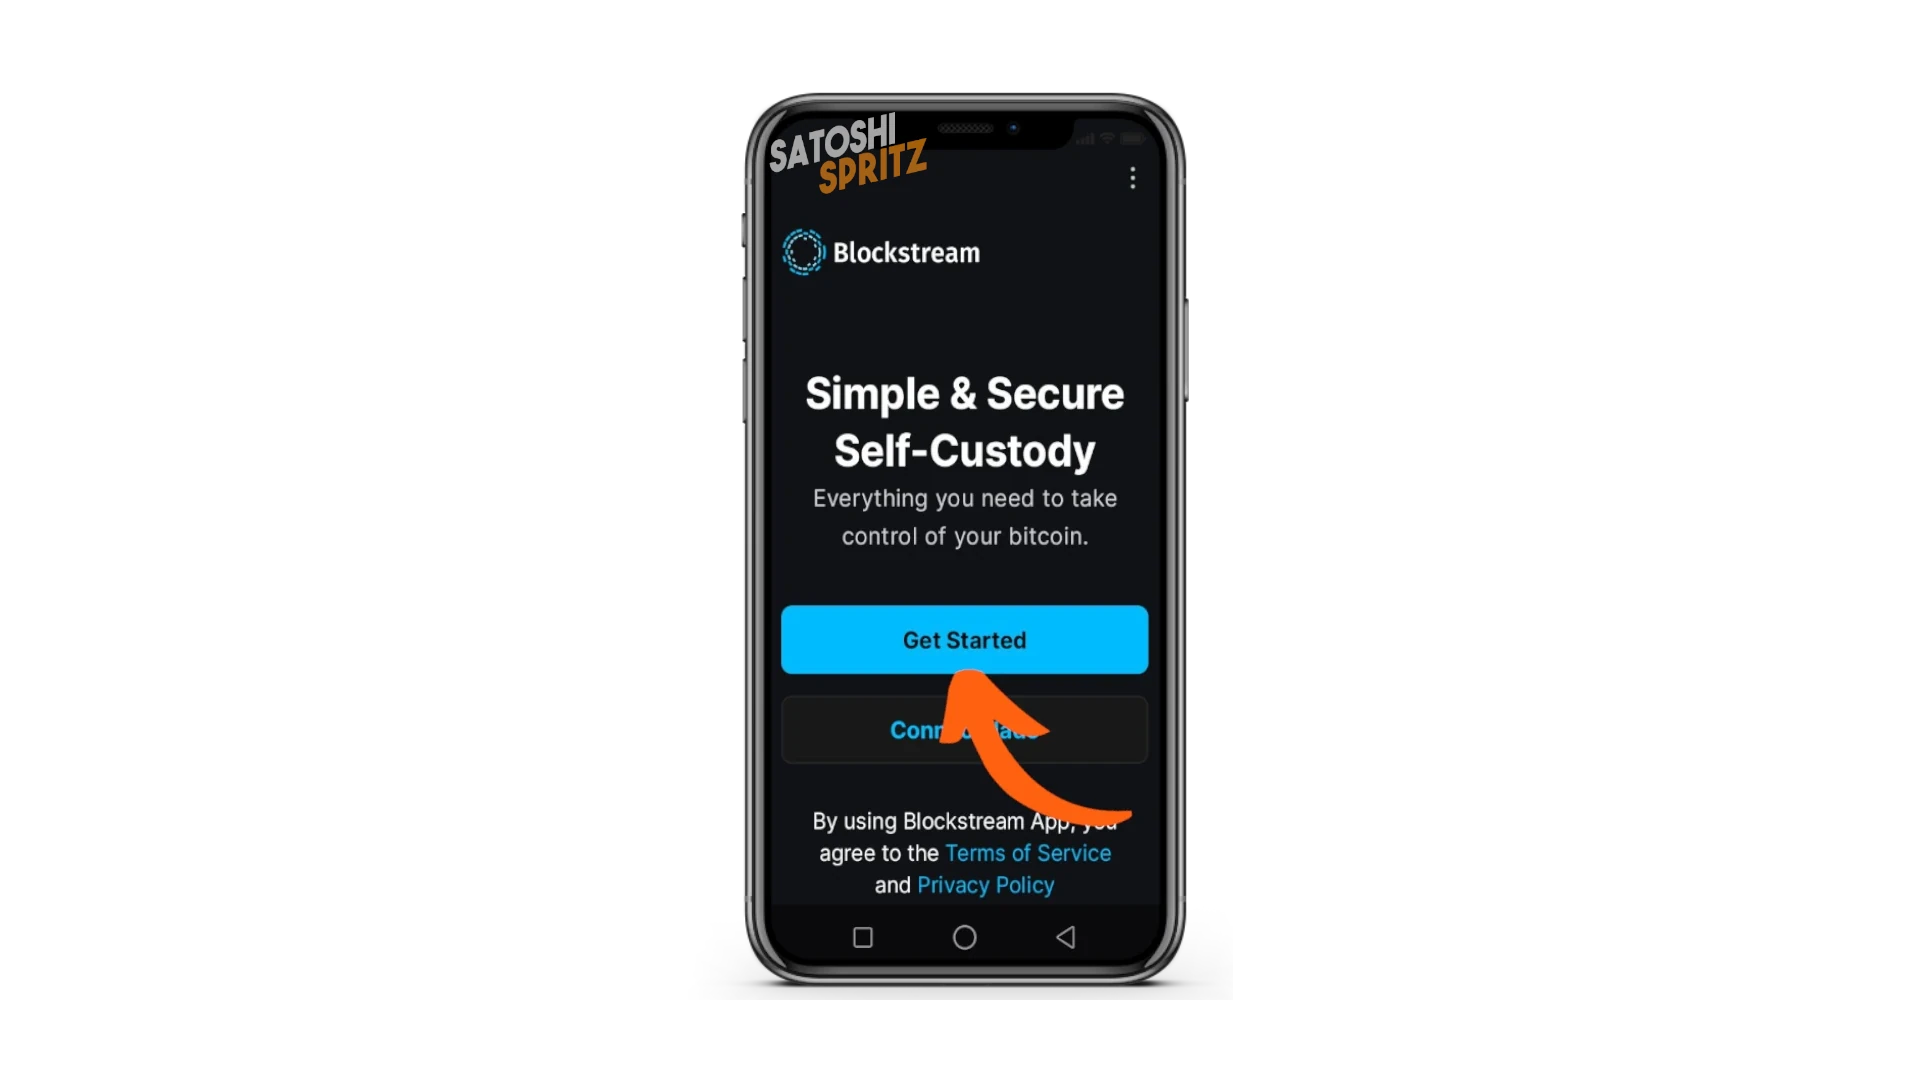
Blockstream App opens and to start using the wallet, choose Get Started.
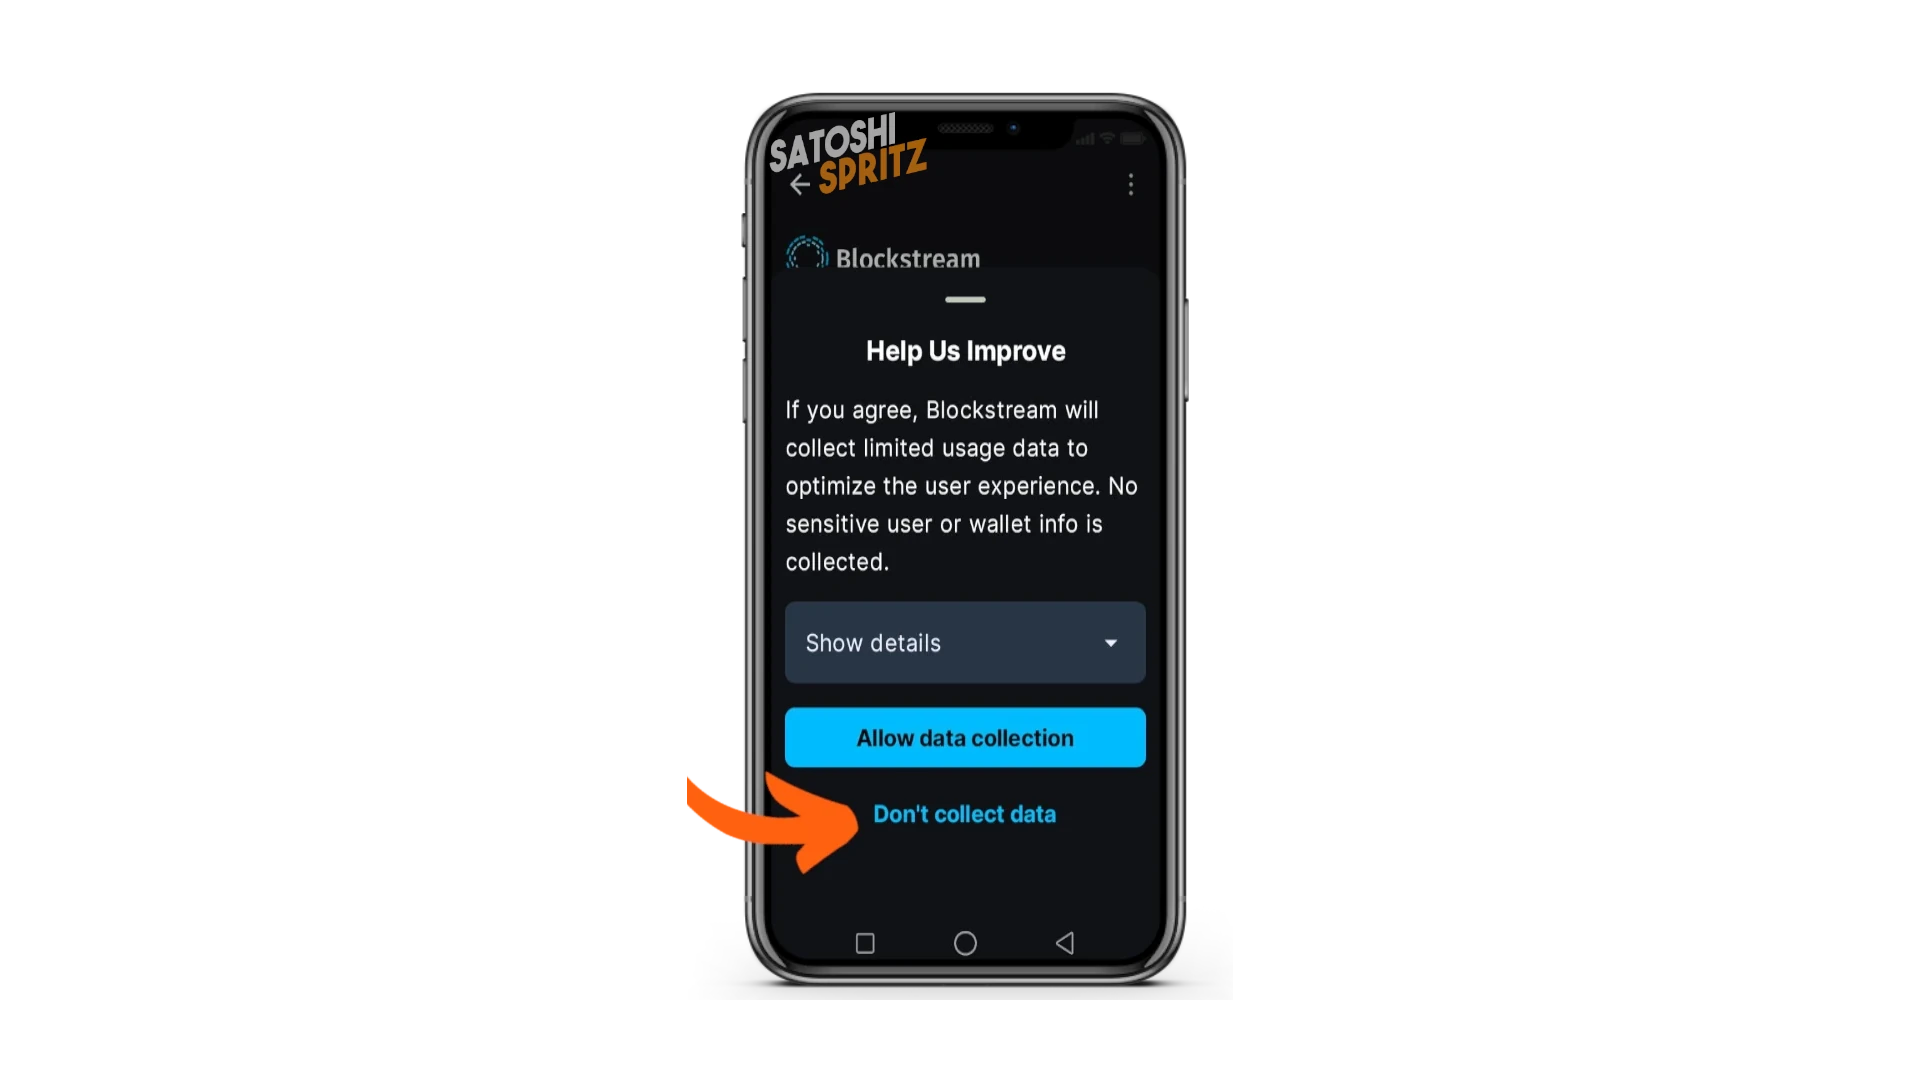
Blockstream will ask you if you want to participate in data collection, to help developers improve the app. Decline the invitation.
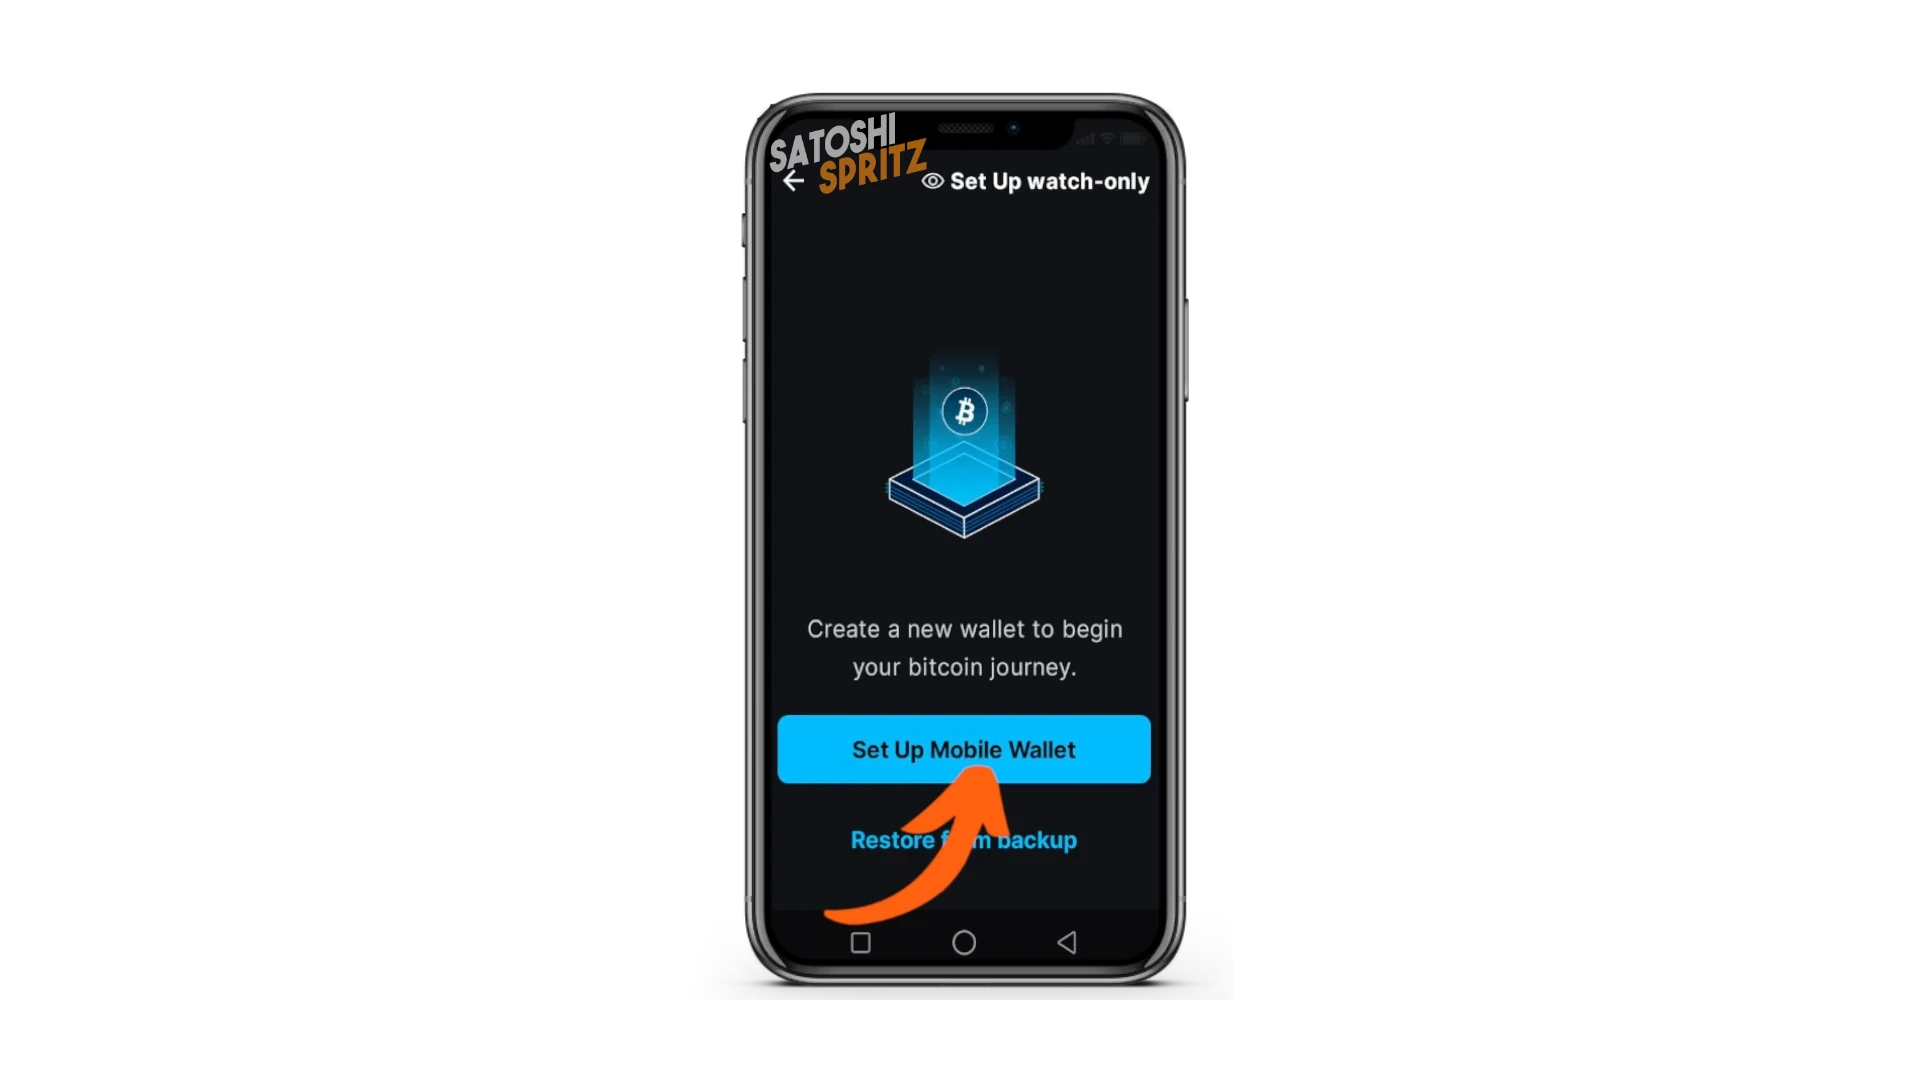
Your First Wallet
You can start creating your first wallet. Click on Set Up Mobile Wallet.
The wallet creation process begins.
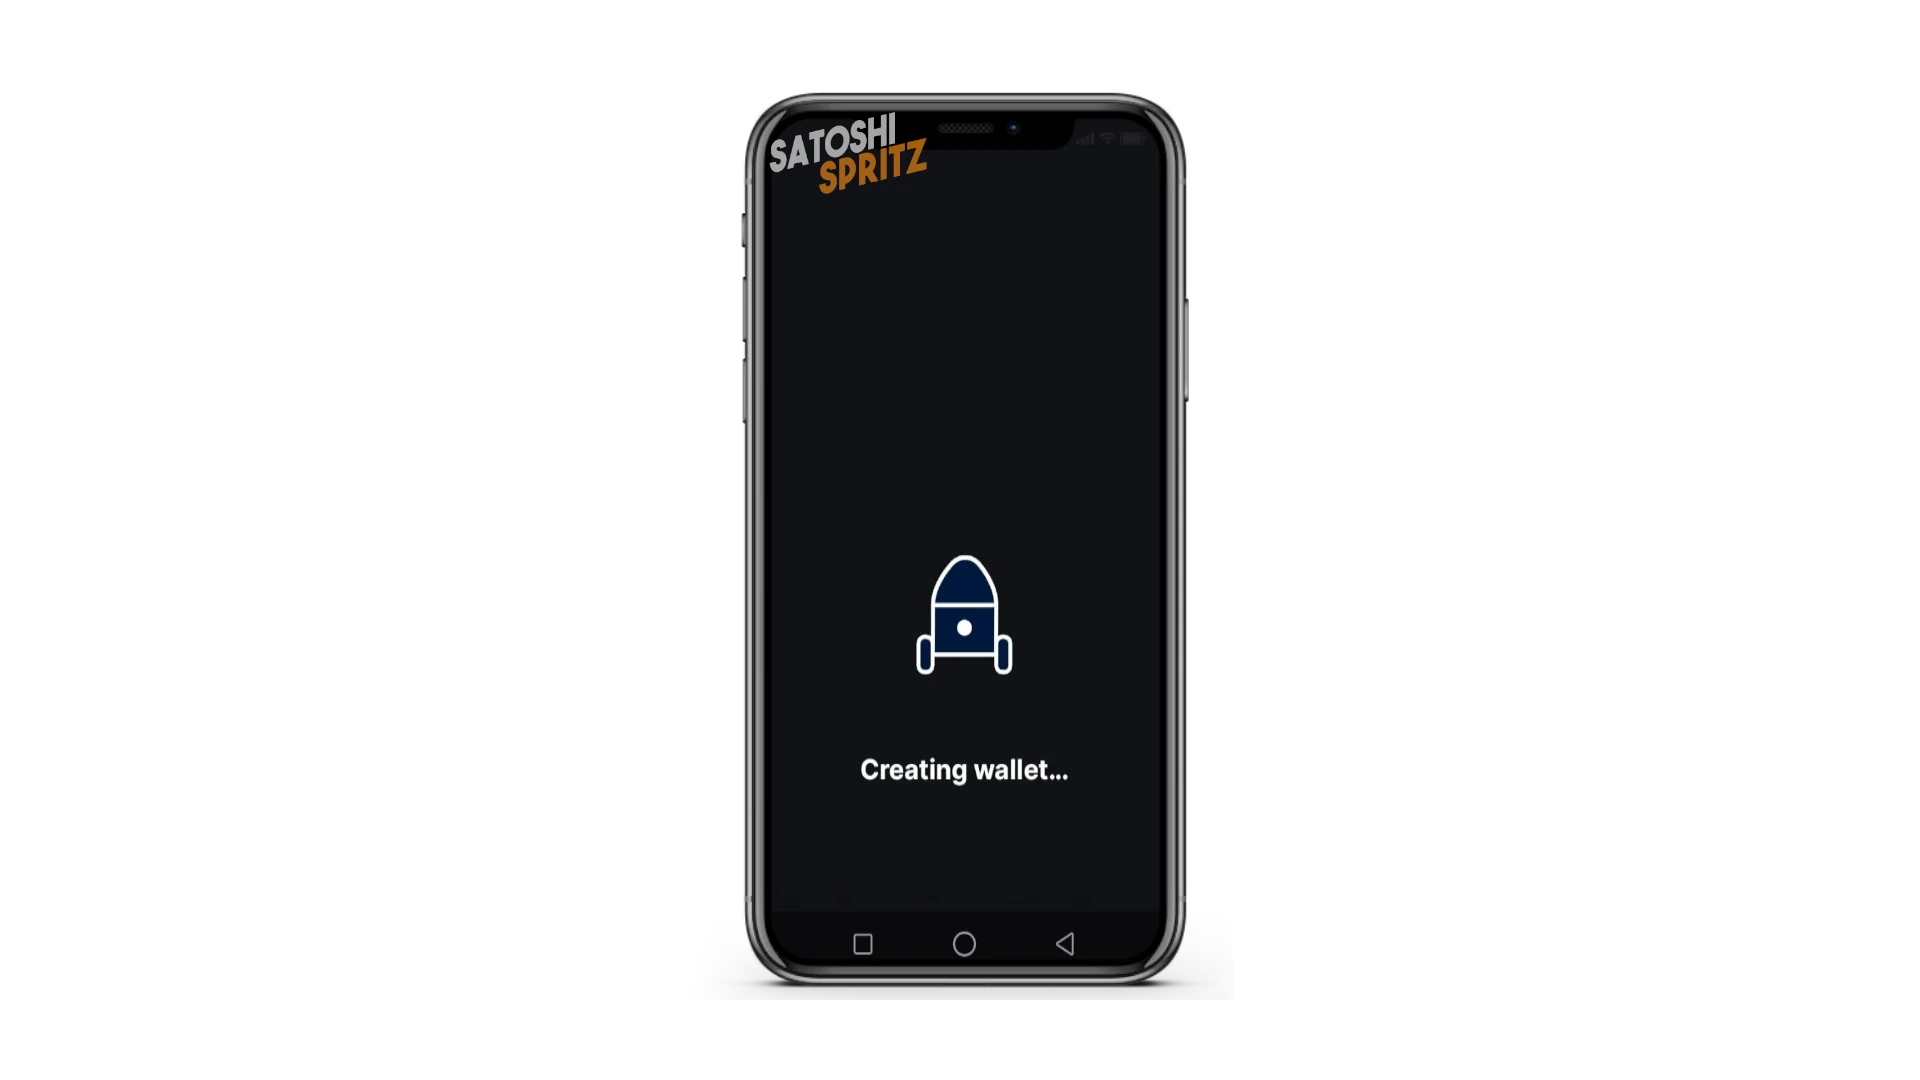
It finishes in just a few seconds. Your wallet is ready and, to start using it, click Continue.
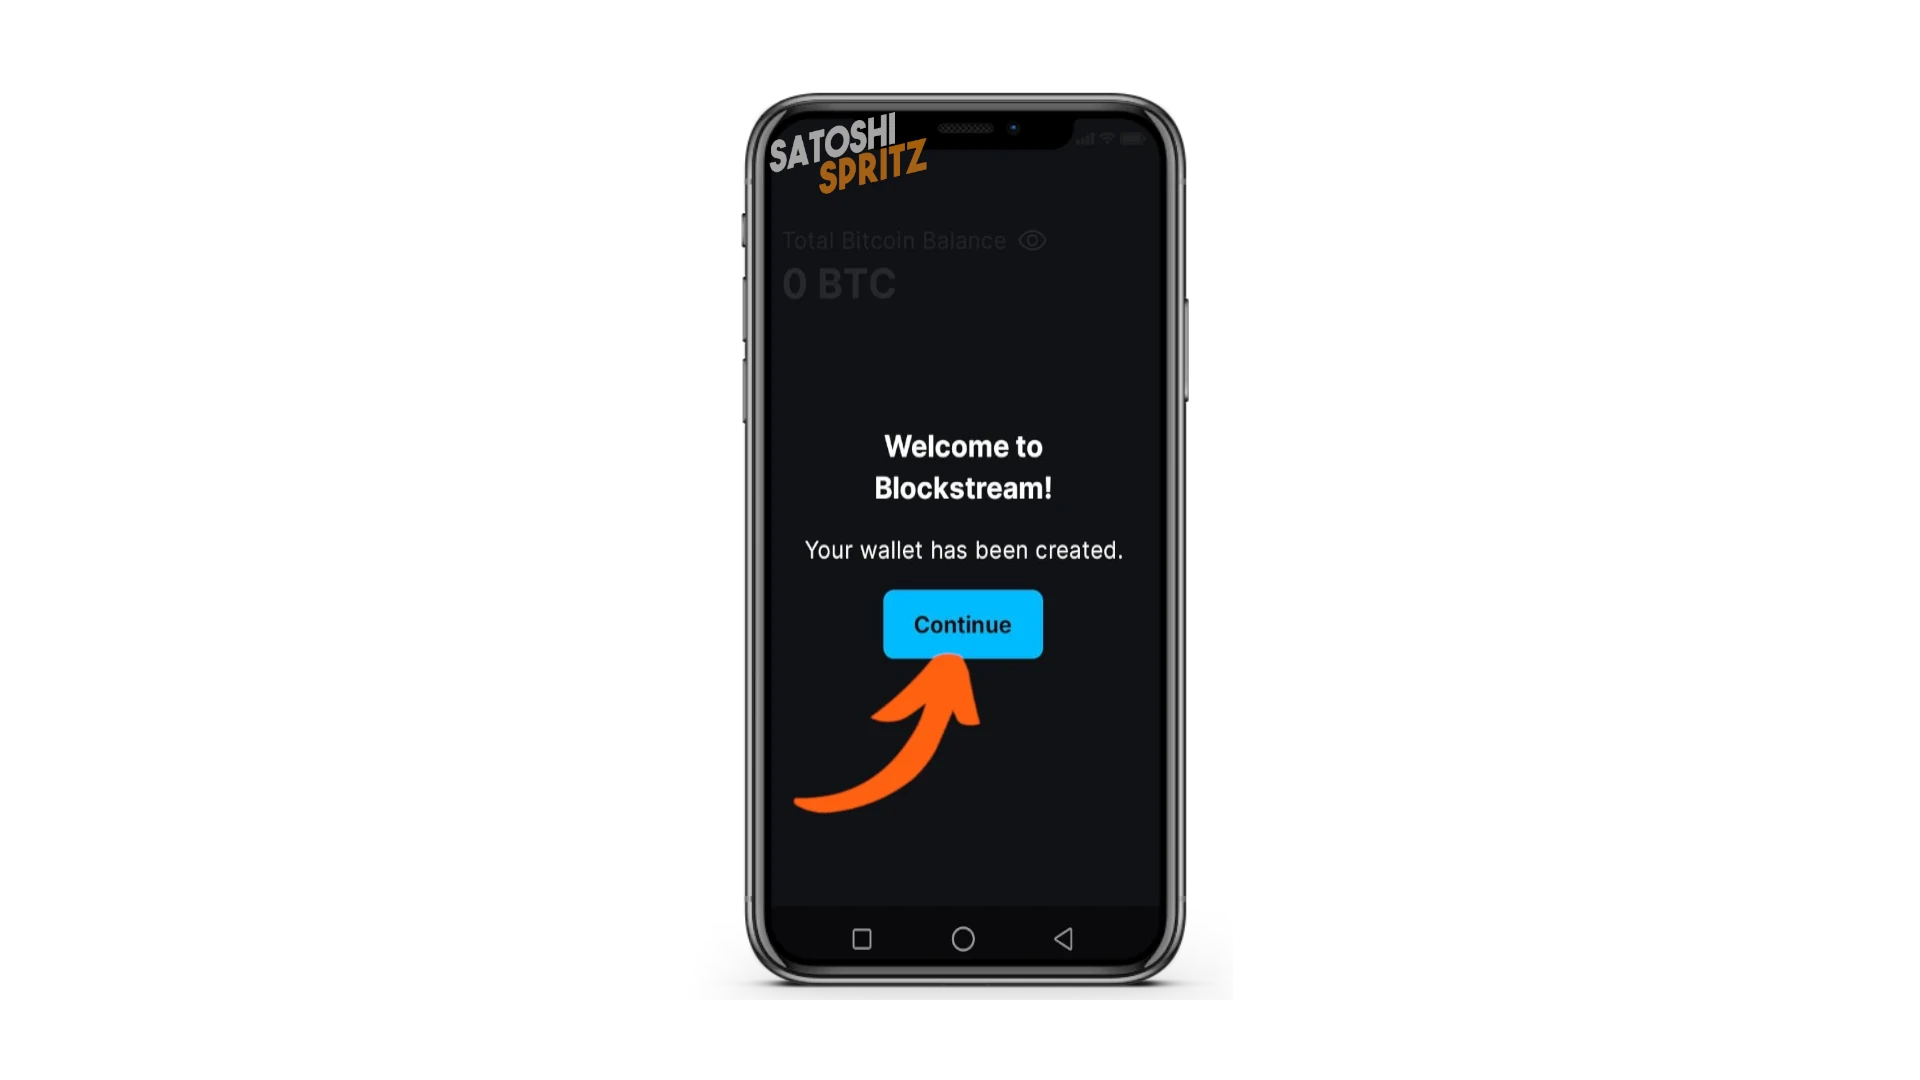
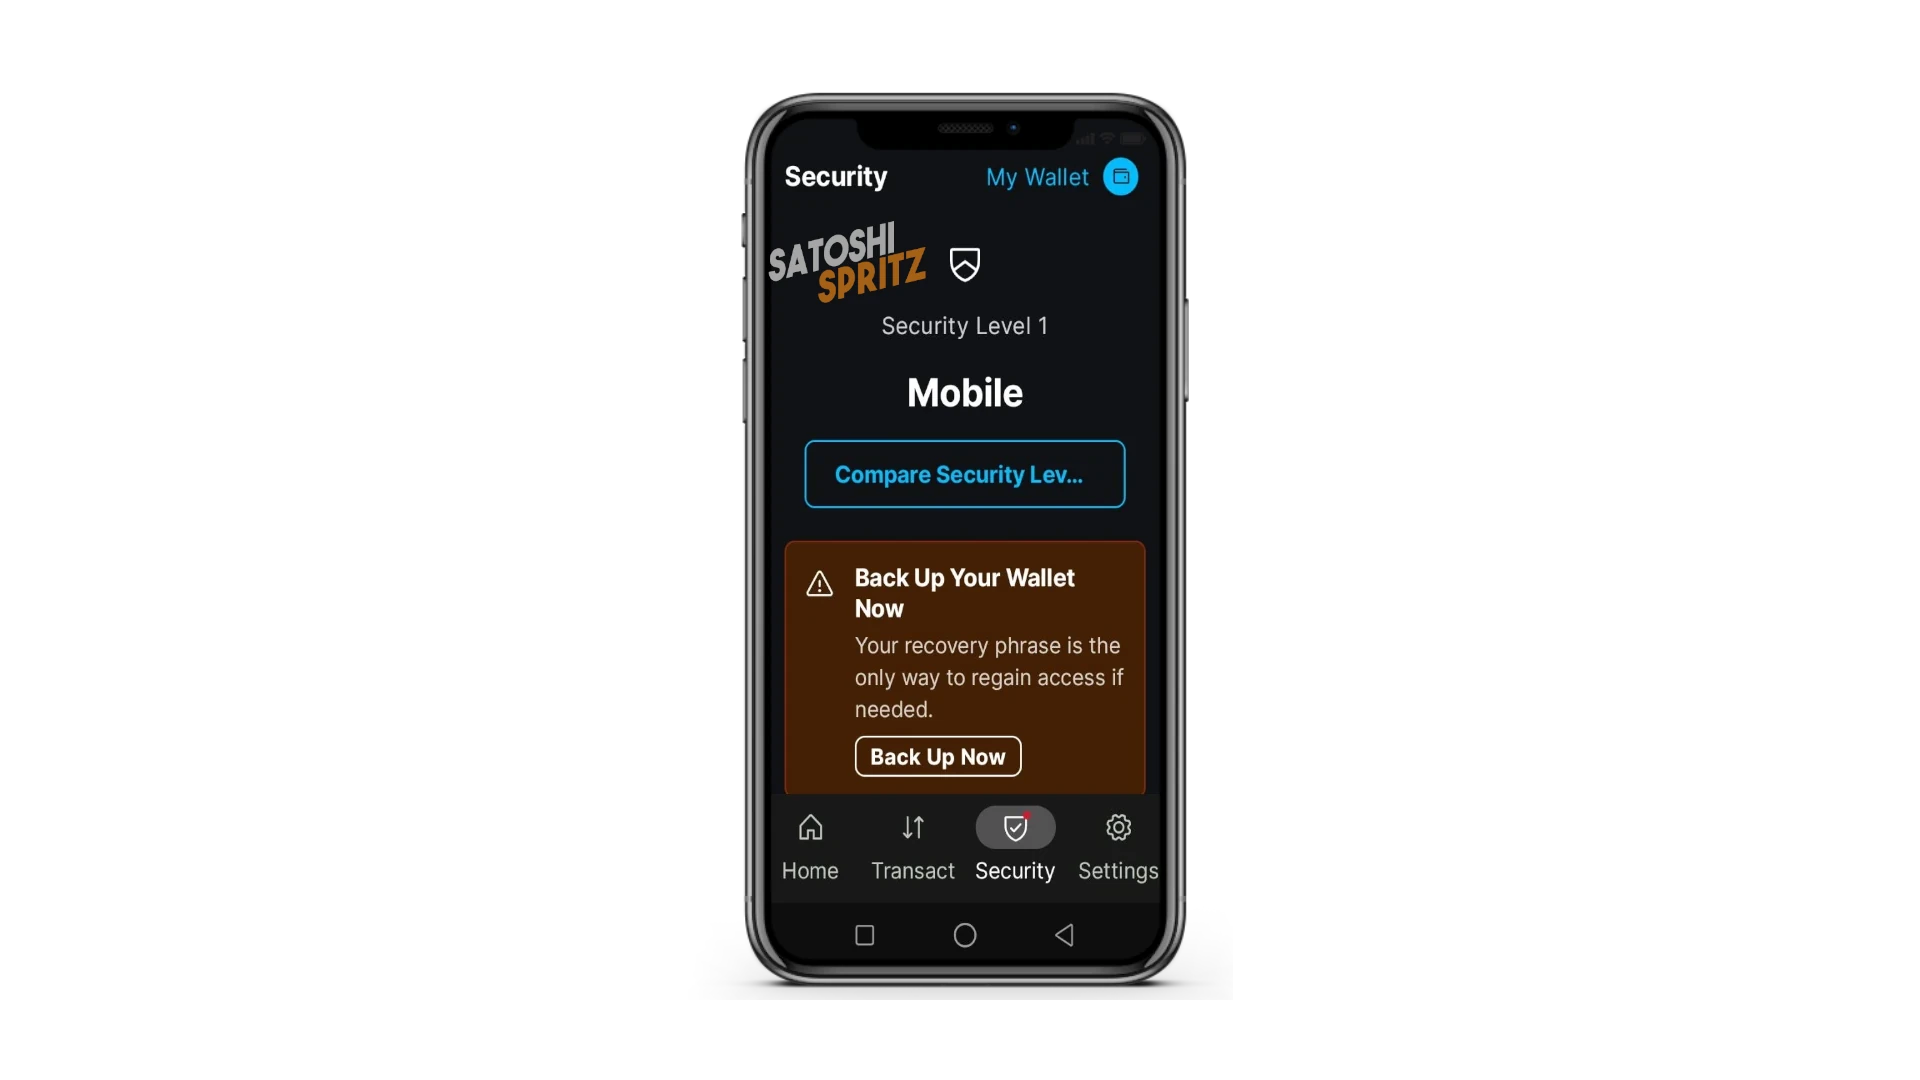
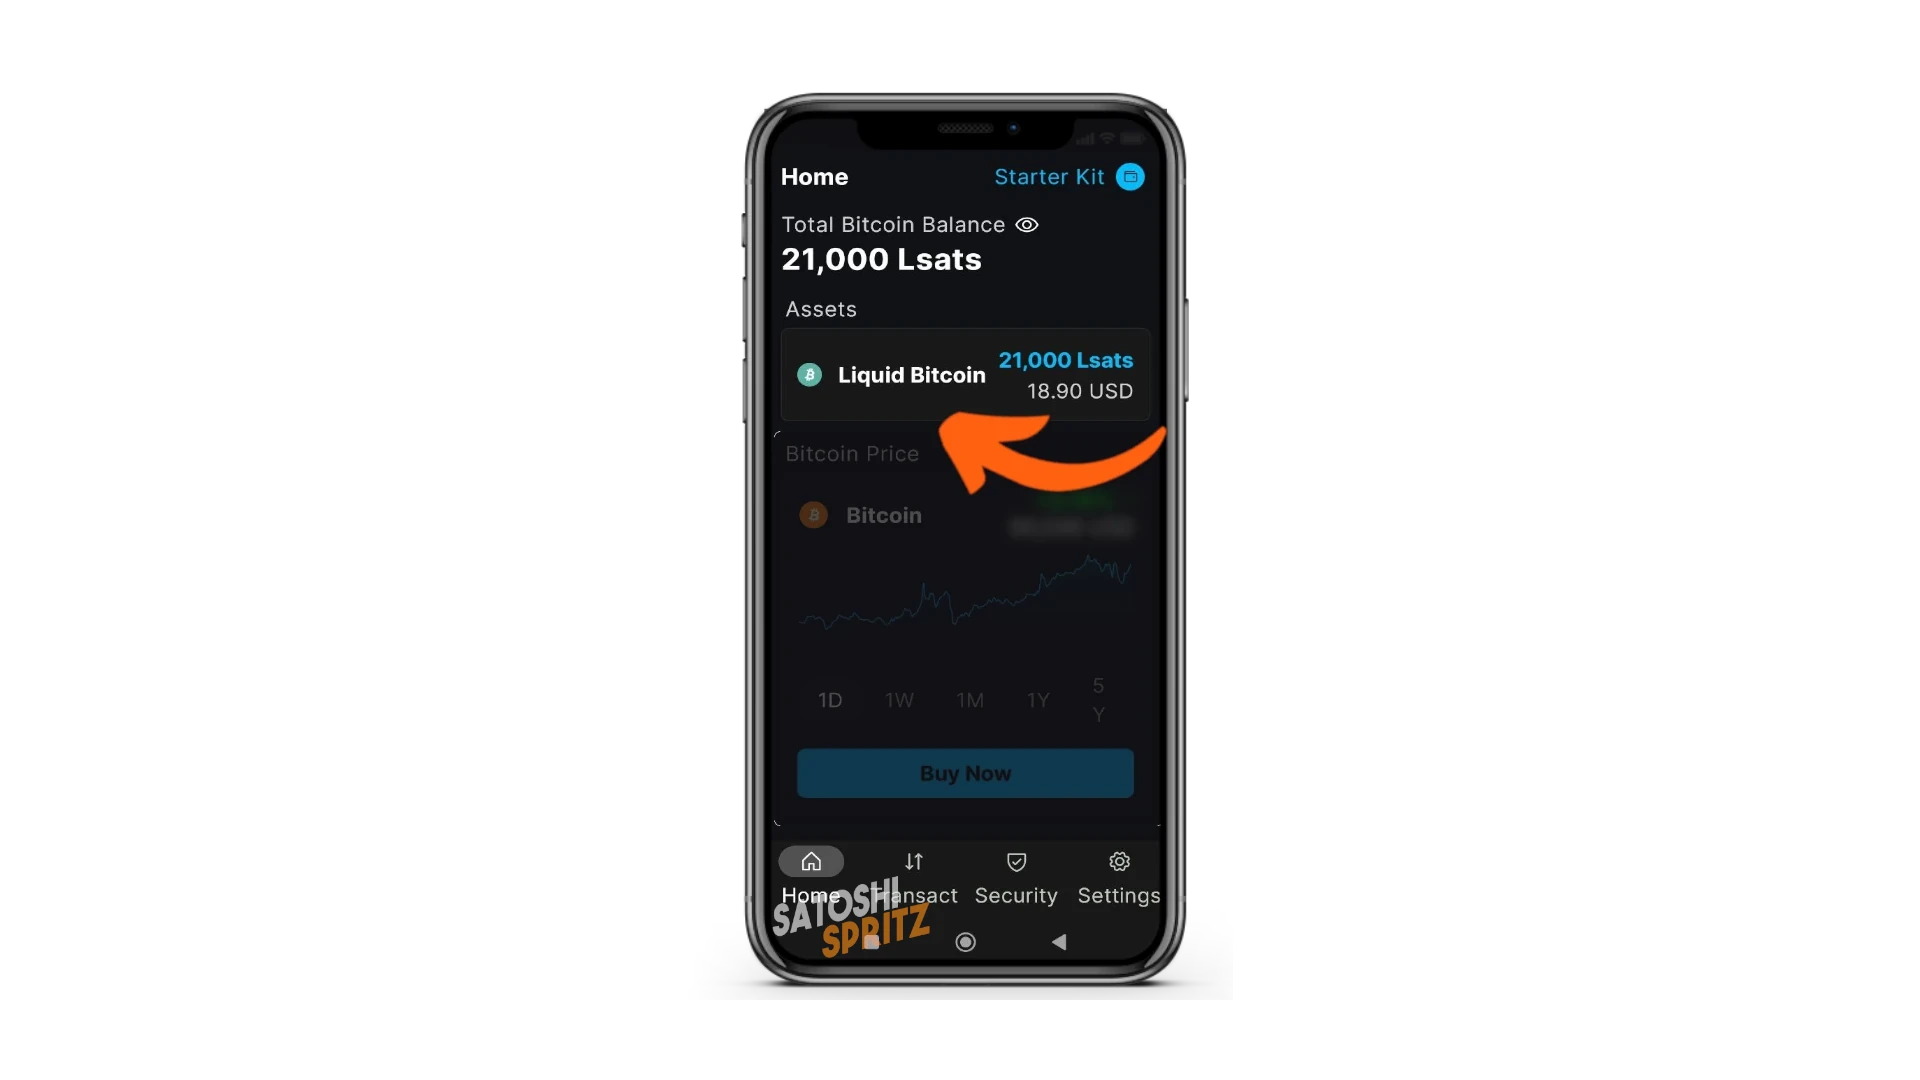
The wallet opens in the screen called Home. For now, take a look, but you should immediately focus on the bottom menu Security.
Your Keys, your coins
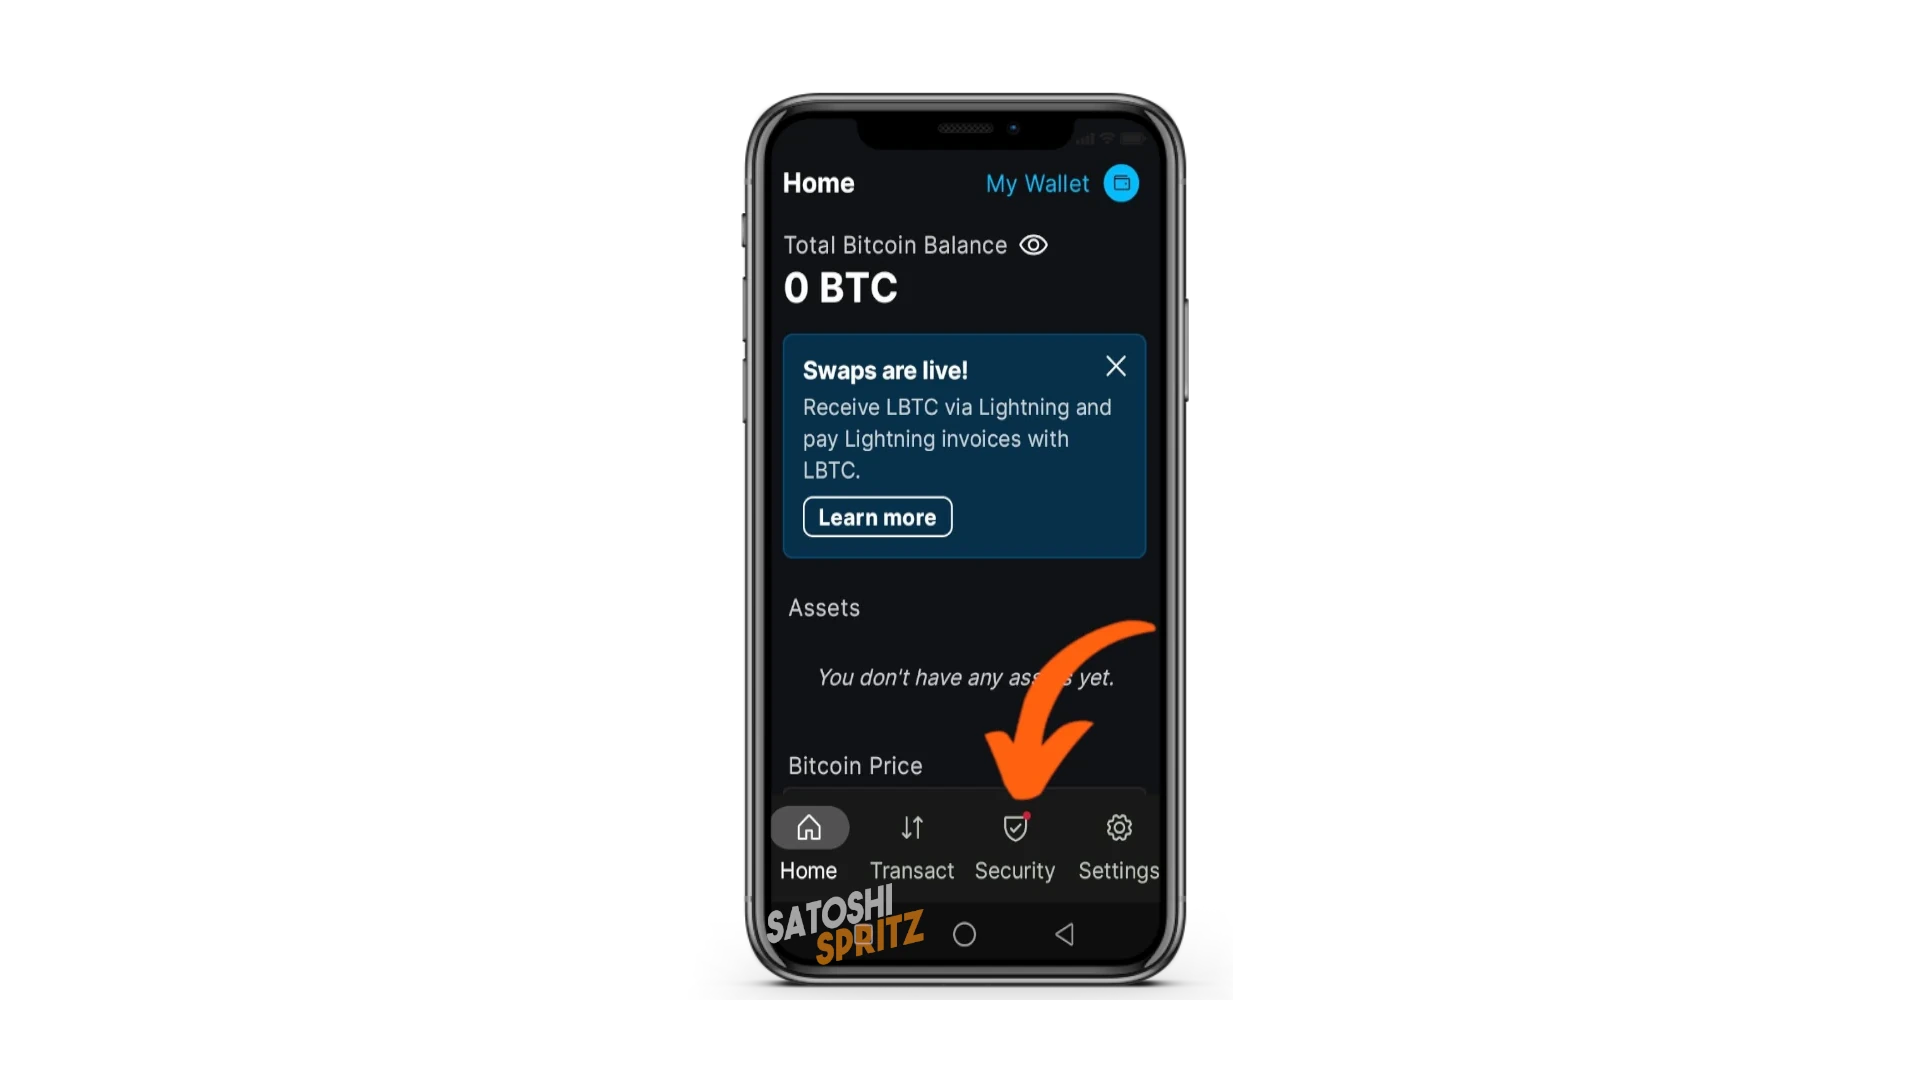
In this menu you’ll be prompted to back up your wallet. This is nothing more than displaying the sequence of 12 words that you’ll need to restore it in the future. These 12 words are your wallet: make sure you’re in a safe environment, away from prying eyes, have a notebook or pad to transcribe the words, before putting them in a safe place (for example in a safe).
Click Back Up Now and discover the 12 words.
Also write down the exact order of the words: 1, 2, 3, etc.: write the words in uppercase, for better future viewing, but remember that if you need to enter them manually in the future, you’ll need to use lowercase.
After transcribing and putting the words in a safe place, proceed with the starter kit. All further settings can be found at the end of the guide.
TRANSACT Menu
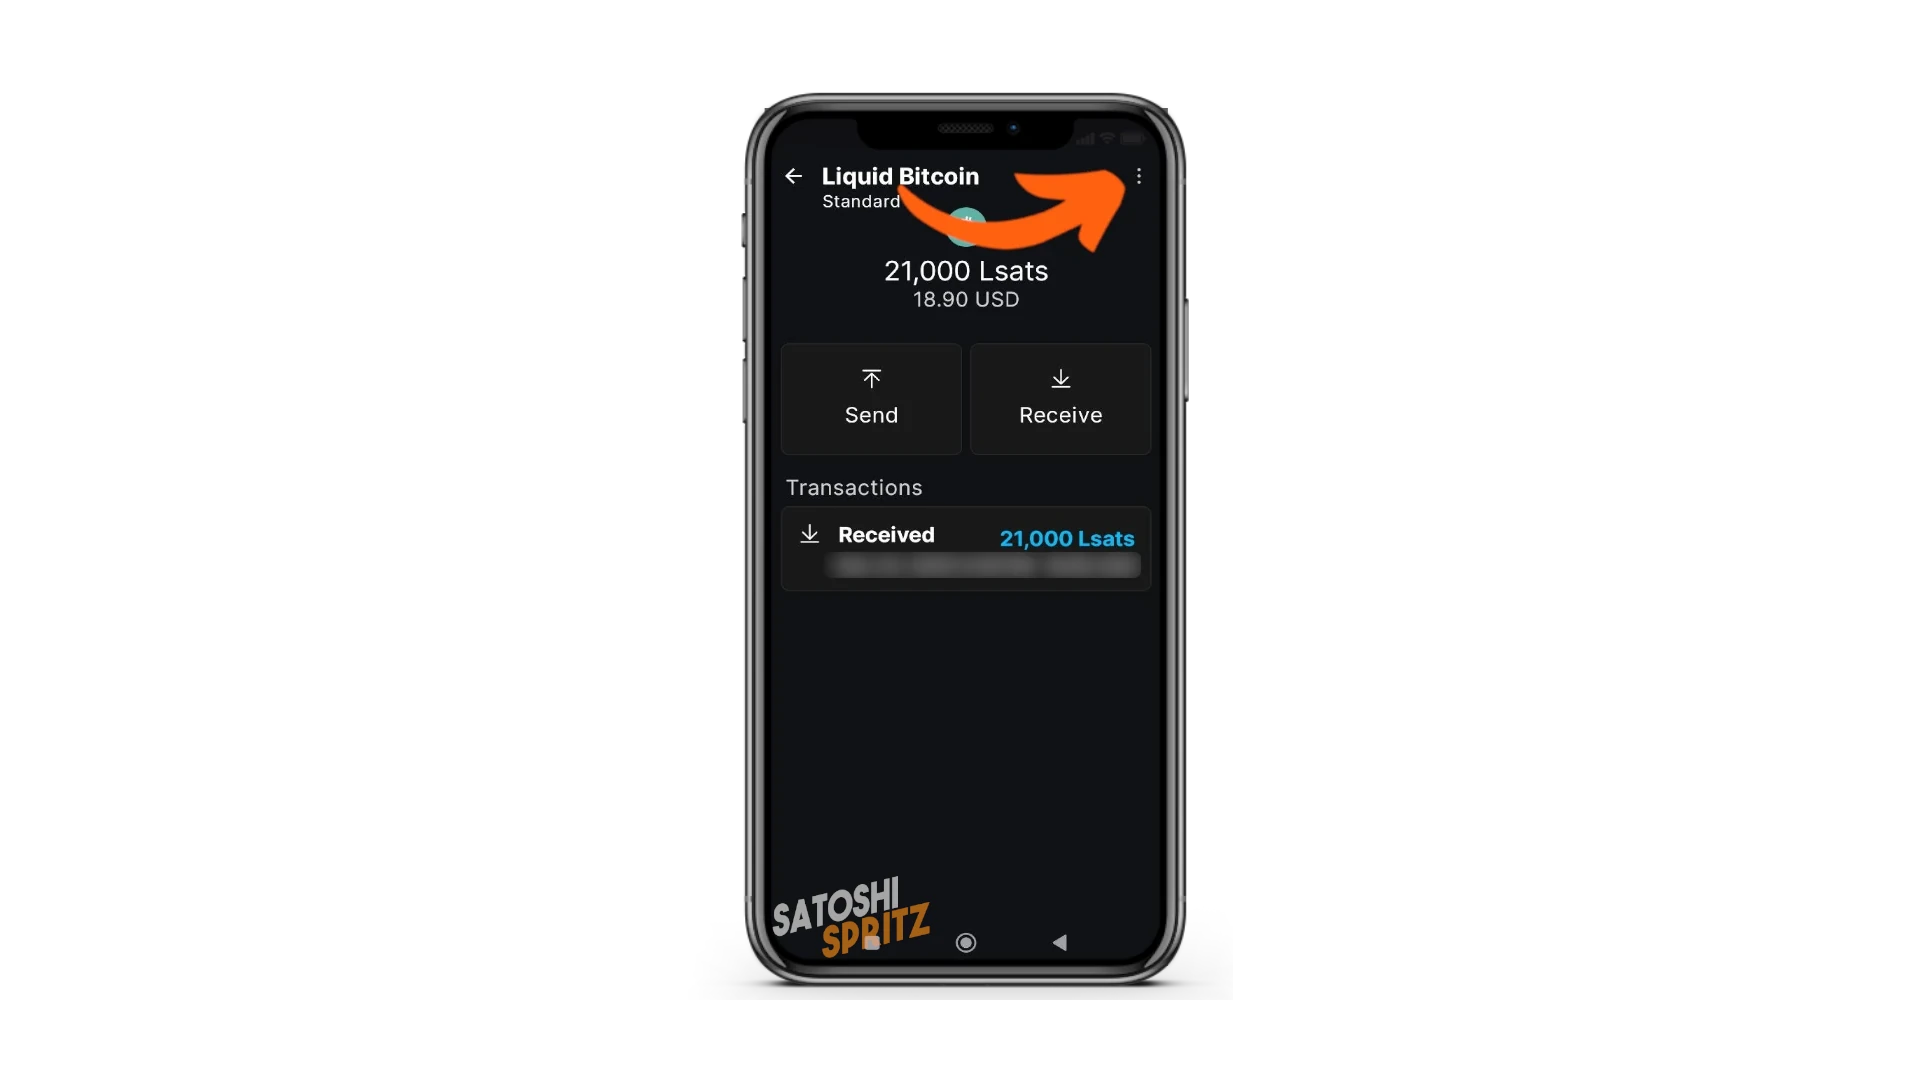
Using the wallet is extremely simple:
- go to the
Transactmenu - there are two main commands:
SendandReceive(ignoreBuy).
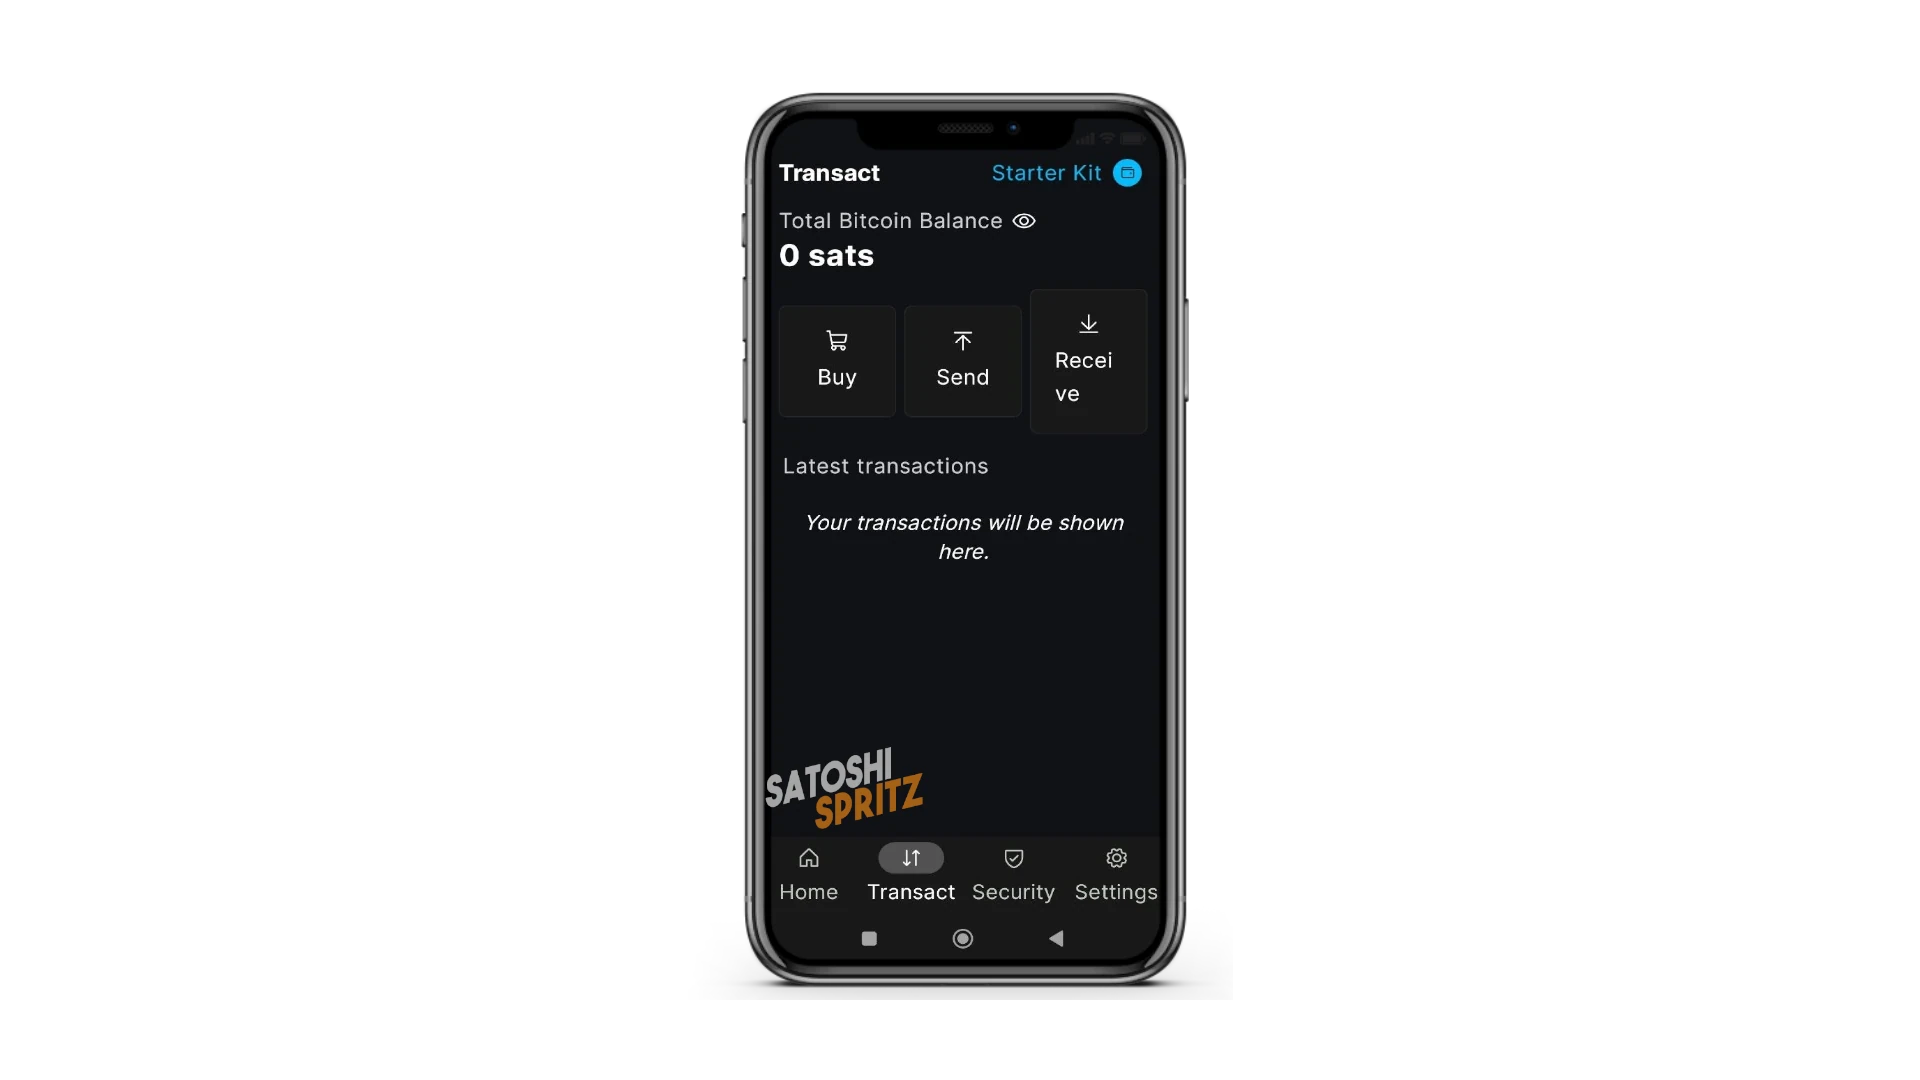
When you have transactions, they’ll be visible in the part below the commands.
Not having funds, to start having some you can select Receive.
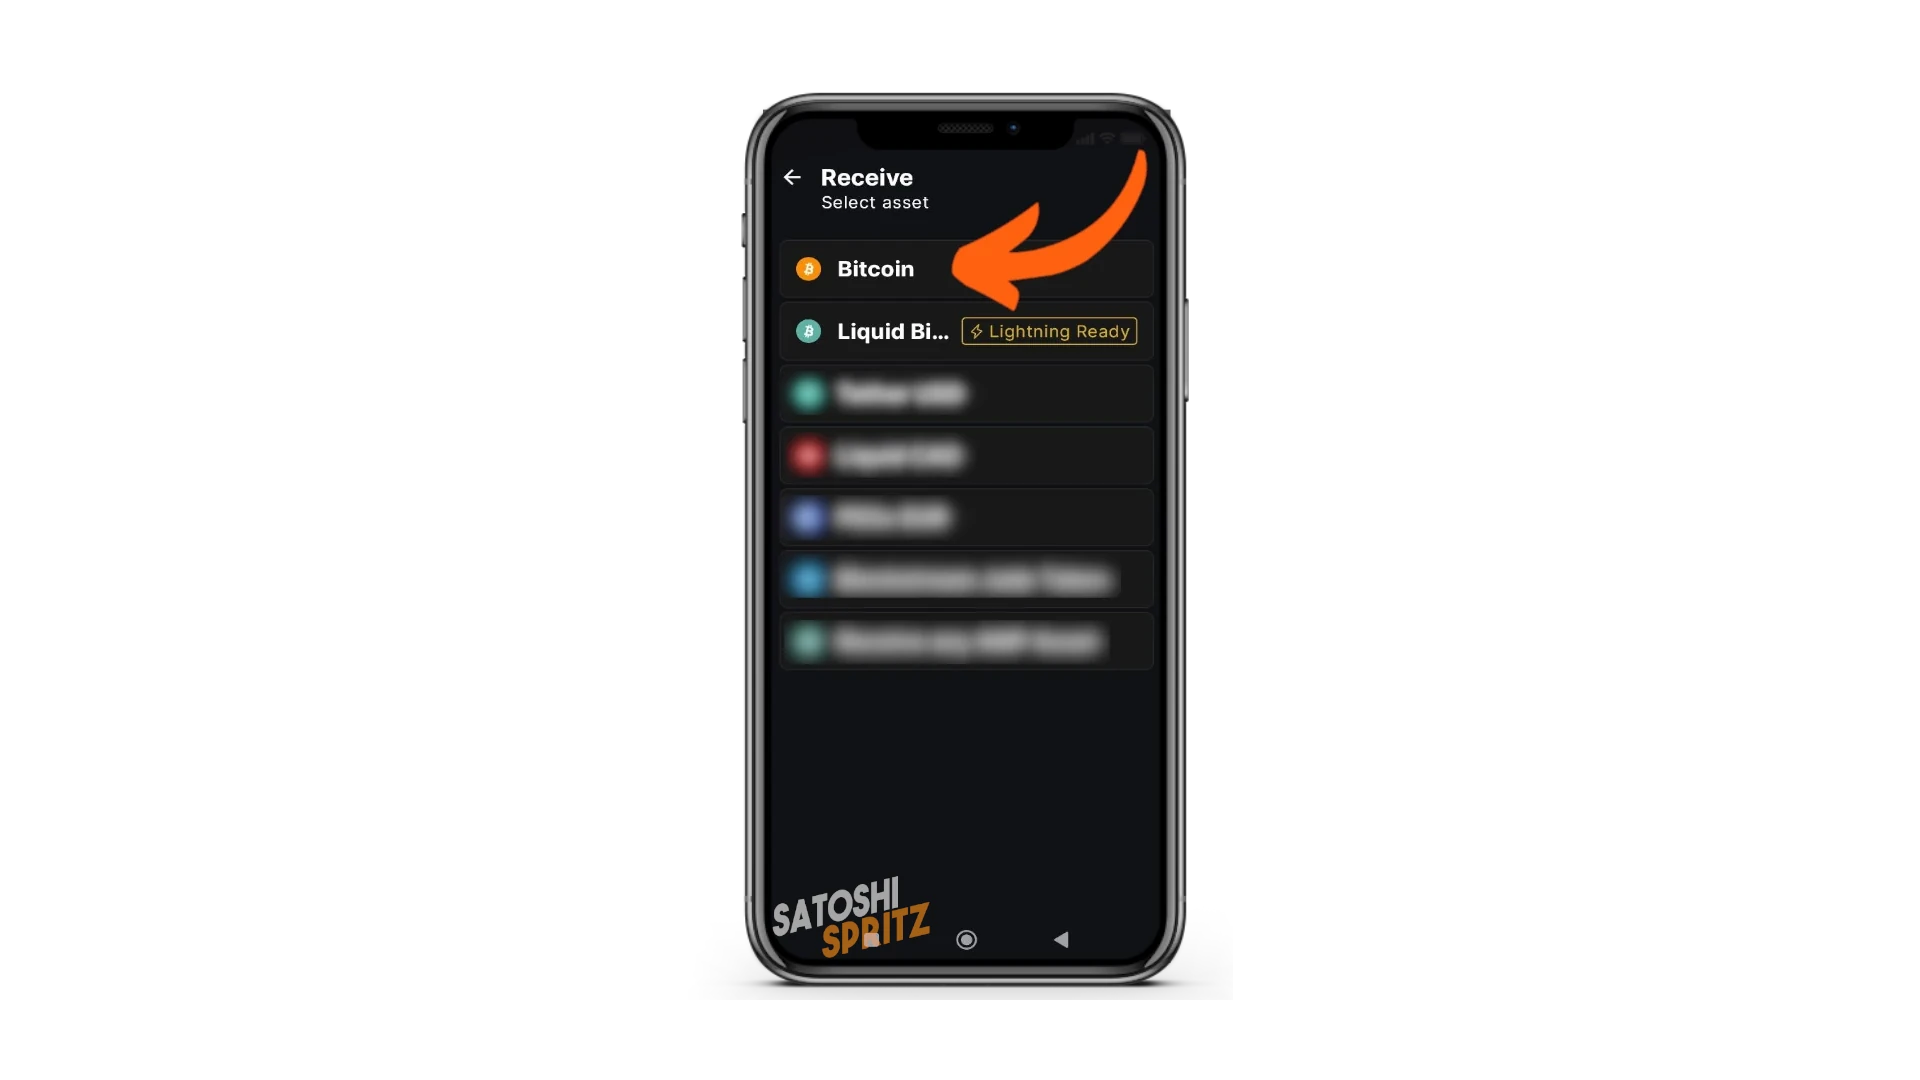
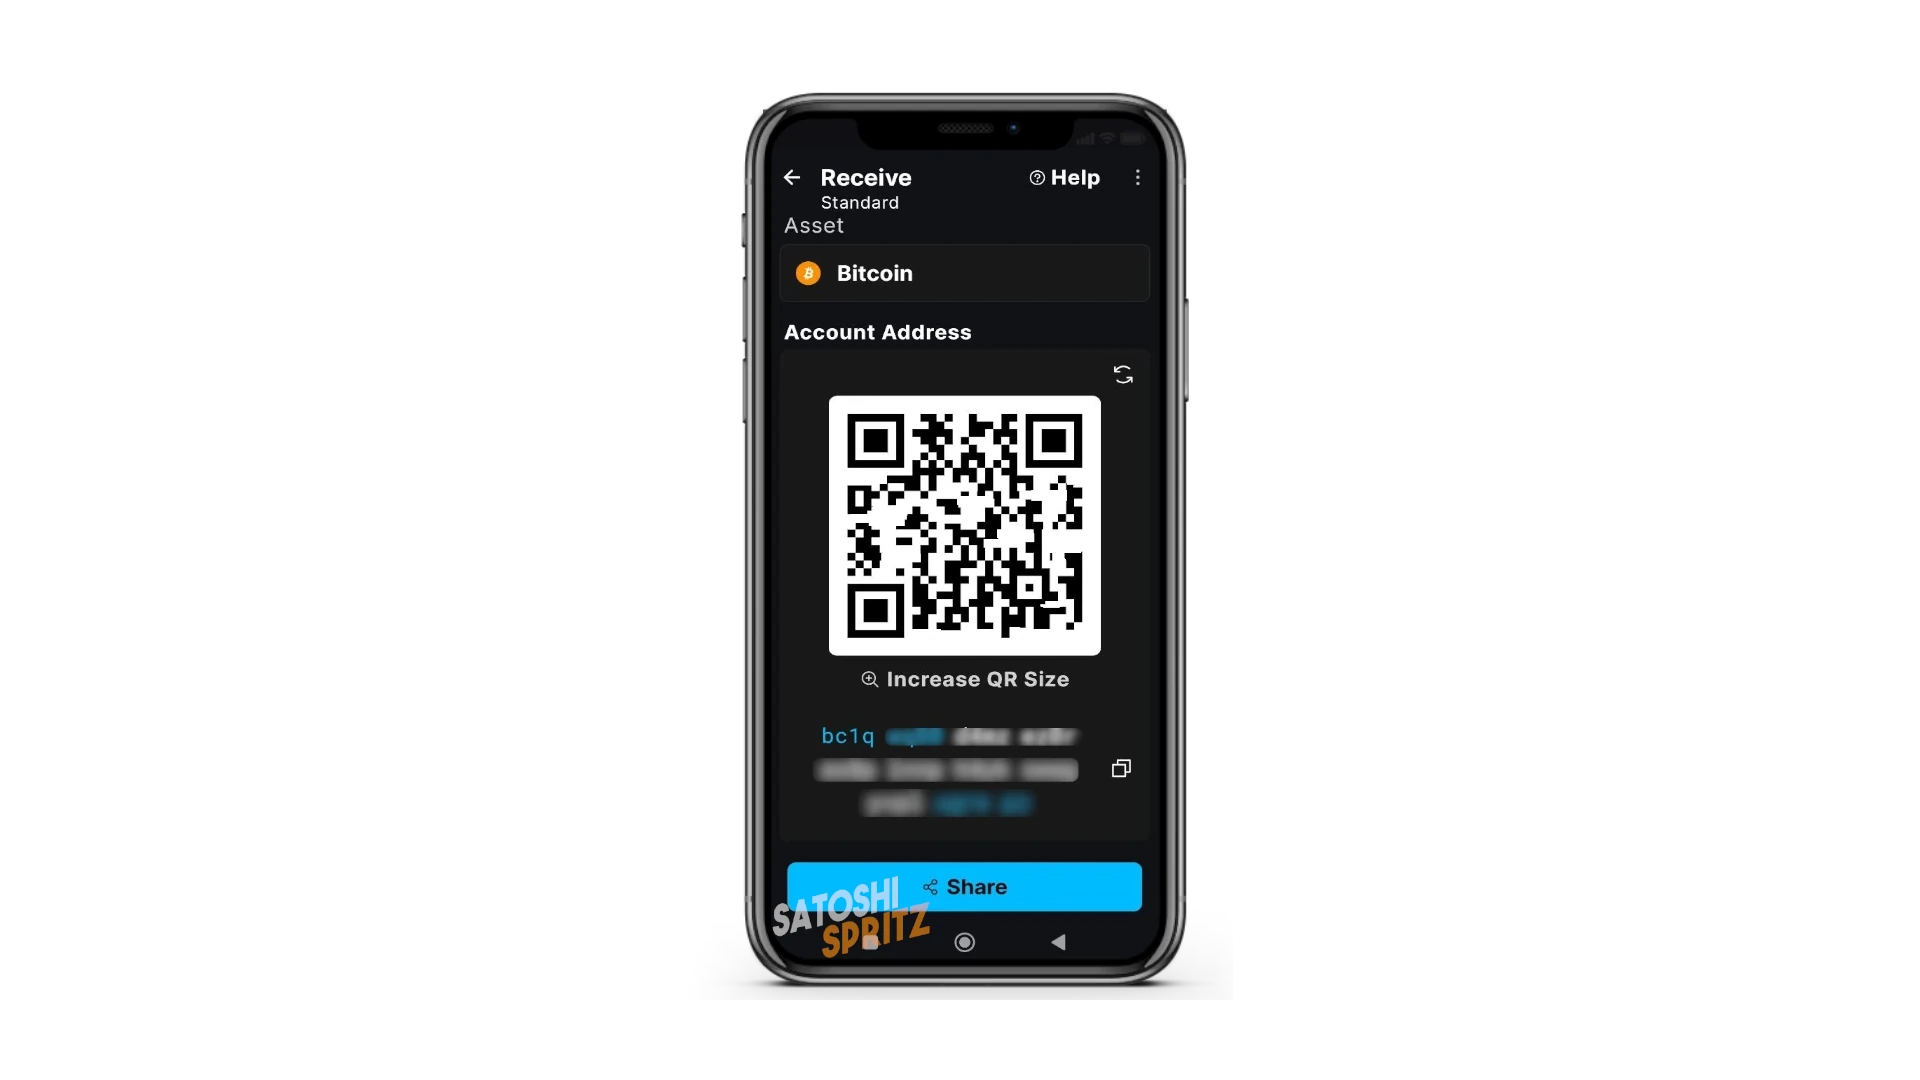
A series of Assets appear, but focus only on Bitcoin. You can choose between Bitcoin onchain (orange icon) and Liquid (blue icon) which is what will allow you to enjoy instant payments, like with Lightning Network, but through a mechanism we’ll see later.
To start, choose Bitcoin Onchain, the orange icon.
What appears is a QR code, which represents one of your Bitcoin addresses, which you also see at the bottom labeled with bc1q followed by other characters.
You can show the QR code to a person who needs to pay you, to receive your first funds, reasonably small fractions of Bitcoin, also called Satoshi.
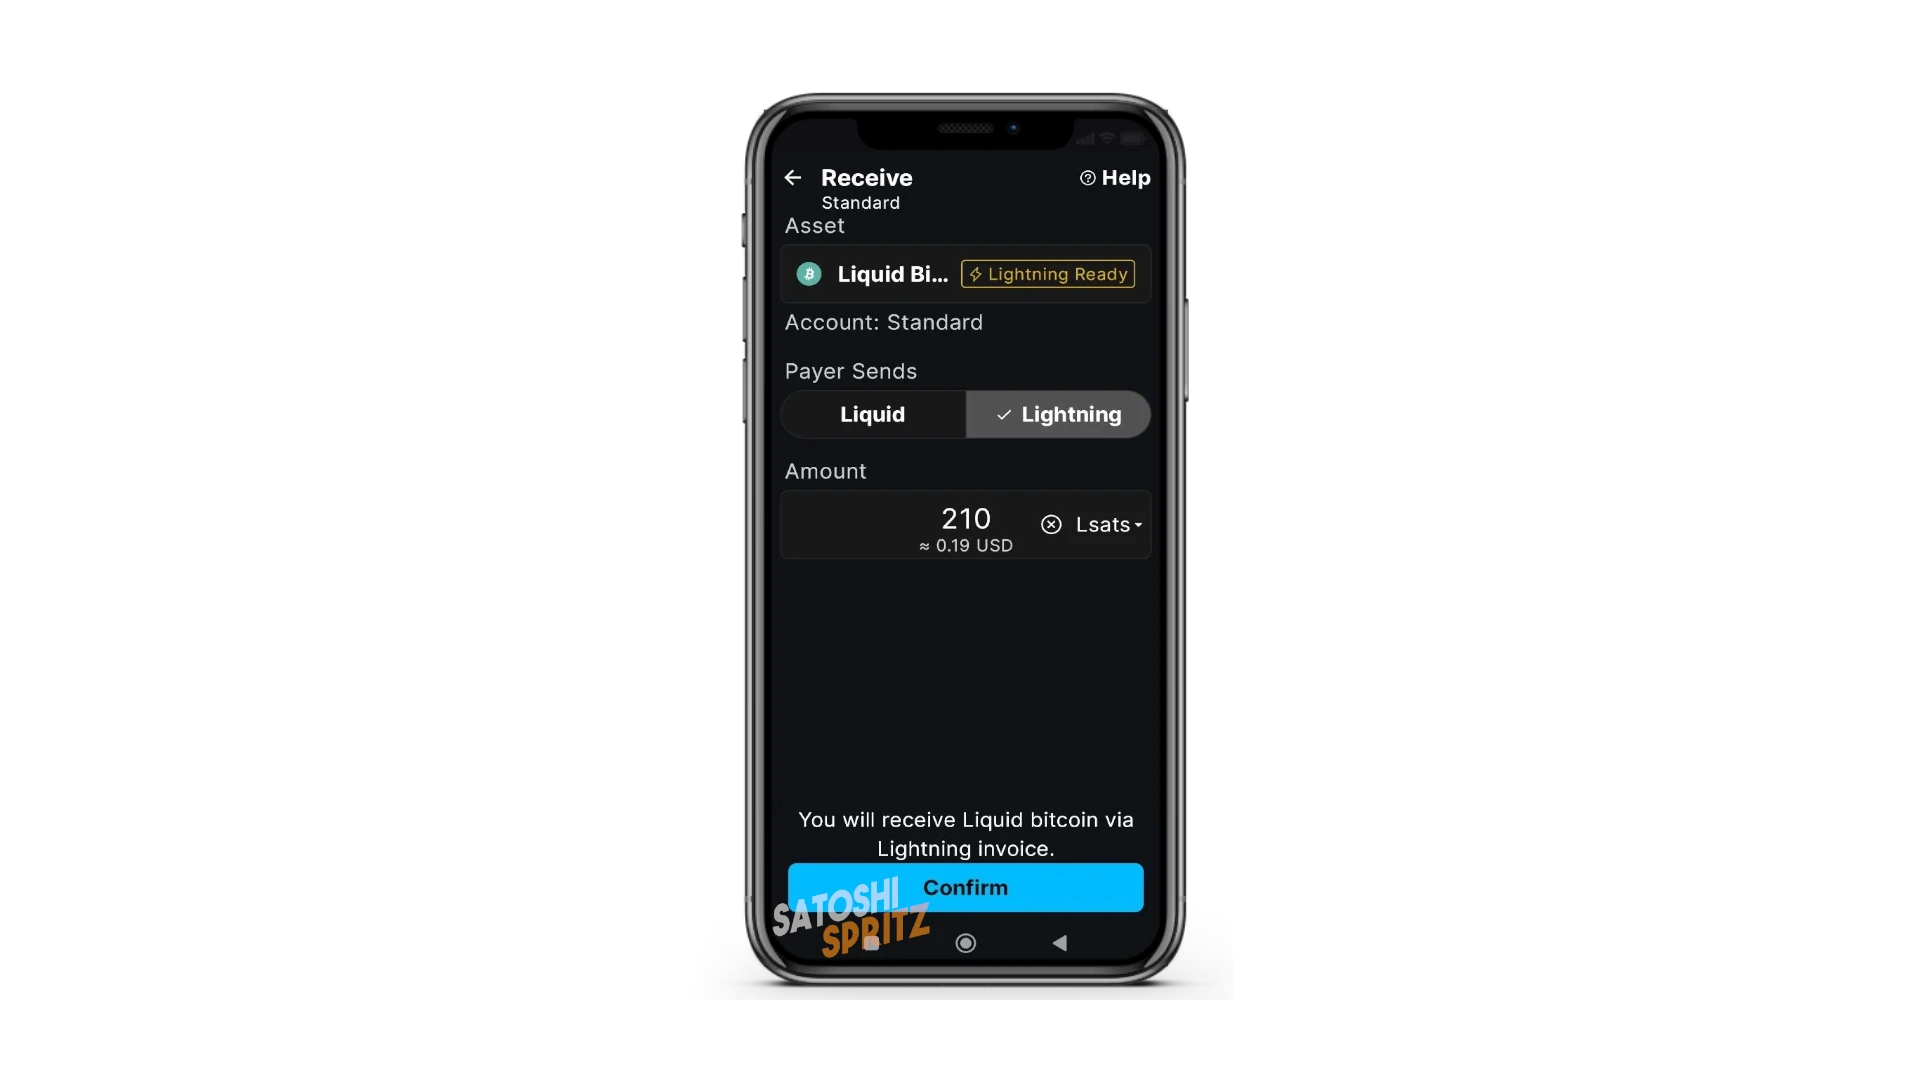
If instead you go back and choose Liquid, the menu signals ⚡️Lightning Ready.
You should know that, using a SWAP service, Blockstream App will allow you to receive almost instant payments, issue Lightning Network payment requests or pay LN invoices, depositing/withdrawing funds from a Liquid account of your same wallet.

In the menu that opens after this choice, select how you want to receive funds, choosing between Liquid and Lightning.
If you choose Liquid, you’ll be shown a QR code similar to the one displayed when choosing Bitcoin Onchain, which represents an address recognizable with the prefix lq1q followed by other characters.
If instead you select Lightning, you’ll be asked to enter the amount you want to receive and confirm by clicking Confirm.
Blockstream App shows you a QR code that represents the LN invoice, which can be paid with any Lightning Network wallet.
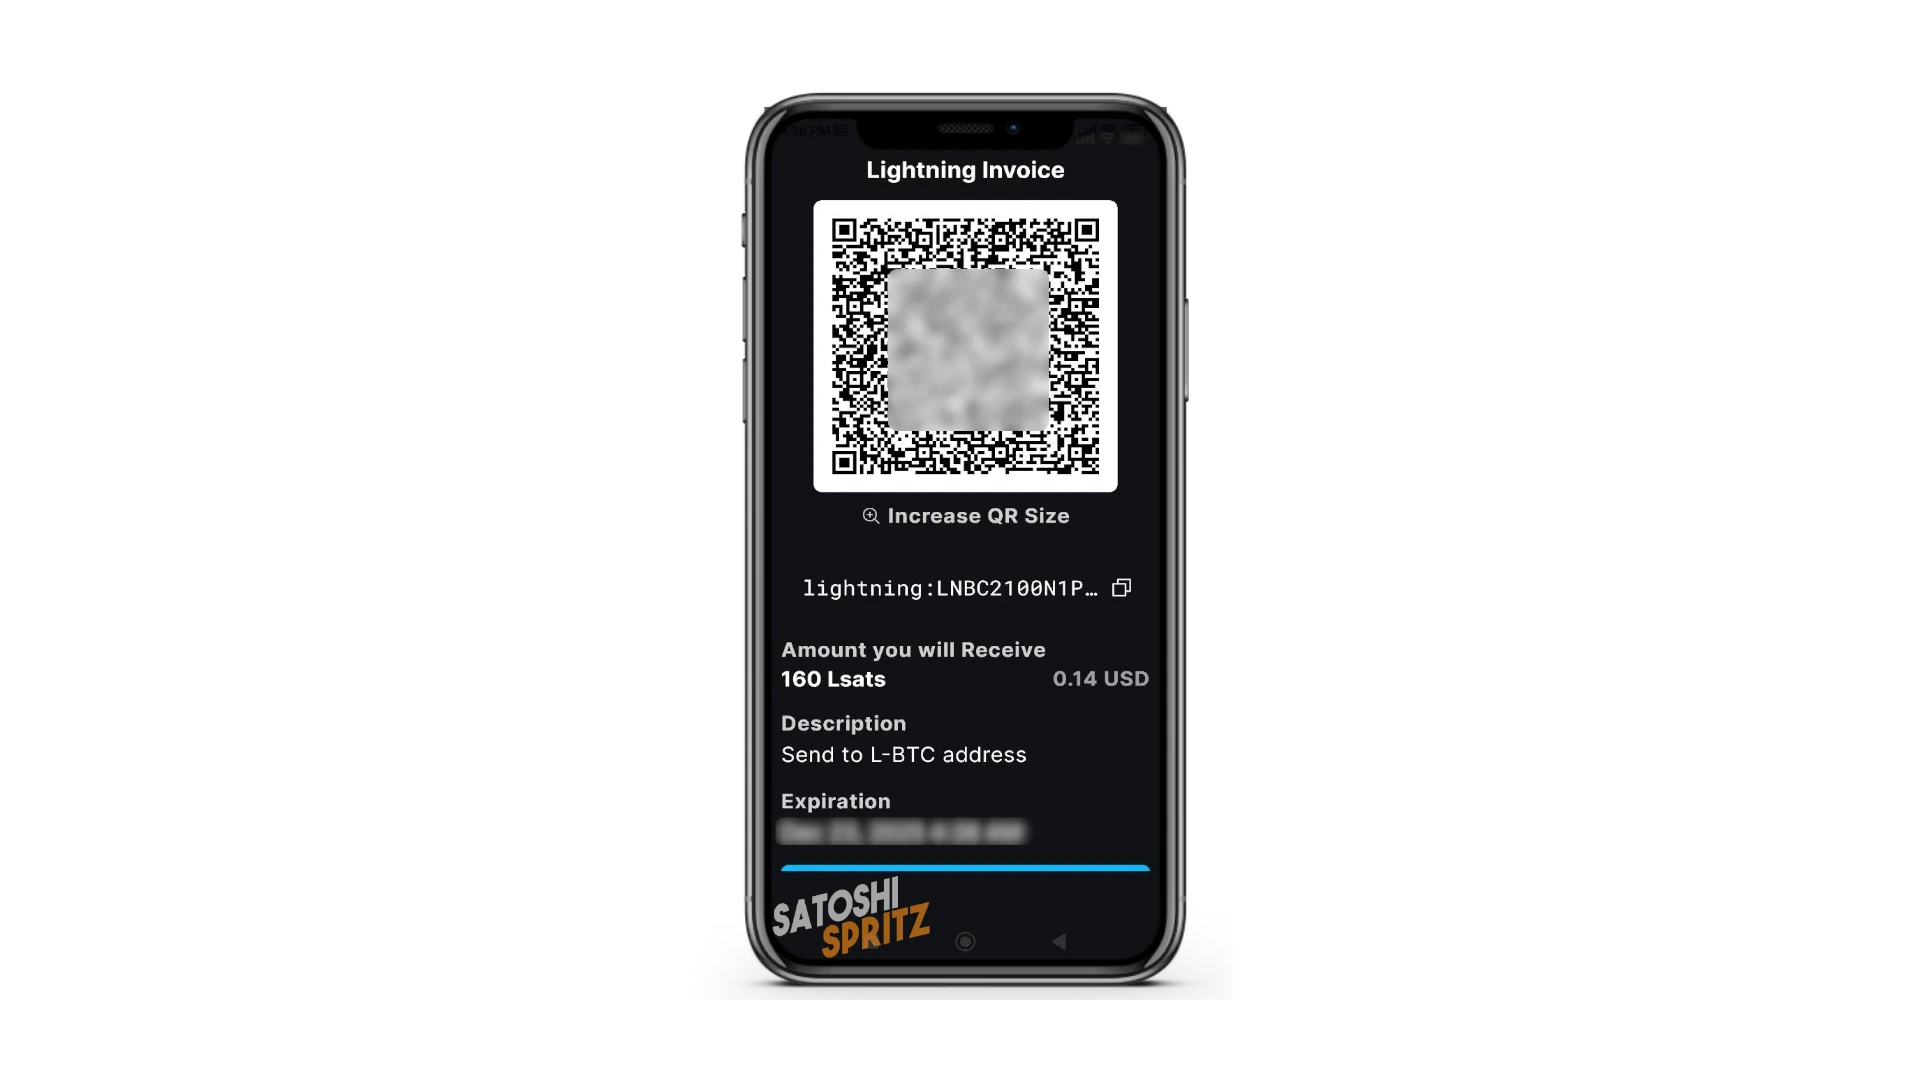
⚠️ In our simulation, we asked to receive 210 sats, but the resulting QR code warns that we’ll receive 160 sats. Swaps indeed have a cost, about 50 satoshis for each payment received. It’s important to keep this aspect in mind, especially when receiving micro payments. Nothing changes for the payer, who will indeed see the requested amount deducted from the request made during setup: 210 satoshis.
Are you a merchant? Use the POS
To make this guide a proper starter kit, we can combine Bitcoin collections on this wallet, using an external POS.
You can configure it in a few simple steps directly at the link https://btcpos.cash/.
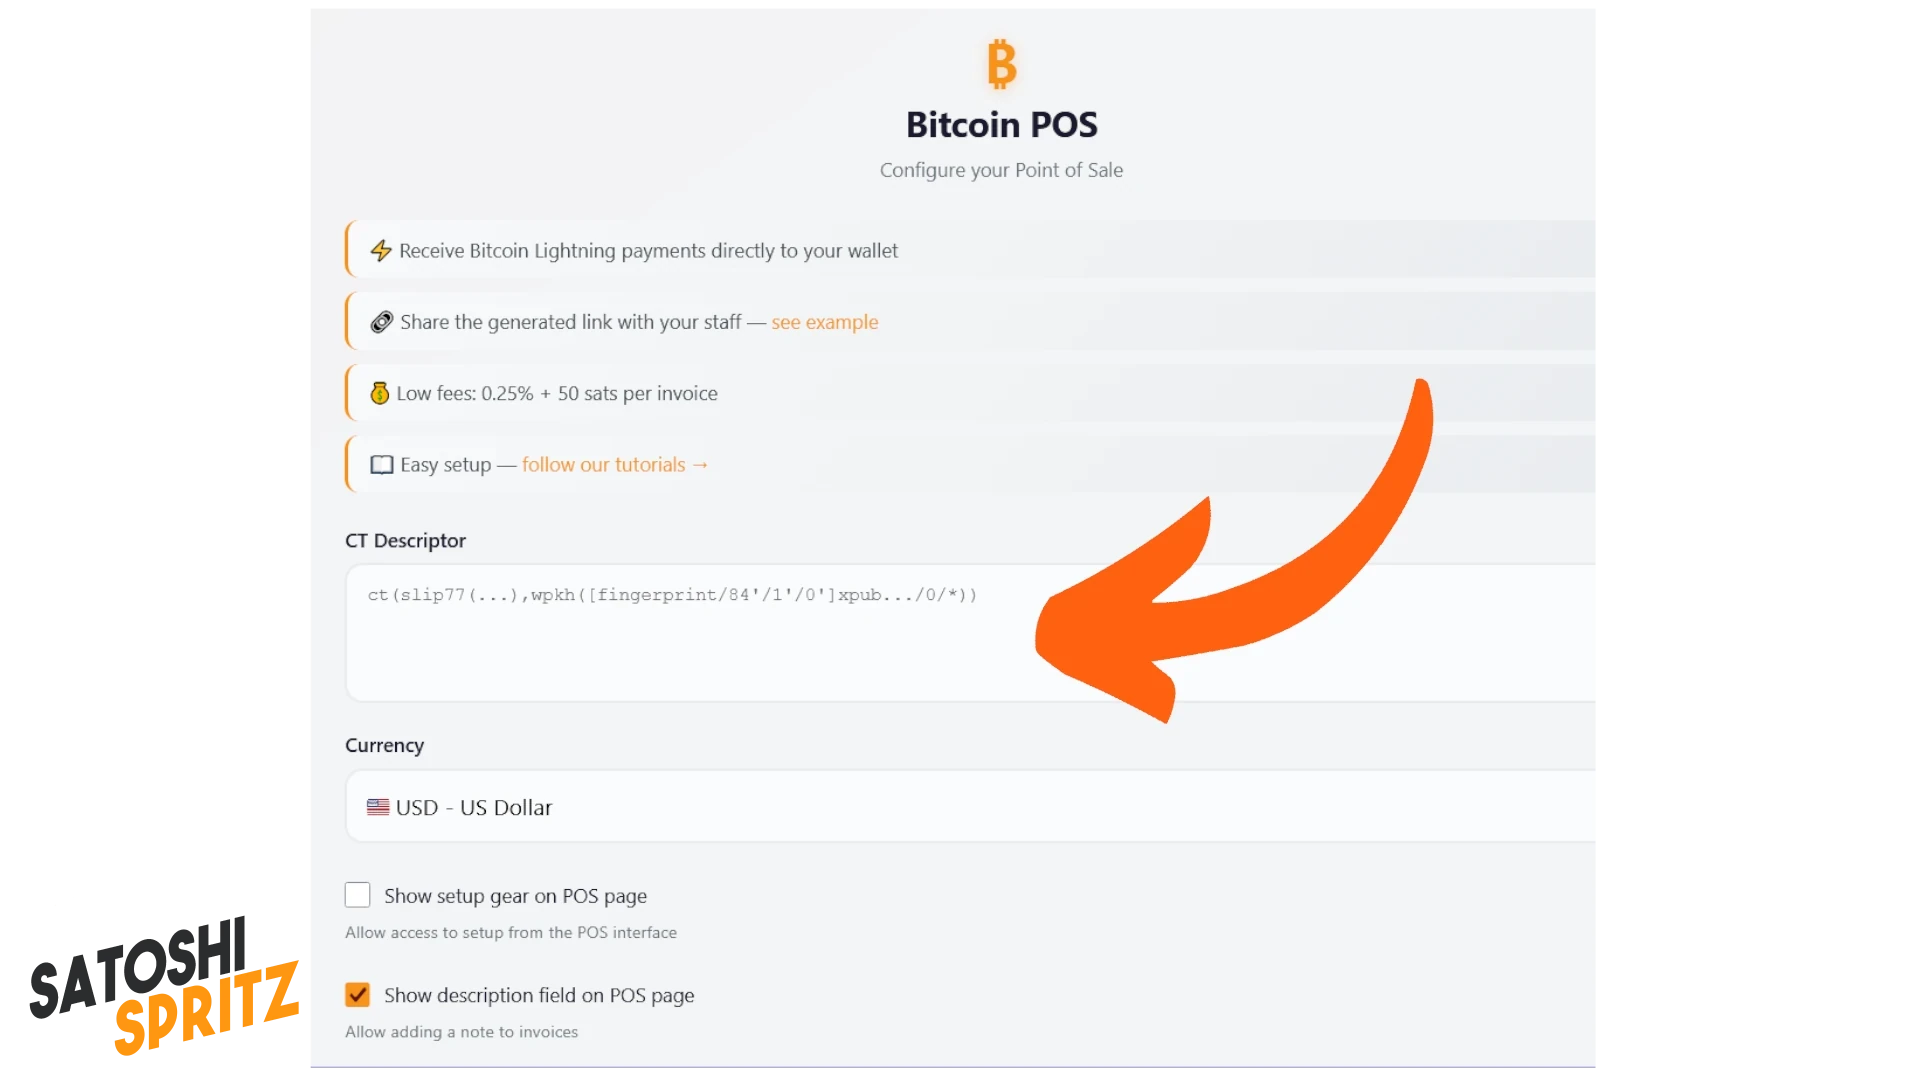
This way you can receive Lightning payments directly on your wallet created on Blockstream App, share the link with collaborators, and - to do this - you just need to follow the next steps and create a link to keep at hand on your phone’s home screen. What you need is to copy your wallet’s Descriptor and paste it in the large central space you find at the link.
1. Receive first funds on the Liquid network
It’s necessary to enable the display of Assets in your wallet’s home screen. If this has just been created, you need to get paid an LN invoice or anyway receive funds on a Liquid address.
After receiving funds, you can select Liquid among the Assets you see in the Home menu.
2. Access necessary parameters
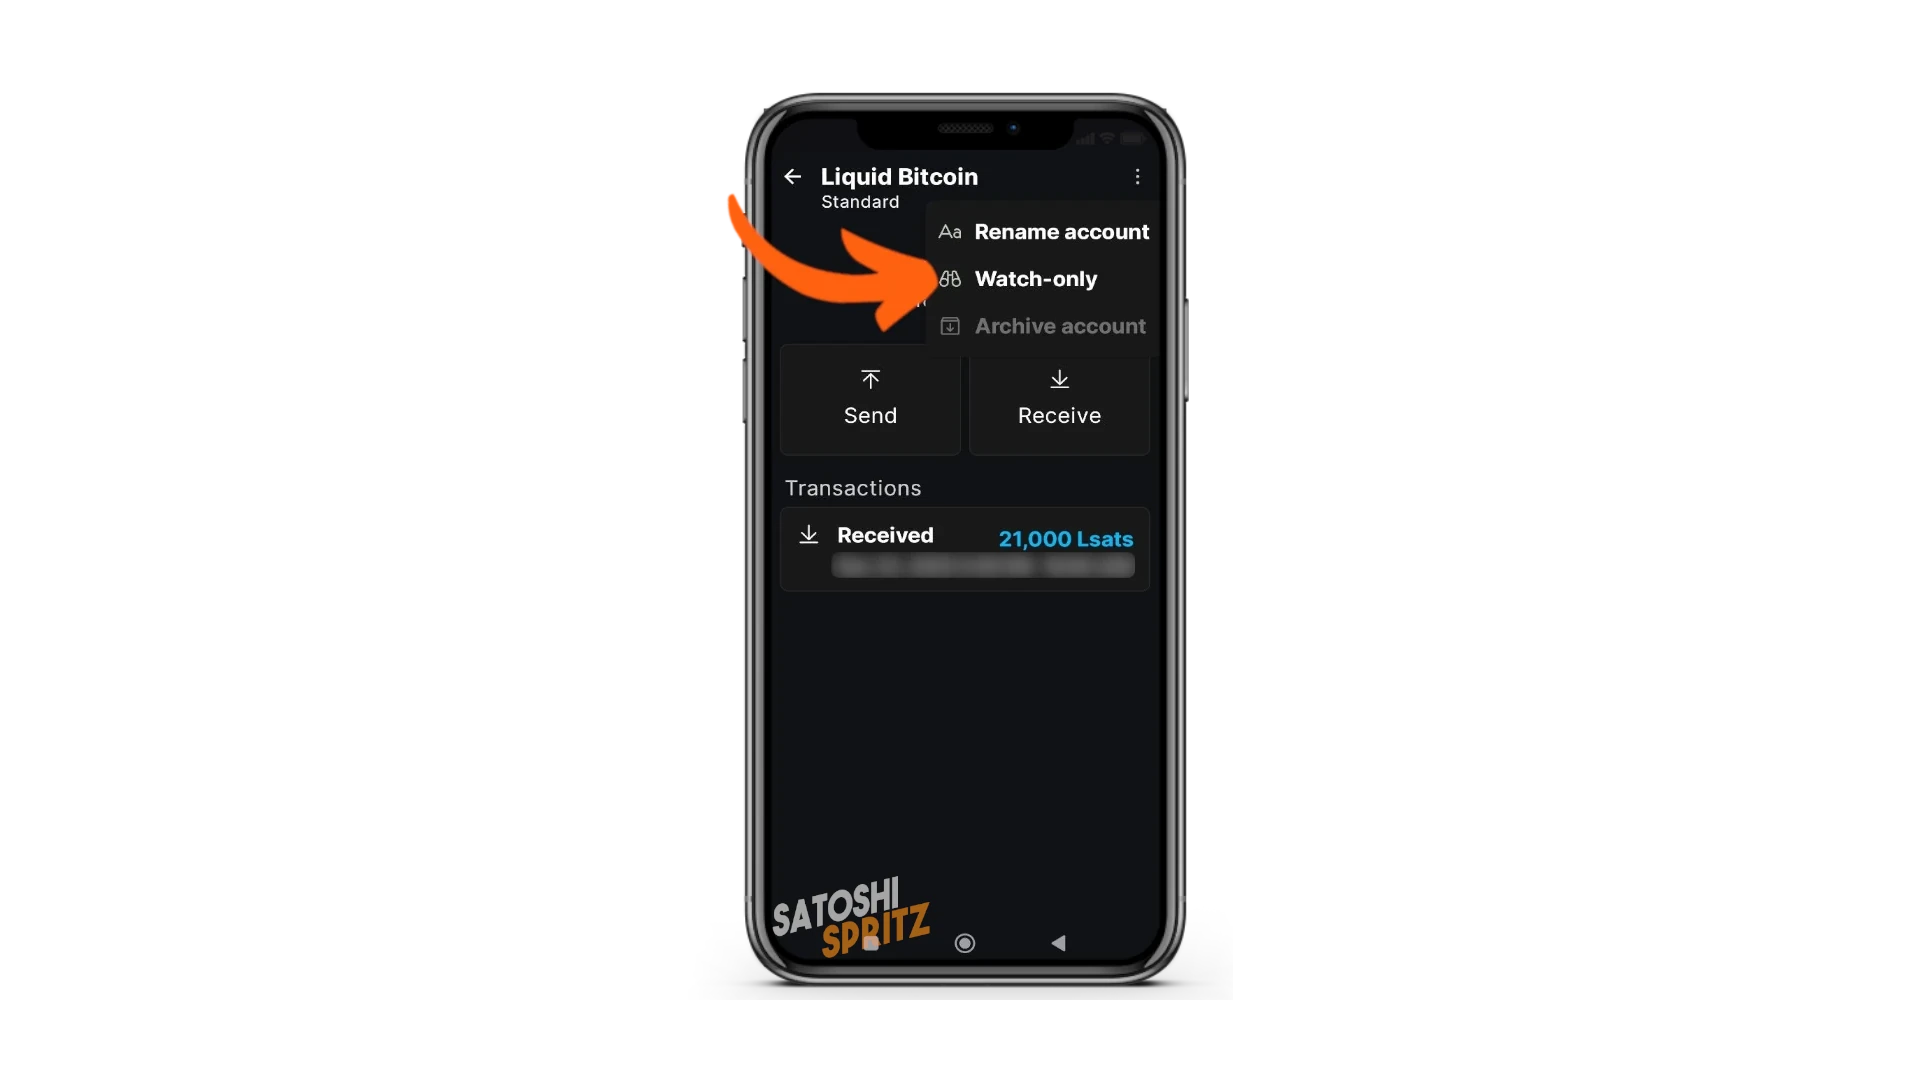
Now you have what you need to access the parameters that will allow you to “transport” your wallet to the POS. Technically it’s called public key export and it’s a technicality you’ll learn through in-depth study. For now, know that to do this, you just need to select the menu at the top right:
And choose Watch-only in the dropdown menu that appears.
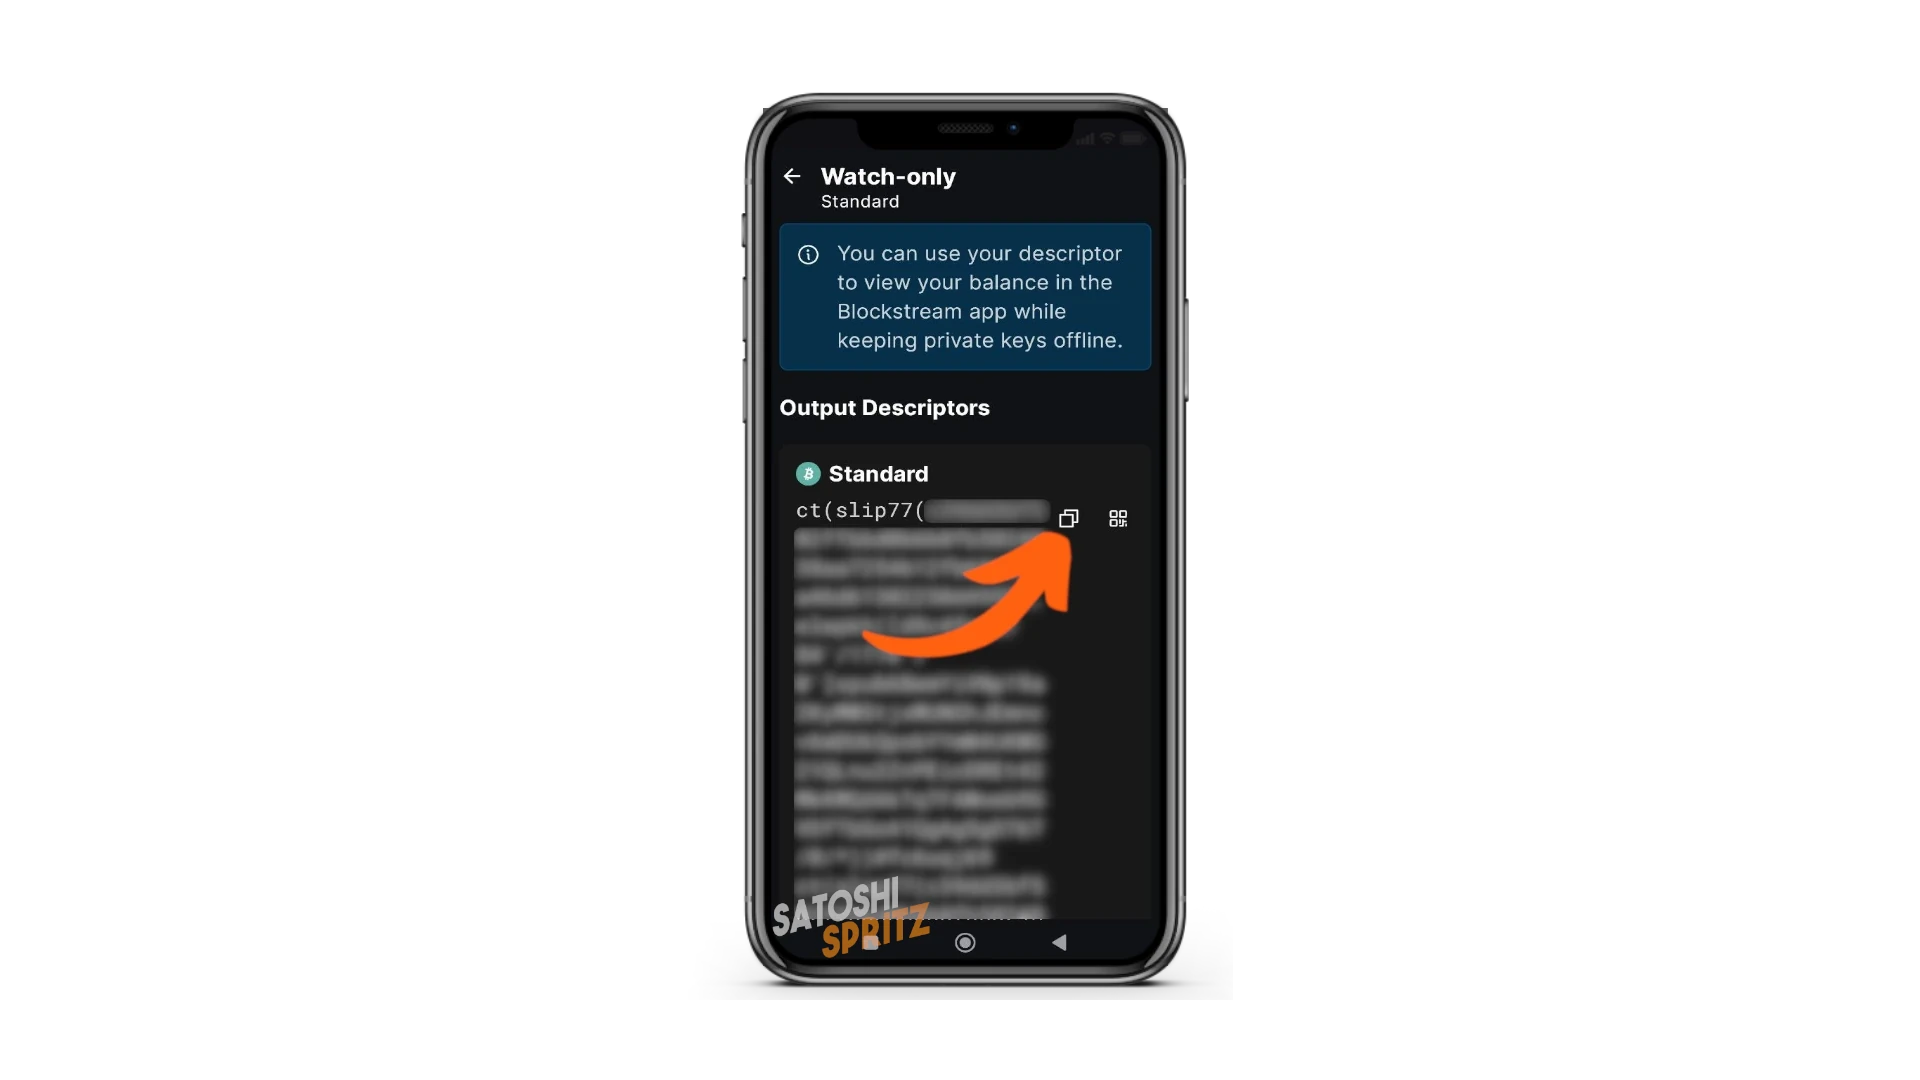
Output Descriptors appears, which is exactly the parameter we’re looking for. Copy it with the appropriate command and go back to the web page where you’re configuring the POS.
3. Configure the POS
Paste the descriptor in the appropriate space and click GENERATE POS LINK. The system will create a unique URL, valid only for you and your wallet.
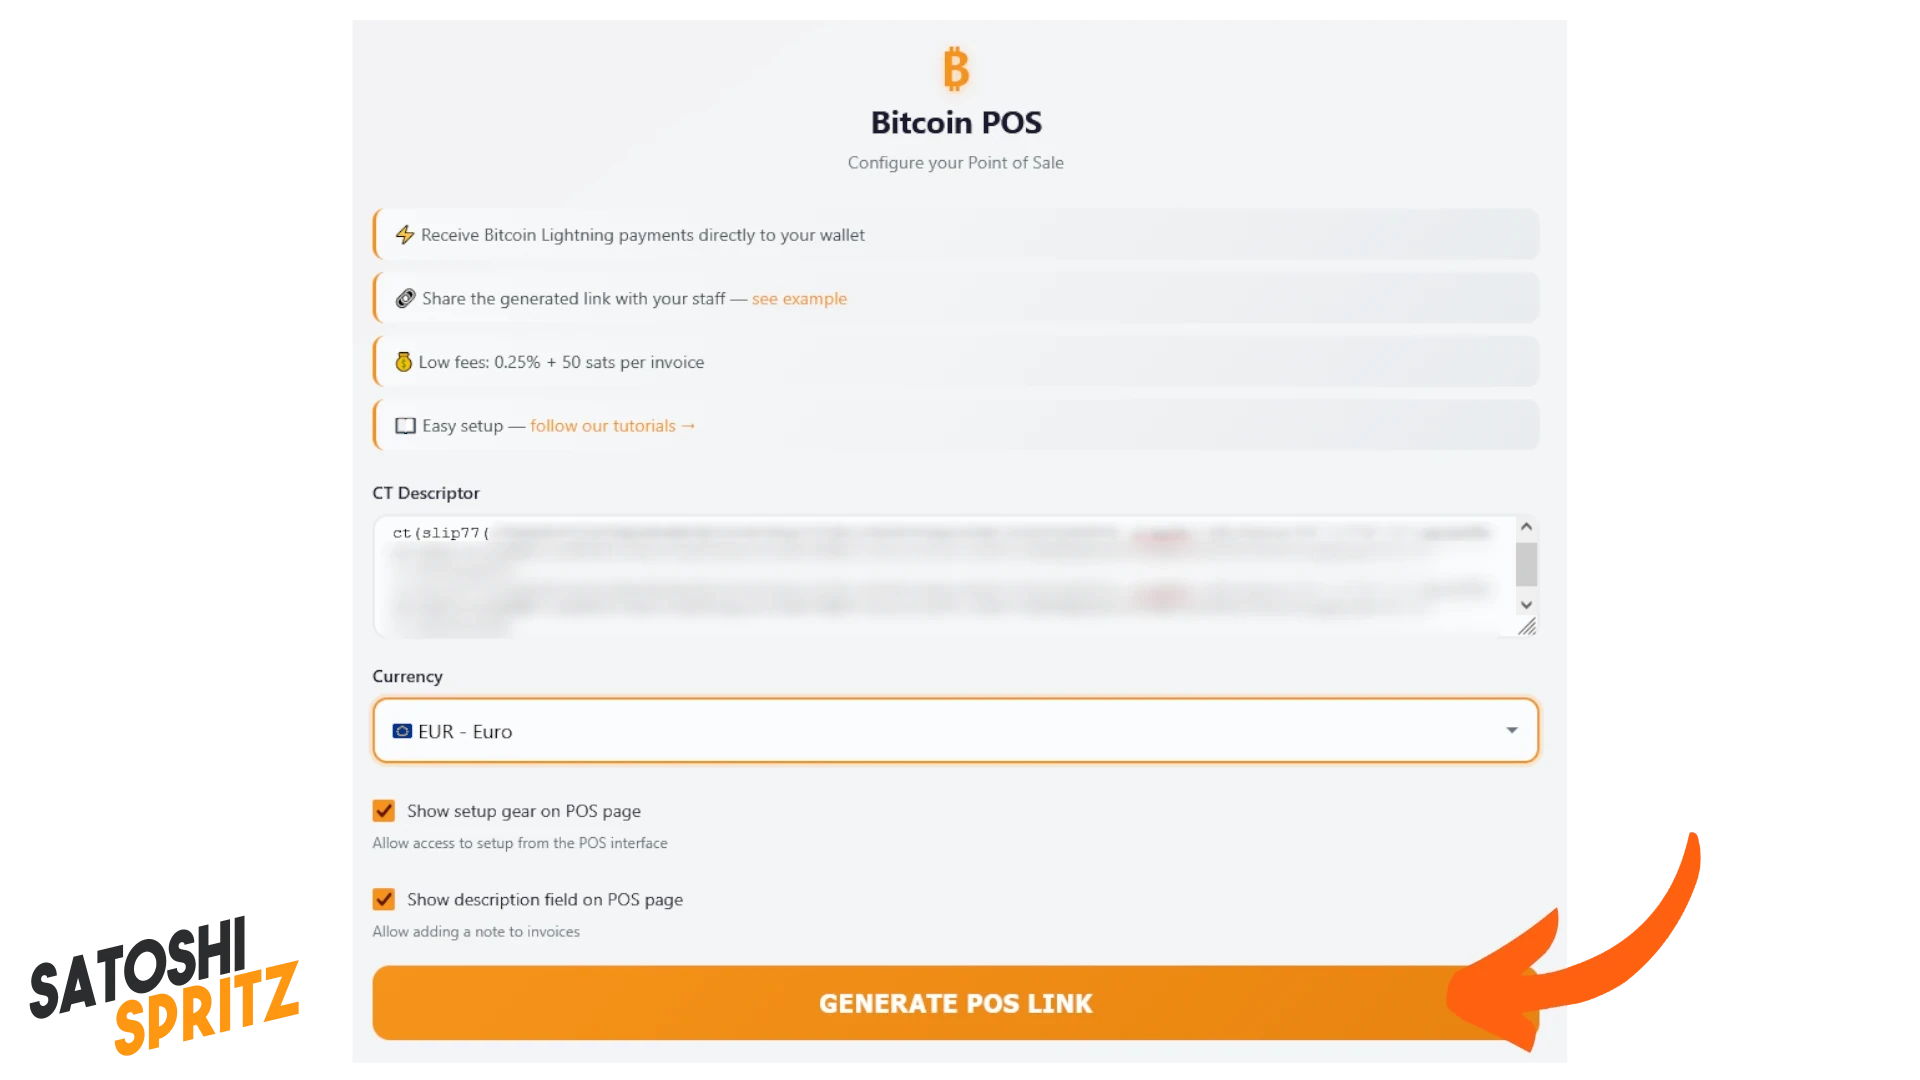
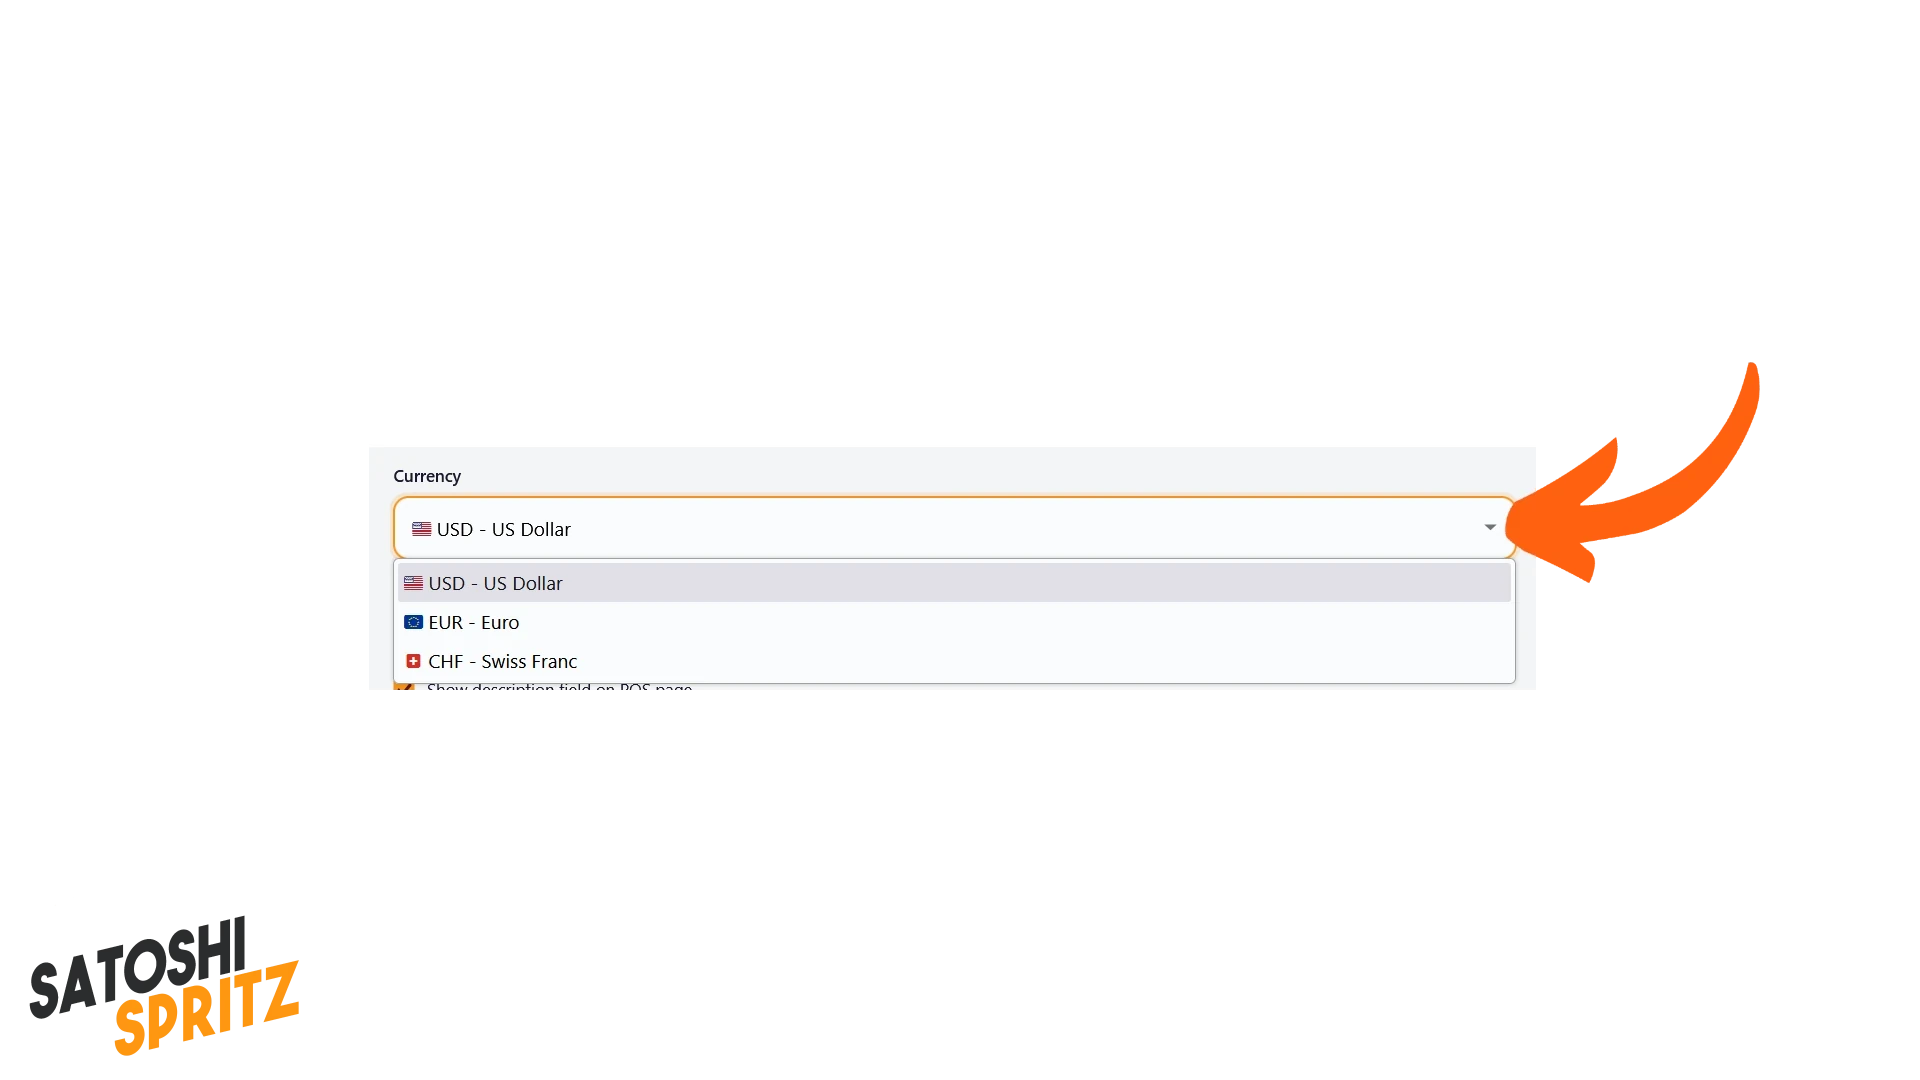
You can also set the reference currency first, choosing between USD, CHF and EUR in the dropdown menu where Currency appears.
4. Collect by generating payment requests with the POS
Once you’ve clicked GENERATE POS LINK, the page shows the result: the link has been created successfully.
You can copy it because the link will always remain accessible only for your wallet at the generated URL.
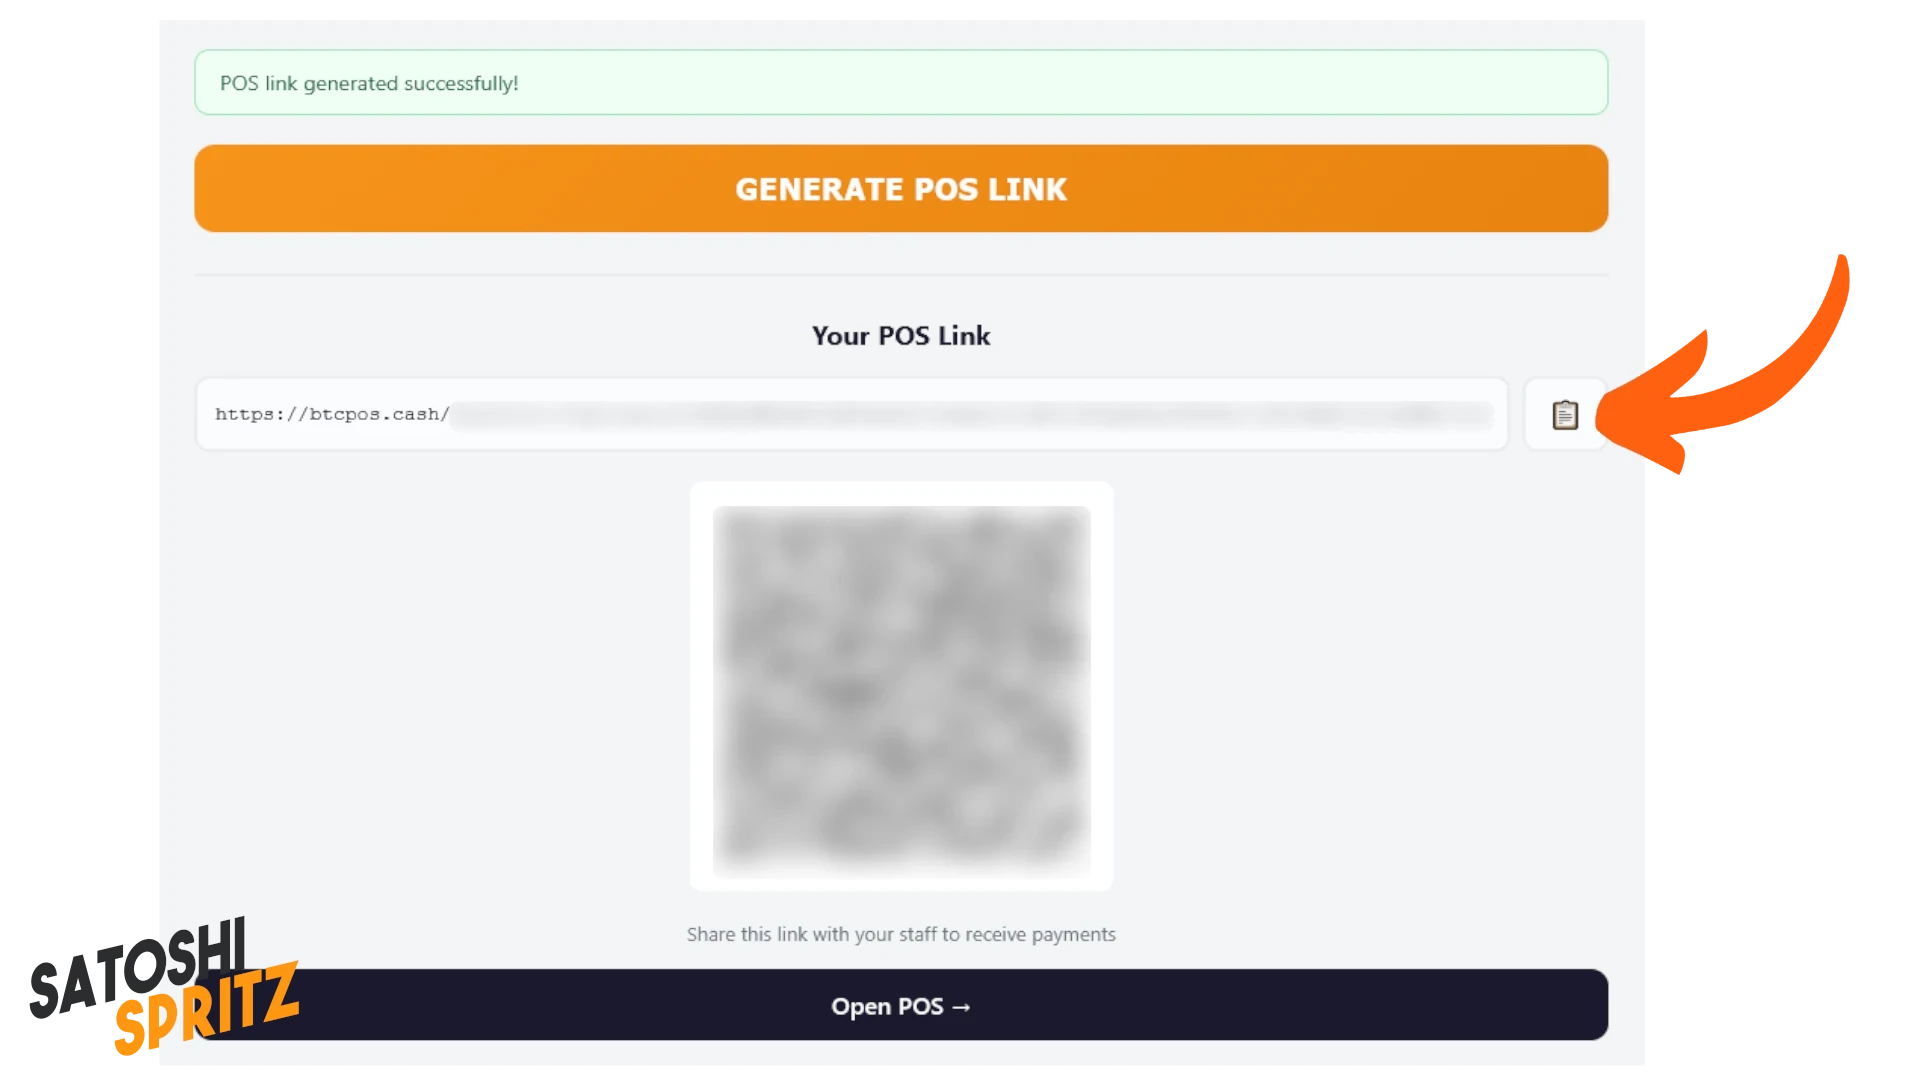
You can also open the POS and start using it:
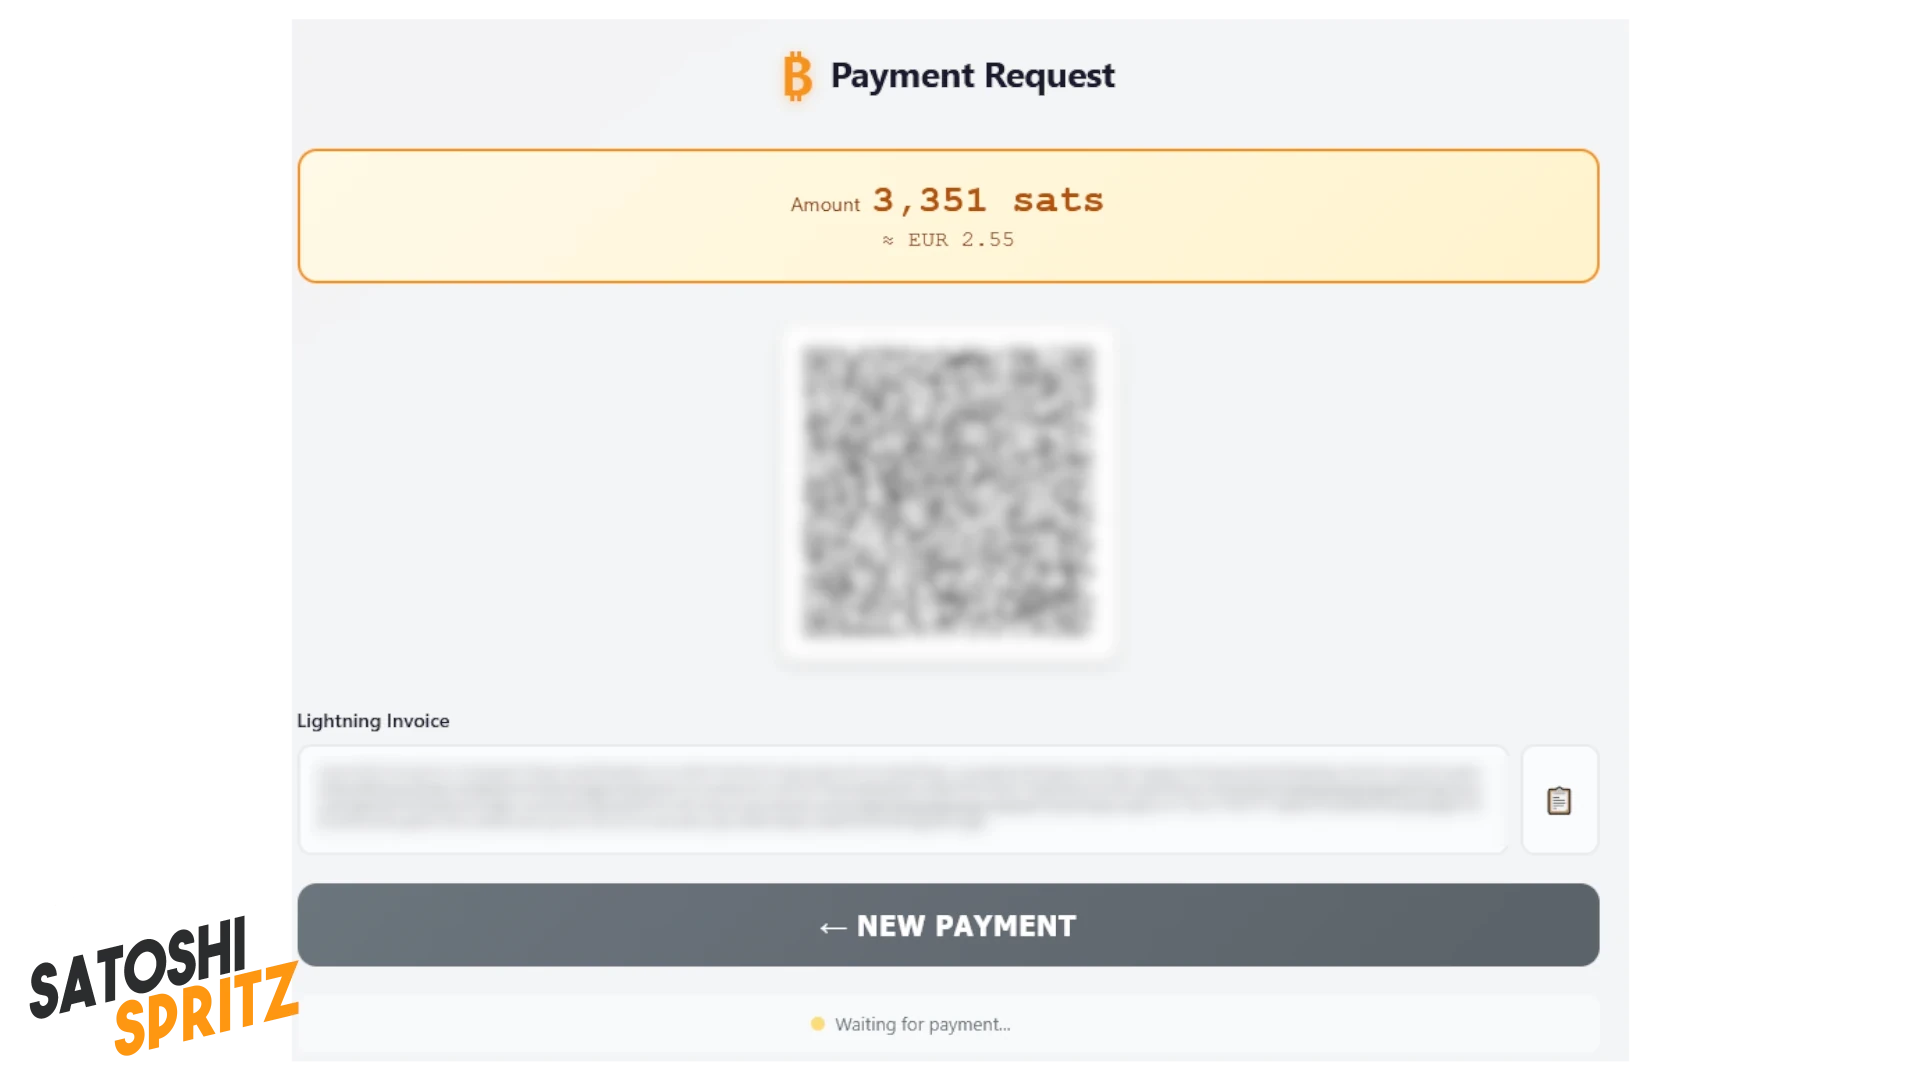
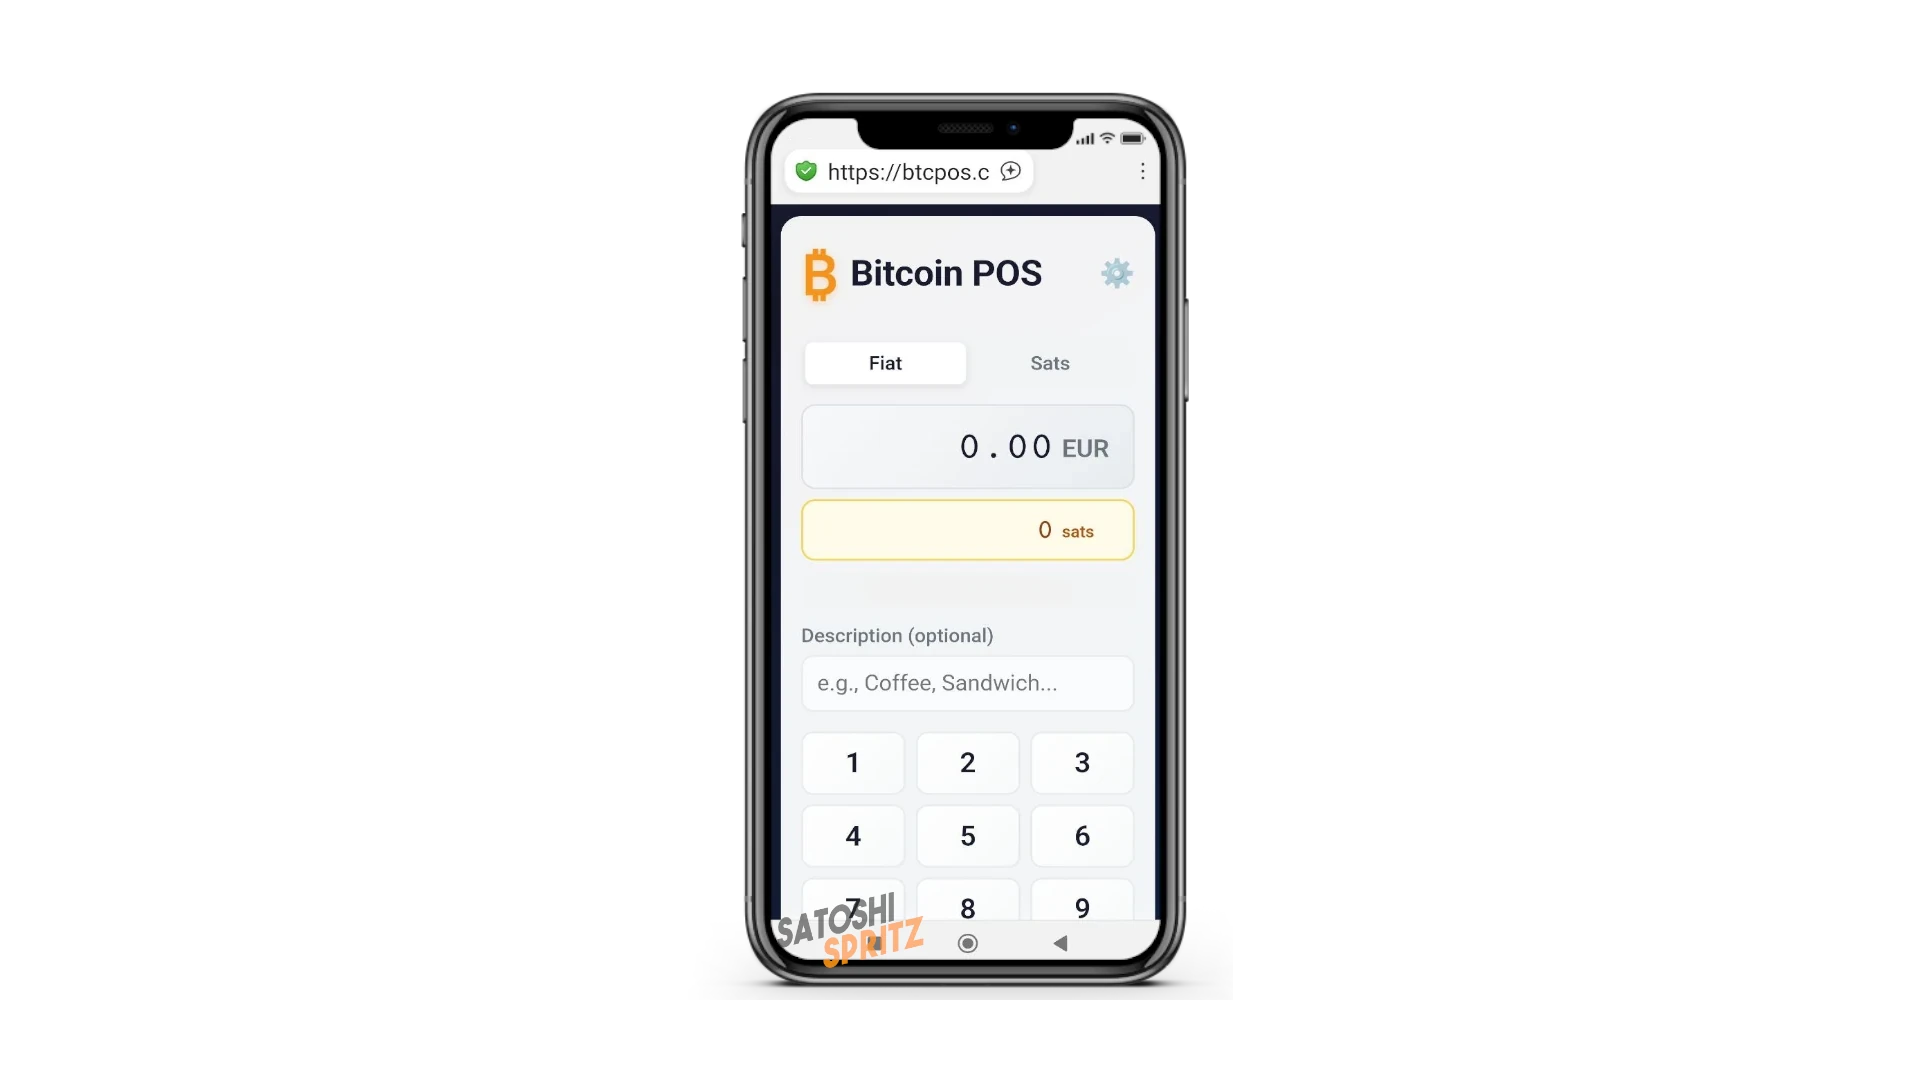
Suppose, for example, you want to generate an invoice for 3,351 sats, associating a description.
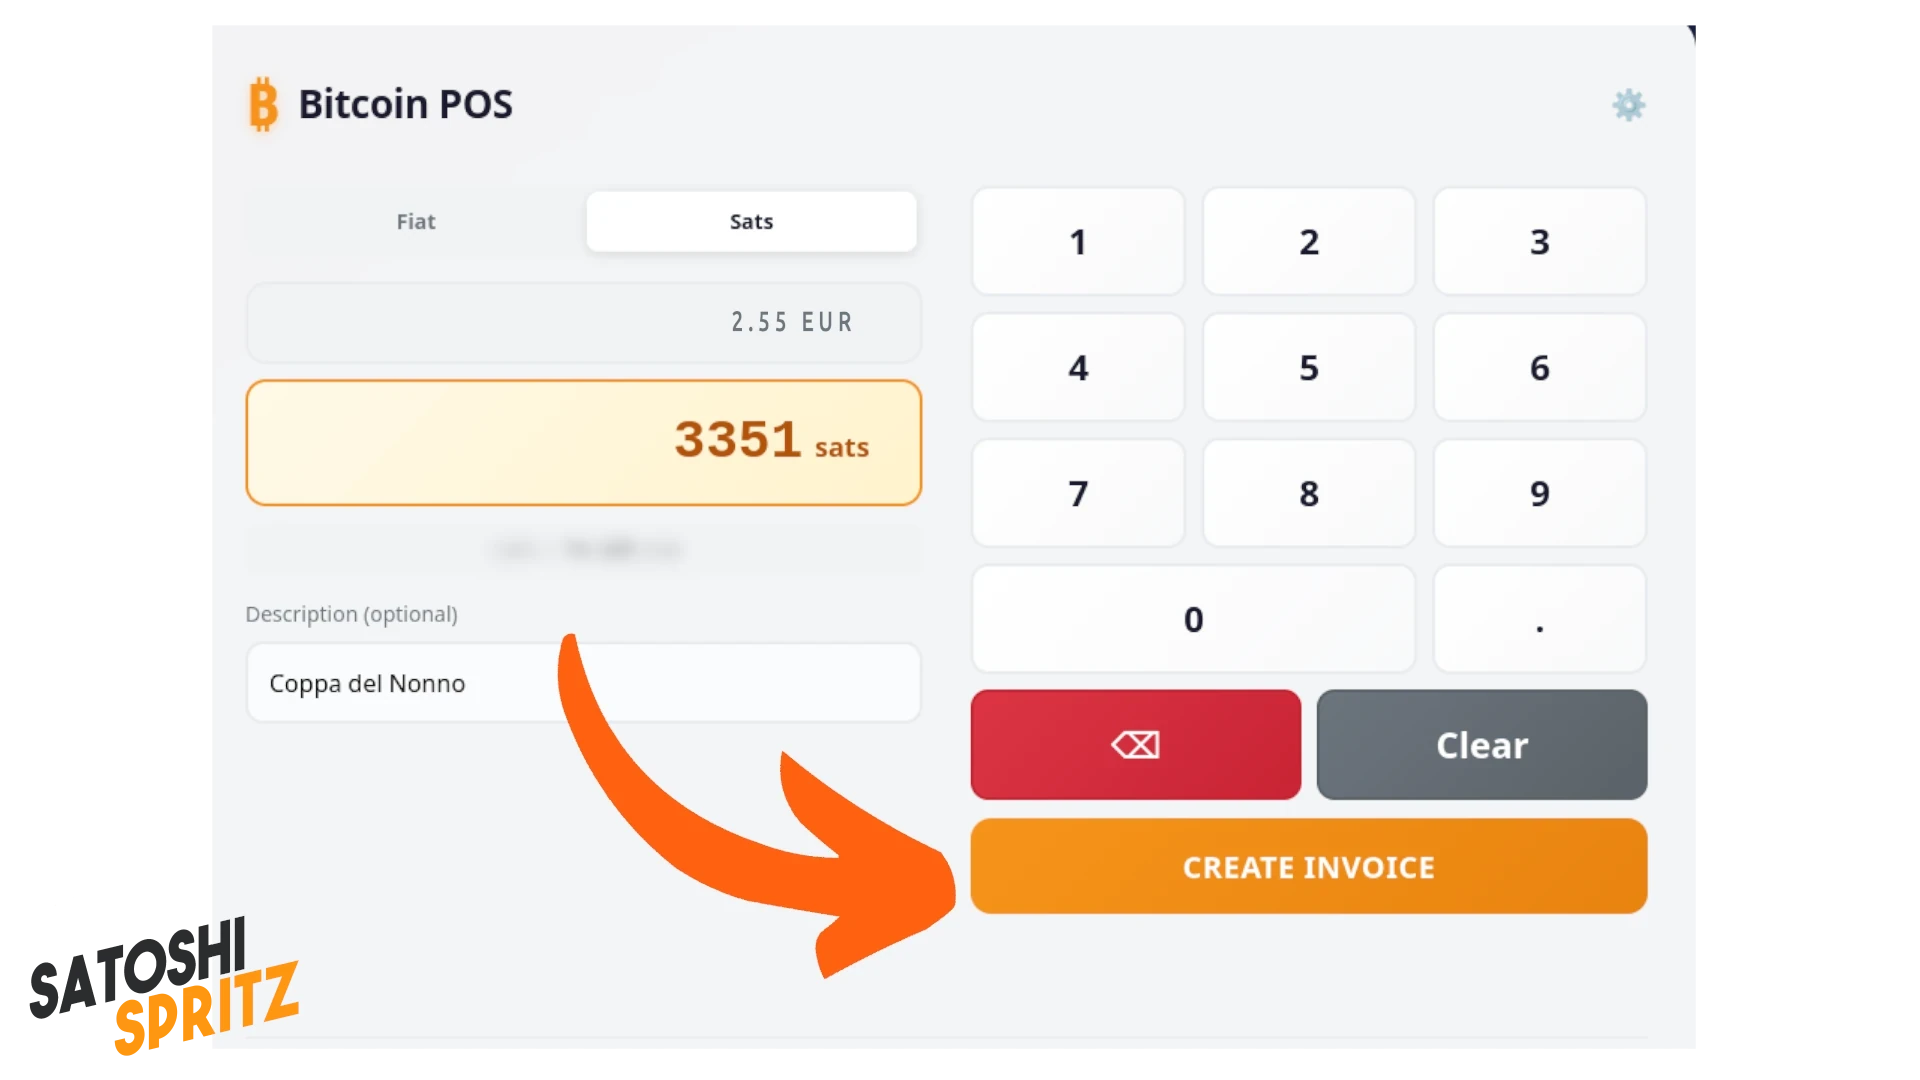
By clicking CREATE INVOICE the POS shows the QR code or textual invoice to submit to a potential customer.
When the customer has paid the invoice, on which they’ll correctly read the description (Coppa del Nonno in this case), the POS signals the payment received.
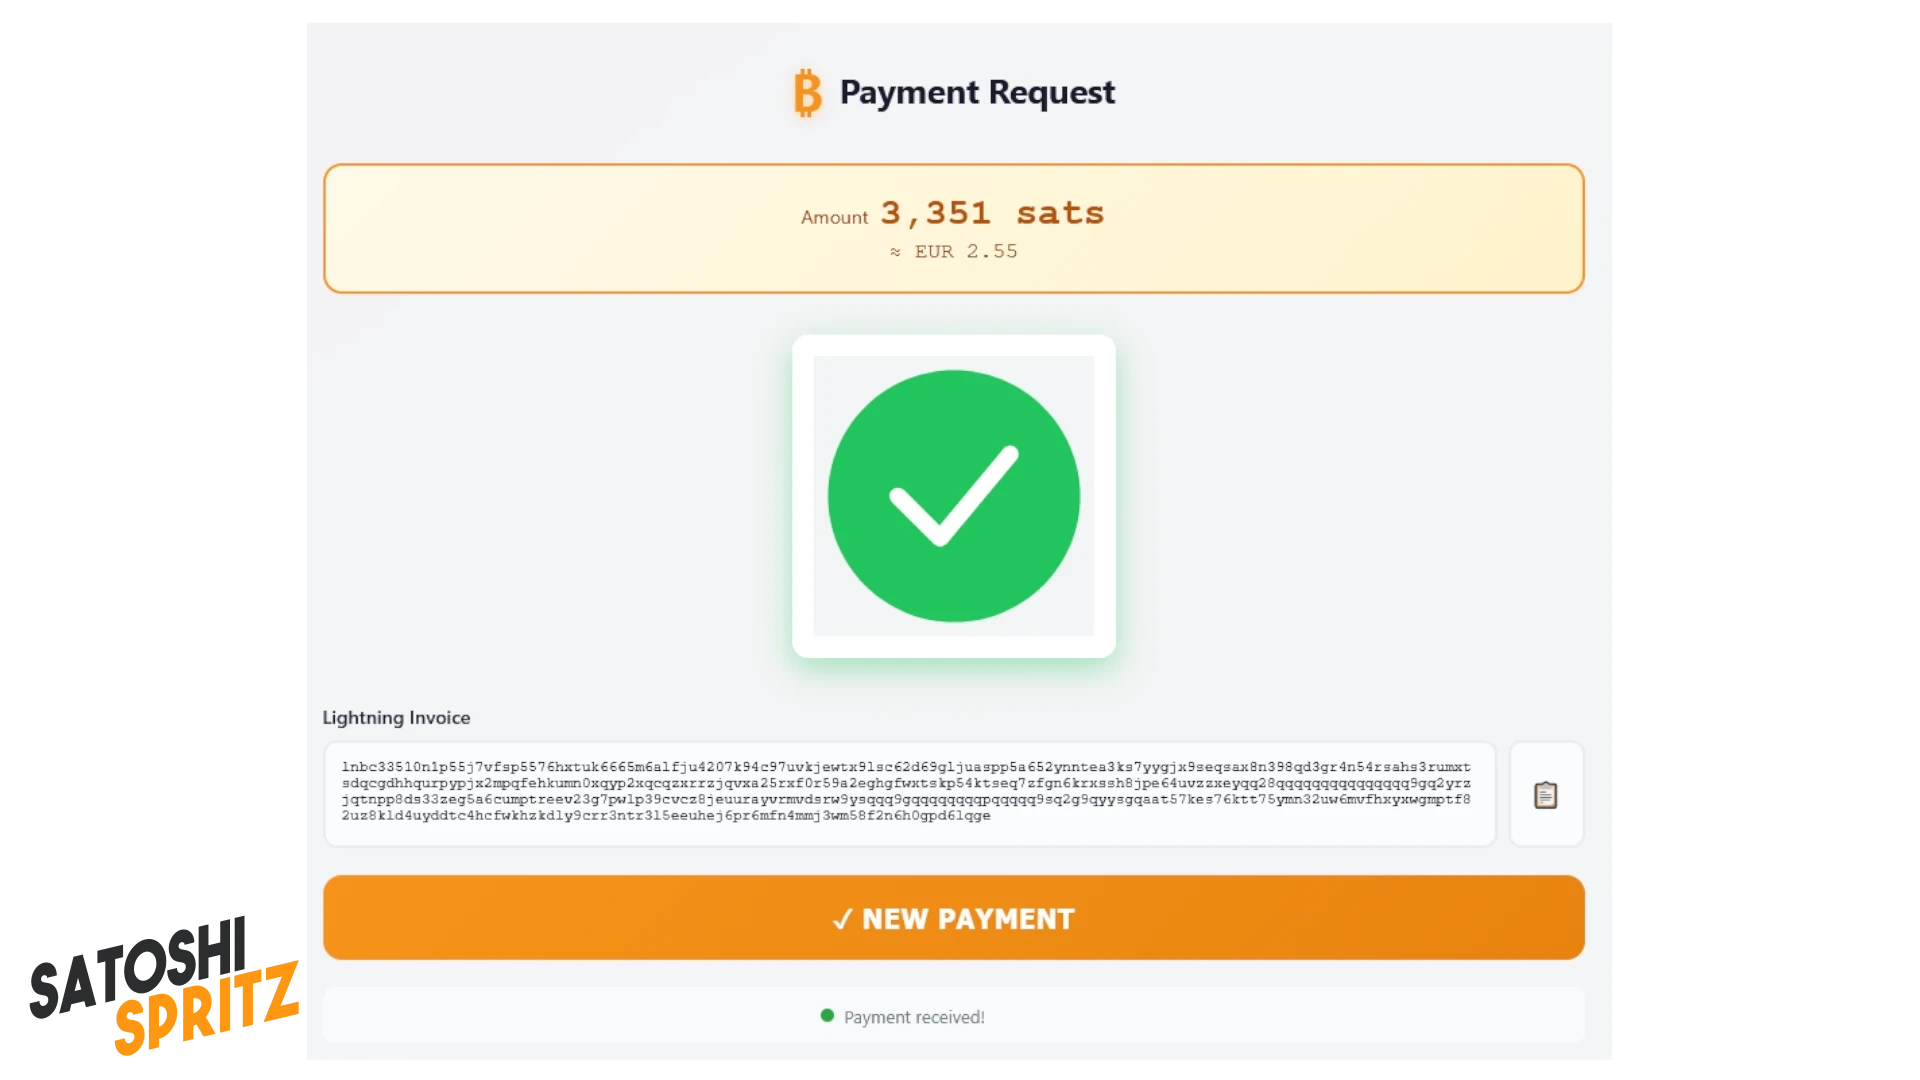
Which is correctly readable also on the wallet!
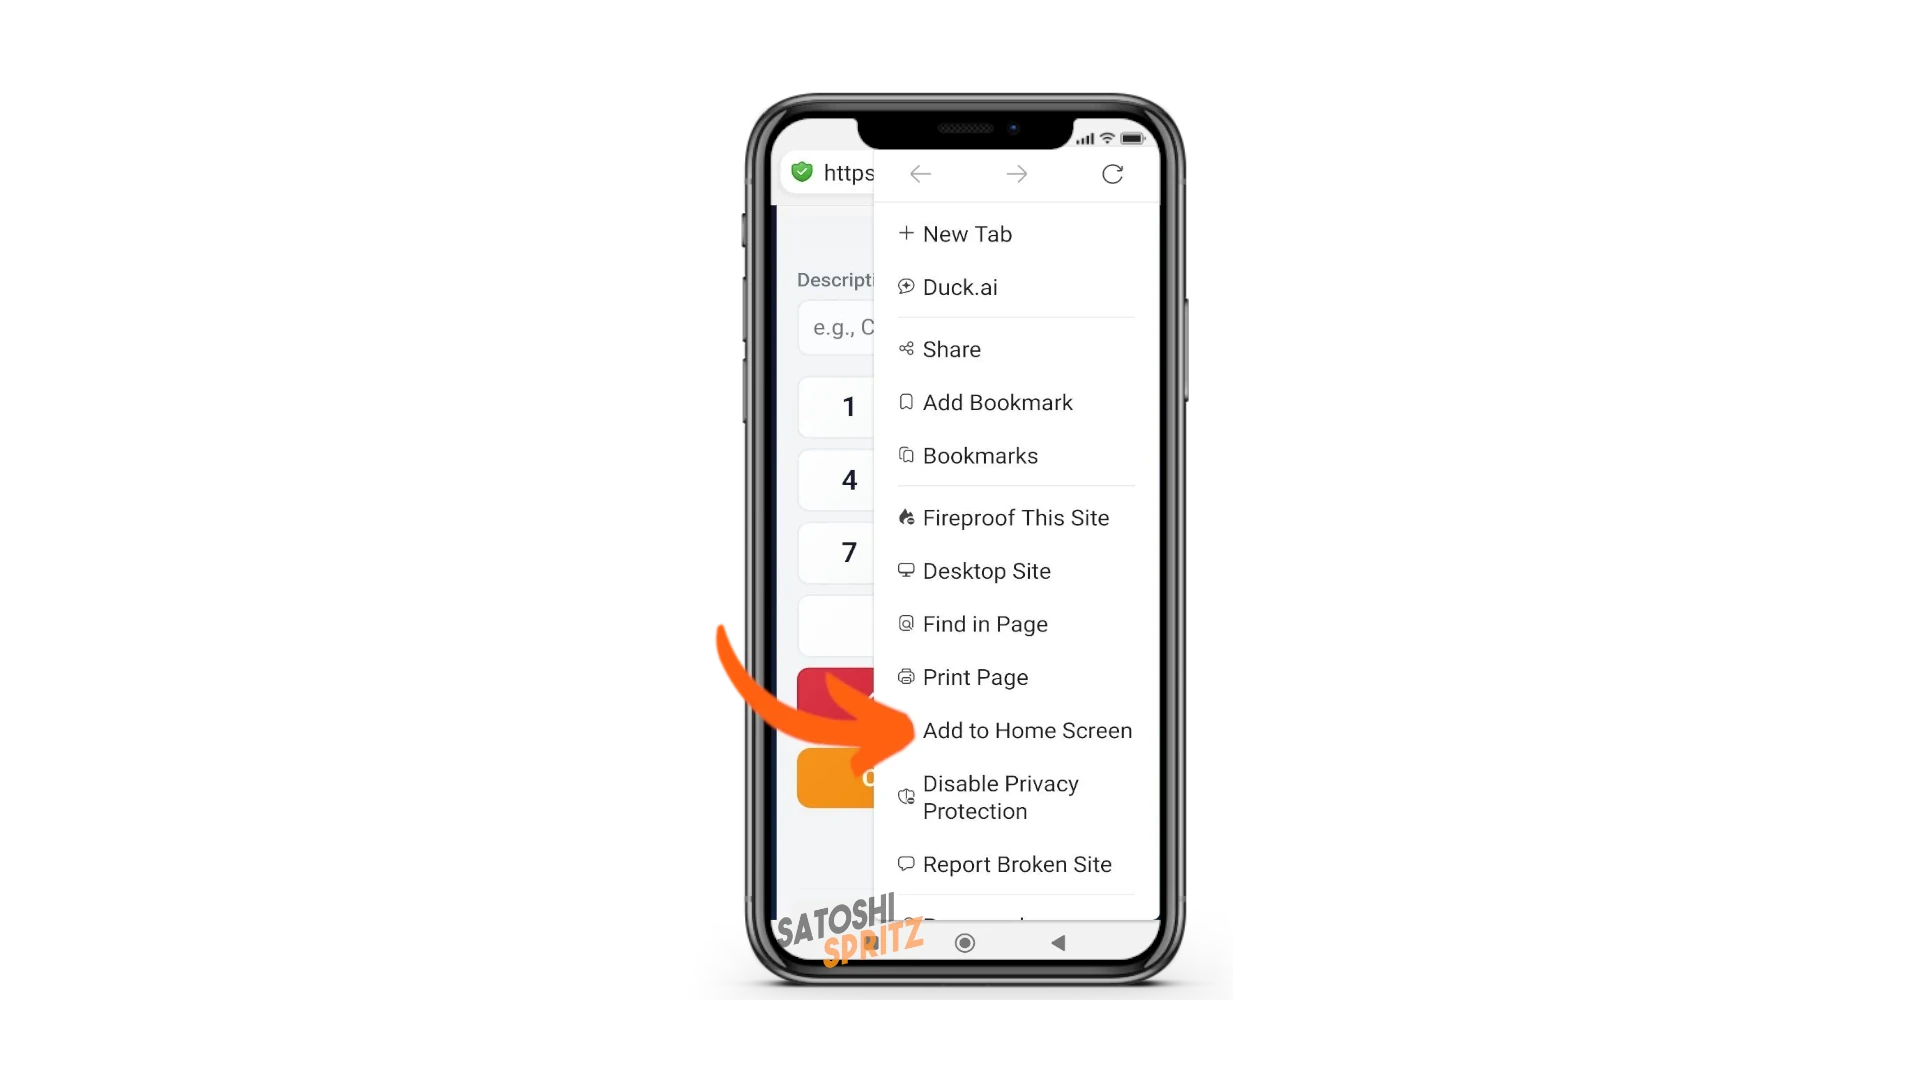
Now you just need to memorize and keep the POS link handy, to use it when needed, even on the phone where you’ve installed your wallet.
Adding it as a link/app on the home screen
⚠️ IMPORTANT NOTE
If you reread the steps just completed, regarding the invoice collection in this last example, we notice two important things:
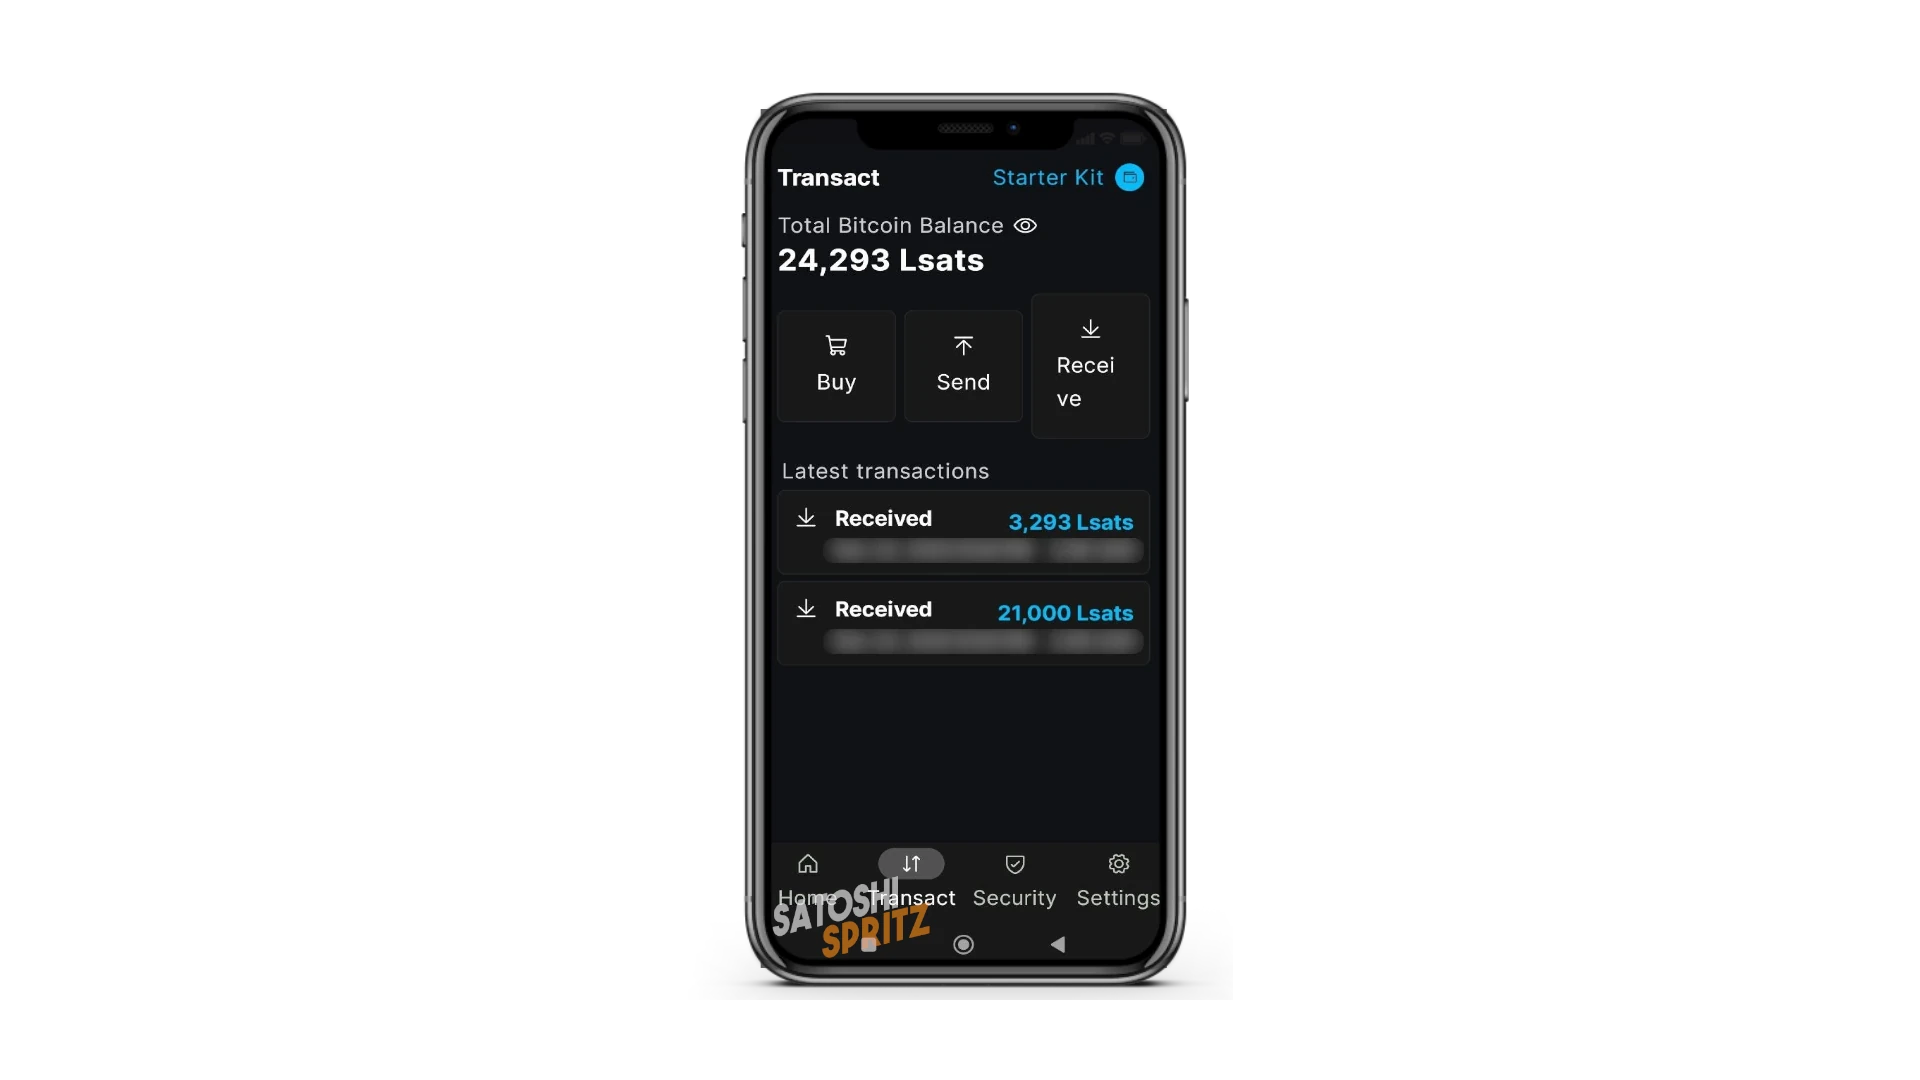
- the customer was shown an invoice for 3,351 sats
- our wallet collected 3,293 sats.
Before crying scandal, it’s necessary to go back to the POS initial screen, which shows the wording you see in the image below:

The difference between 3,351 (invoice submitted to customer) and 3,293 (your collection) is exactly in these terms:
- 50 sats for each invoice generated
- 0.25% as service fee (8 sats = 0.25% of 3,351)
- Total collected: 3,293
You’re just starting out and this is a starter kit. A small fee is the compromise to use Bitcoin in self-custody, without intermediaries and enjoy all opportunities, including small instant payments.
Through study you’ll learn to use other tools, which won’t require other fees beyond those also expected for experienced users.
Other Settings
It’s time to get to know your first wallet well. Settings are important, because they’ll help you in daily use.
Menu
Blockstream App menus are at the bottom and are:
- Home
- Transact
- Security
- Settings
Continue configuring your wallet from the Security menu. In addition to the possibility of viewing and transcribing the Recovery phrase words, this menu makes other important features available to you.
You can set, for example, login to your wallet with biometric control (if set on your phone) or also add a six-digit PIN to access the wallet. These options are very important, because they prevent strangers from accessing and viewing your wallet, should they have your phone in hand.
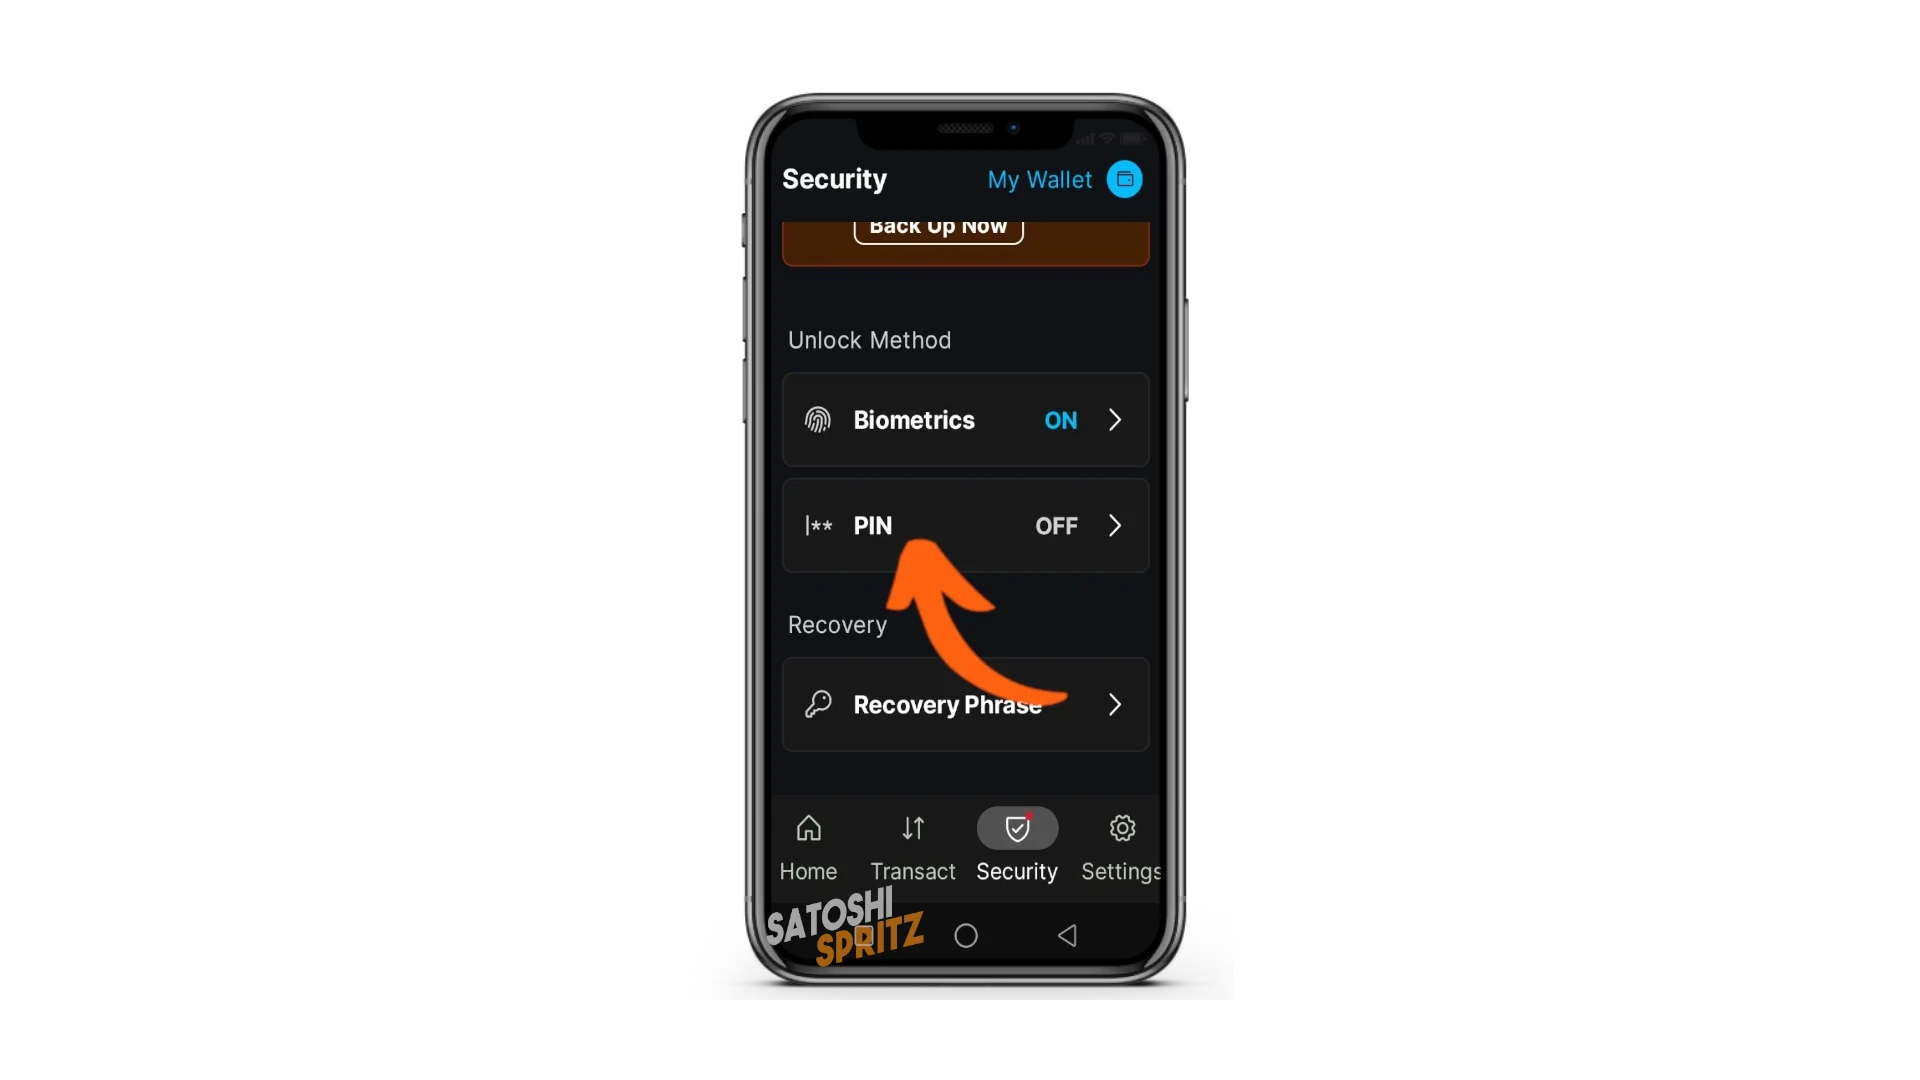
In this menu you can also decide the Logout time, i.e., when the wallet disconnects after a few minutes of inactivity. By default it’s set to 5 minutes and you can vary this time according to your needs, longer or shorter adjusting it based on your manual dexterity.

SETTINGS Menu
Very important menu because it contains all wallet settings. By clicking in this menu you can, for example, rename the wallet: in our example we called it Starter Kit. Renaming wallets, to distinguish them, is very important when using more than one on the same device and you need to understand/choose which one to use.
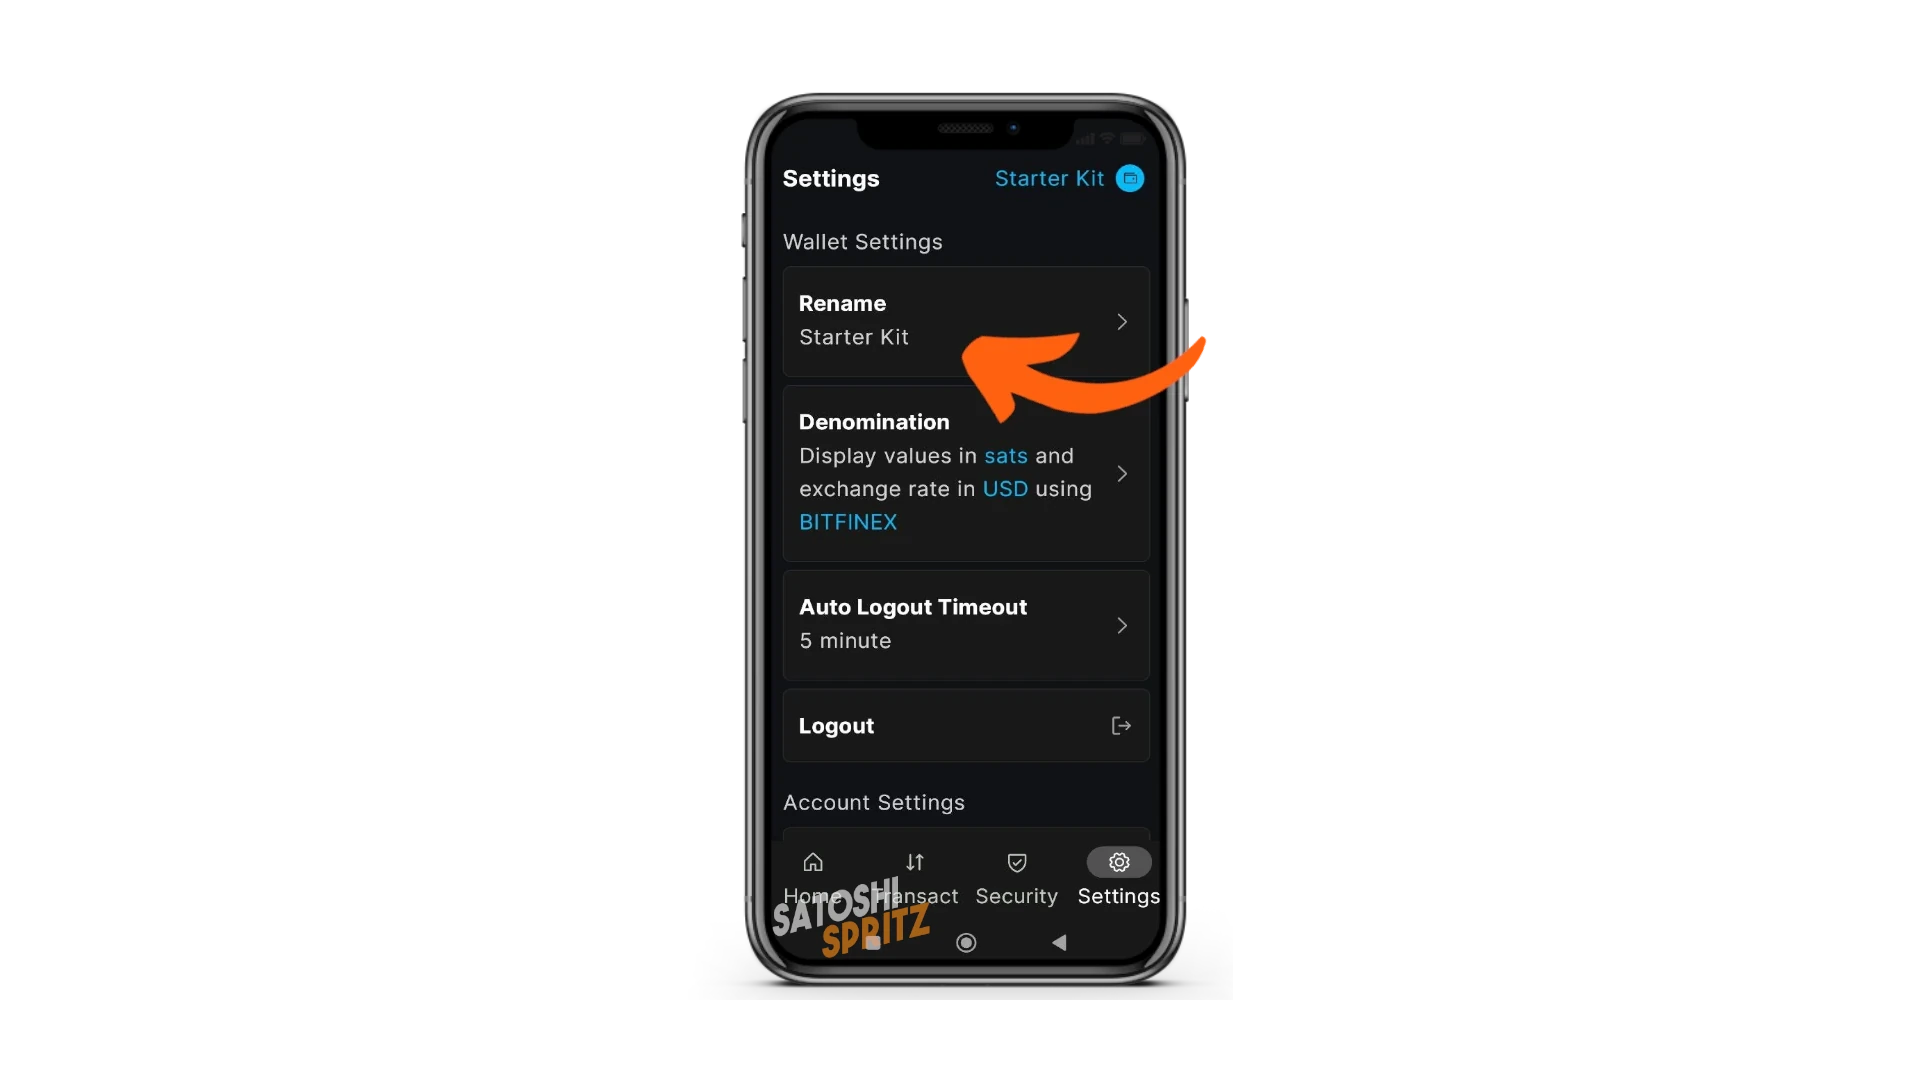
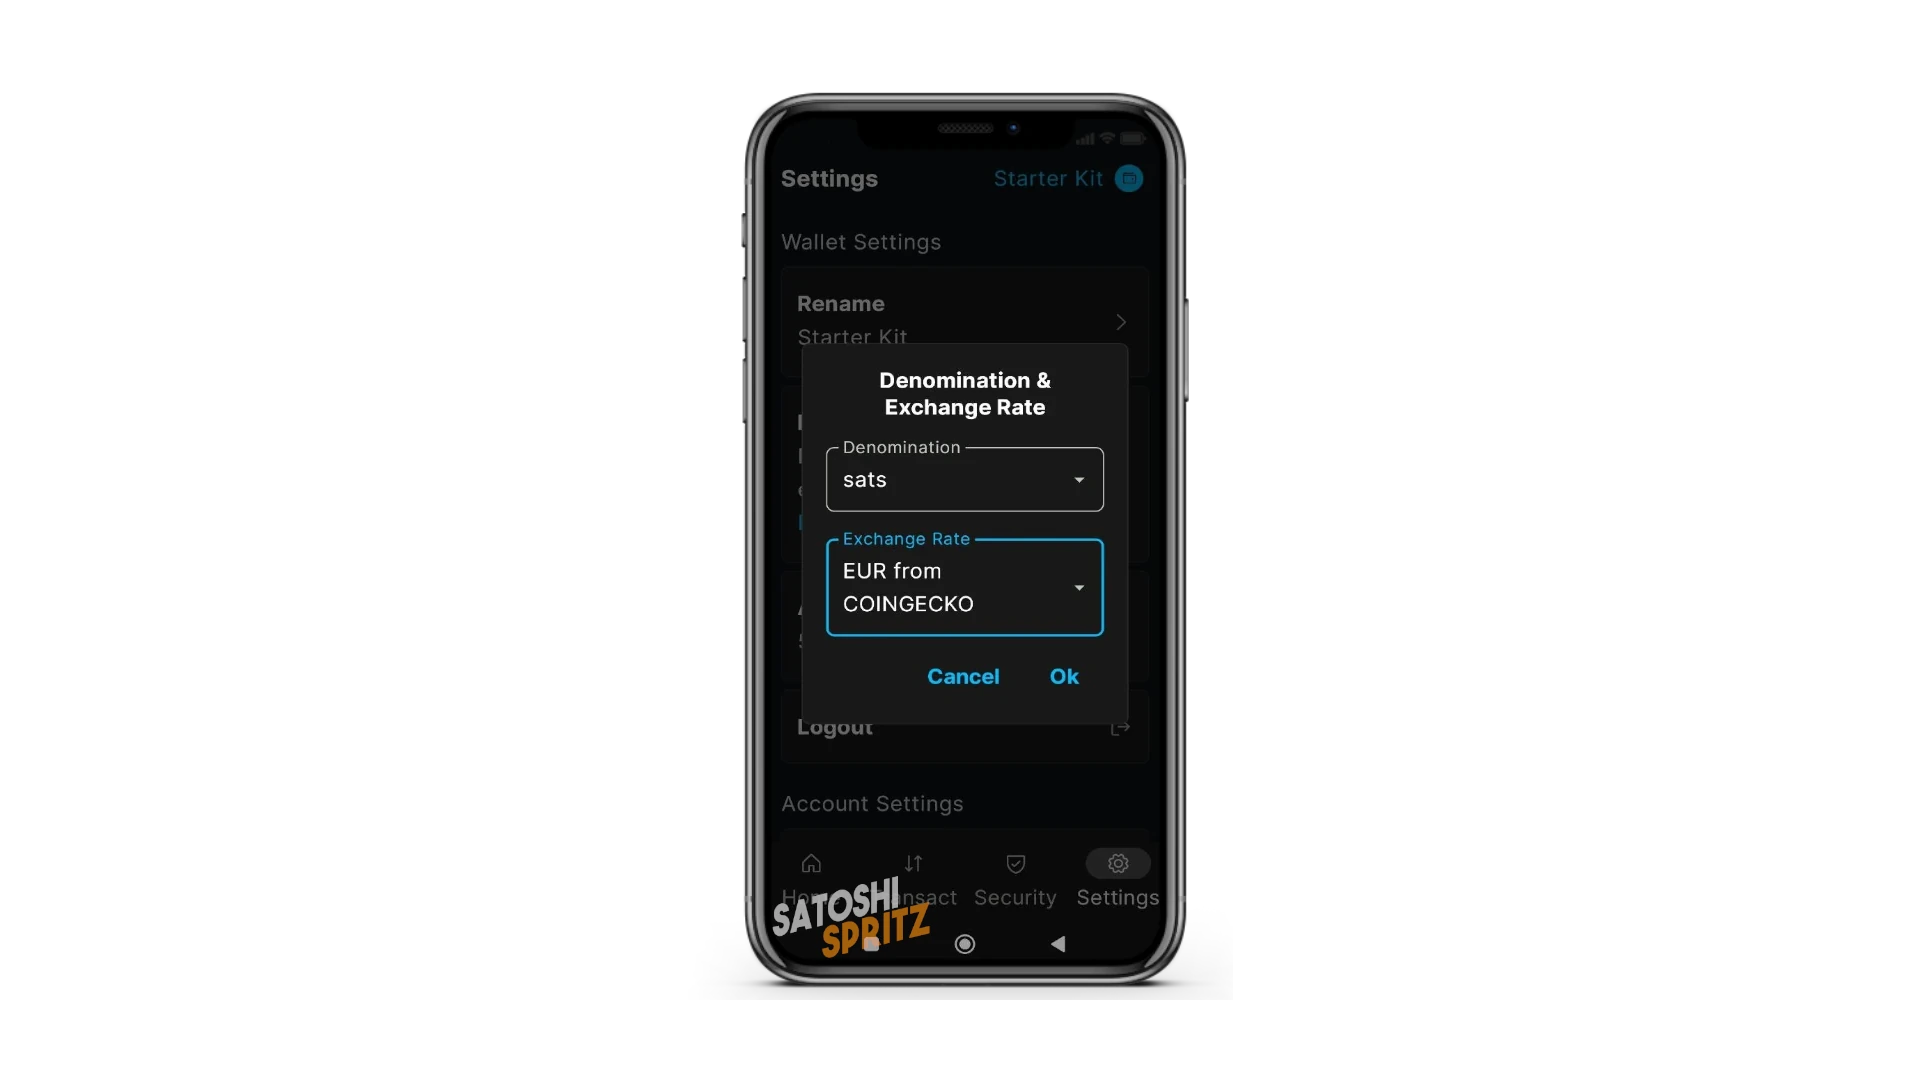
If instead you move to the Denomination sub-menu, you can find very useful settings regarding currency.
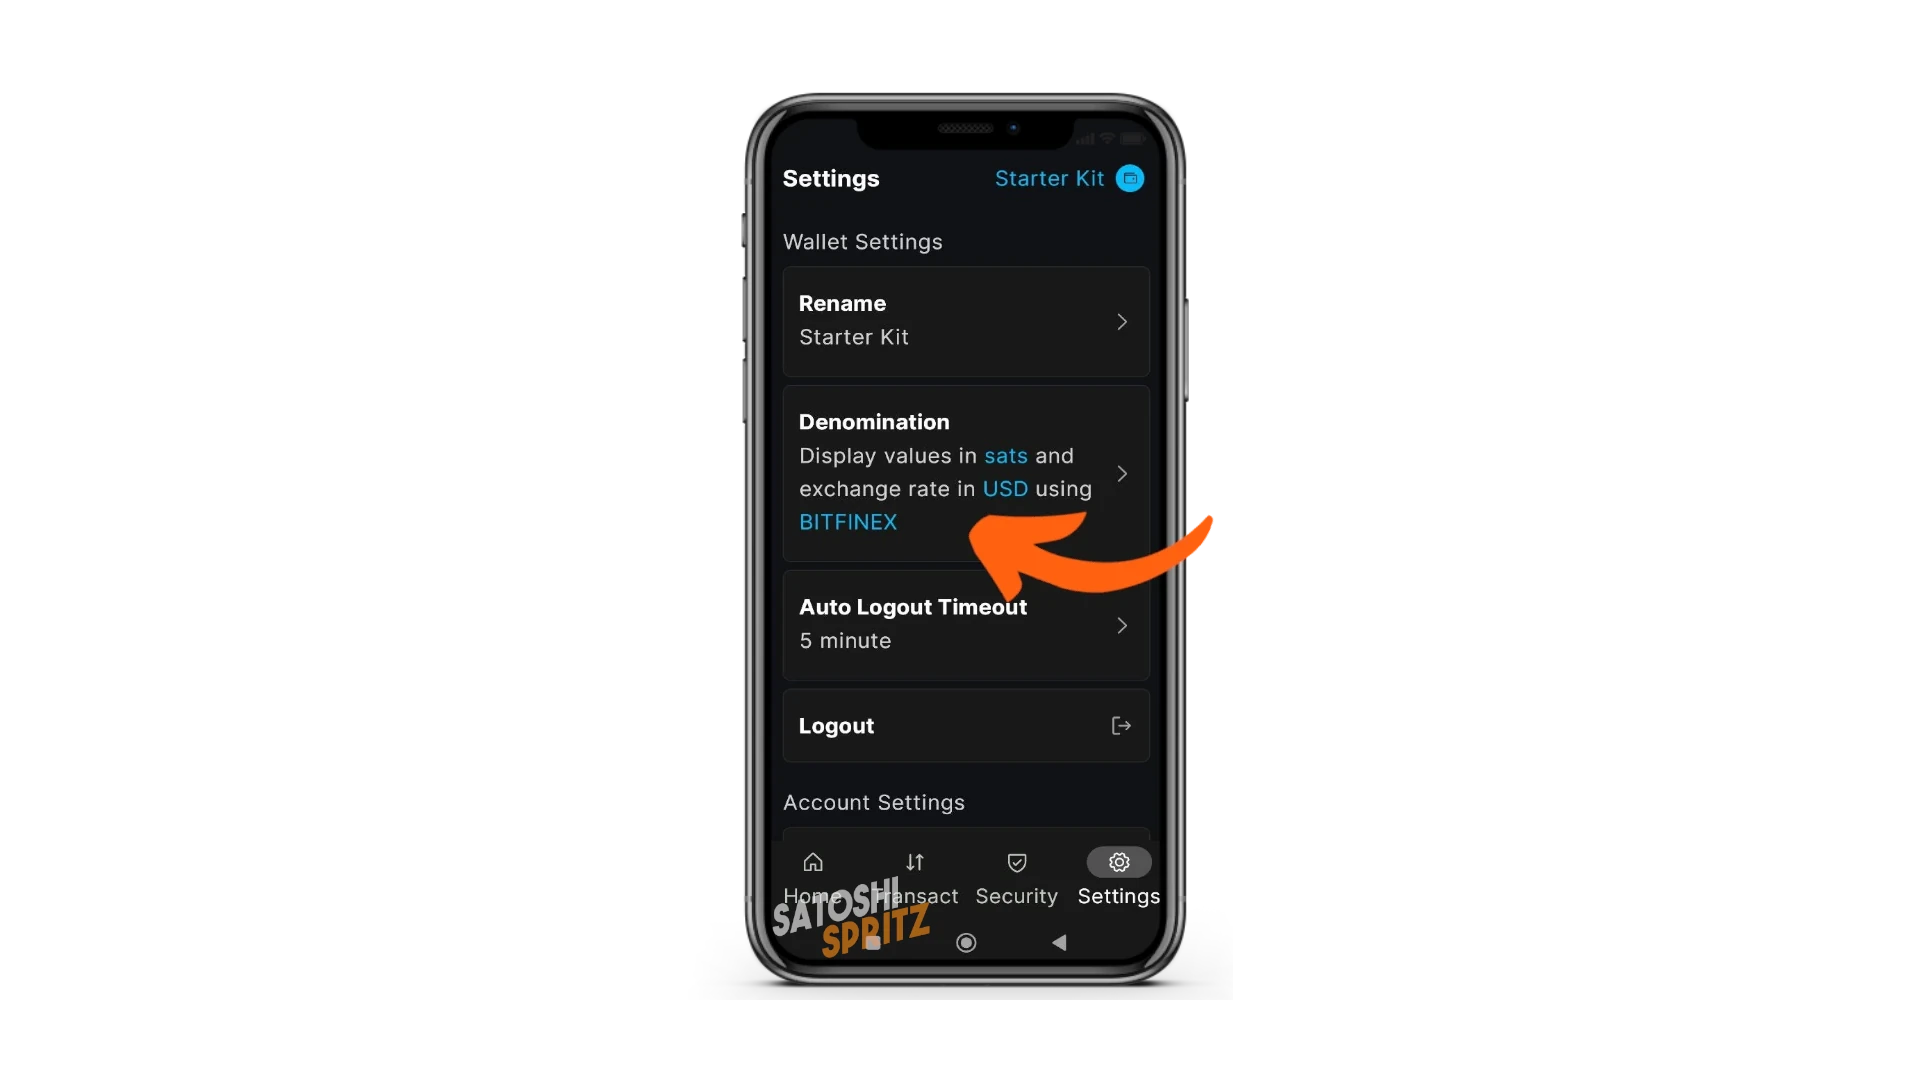
I recommend using satoshi/sats as the unit for Bitcoin amounts. The Satoshi is the smallest unit of BTC, equal to one hundred-millionth of Bitcoin.
In addition, the choice of reference exchange for conversion will appear. Use one that allows you to view and set amounts in EUR.
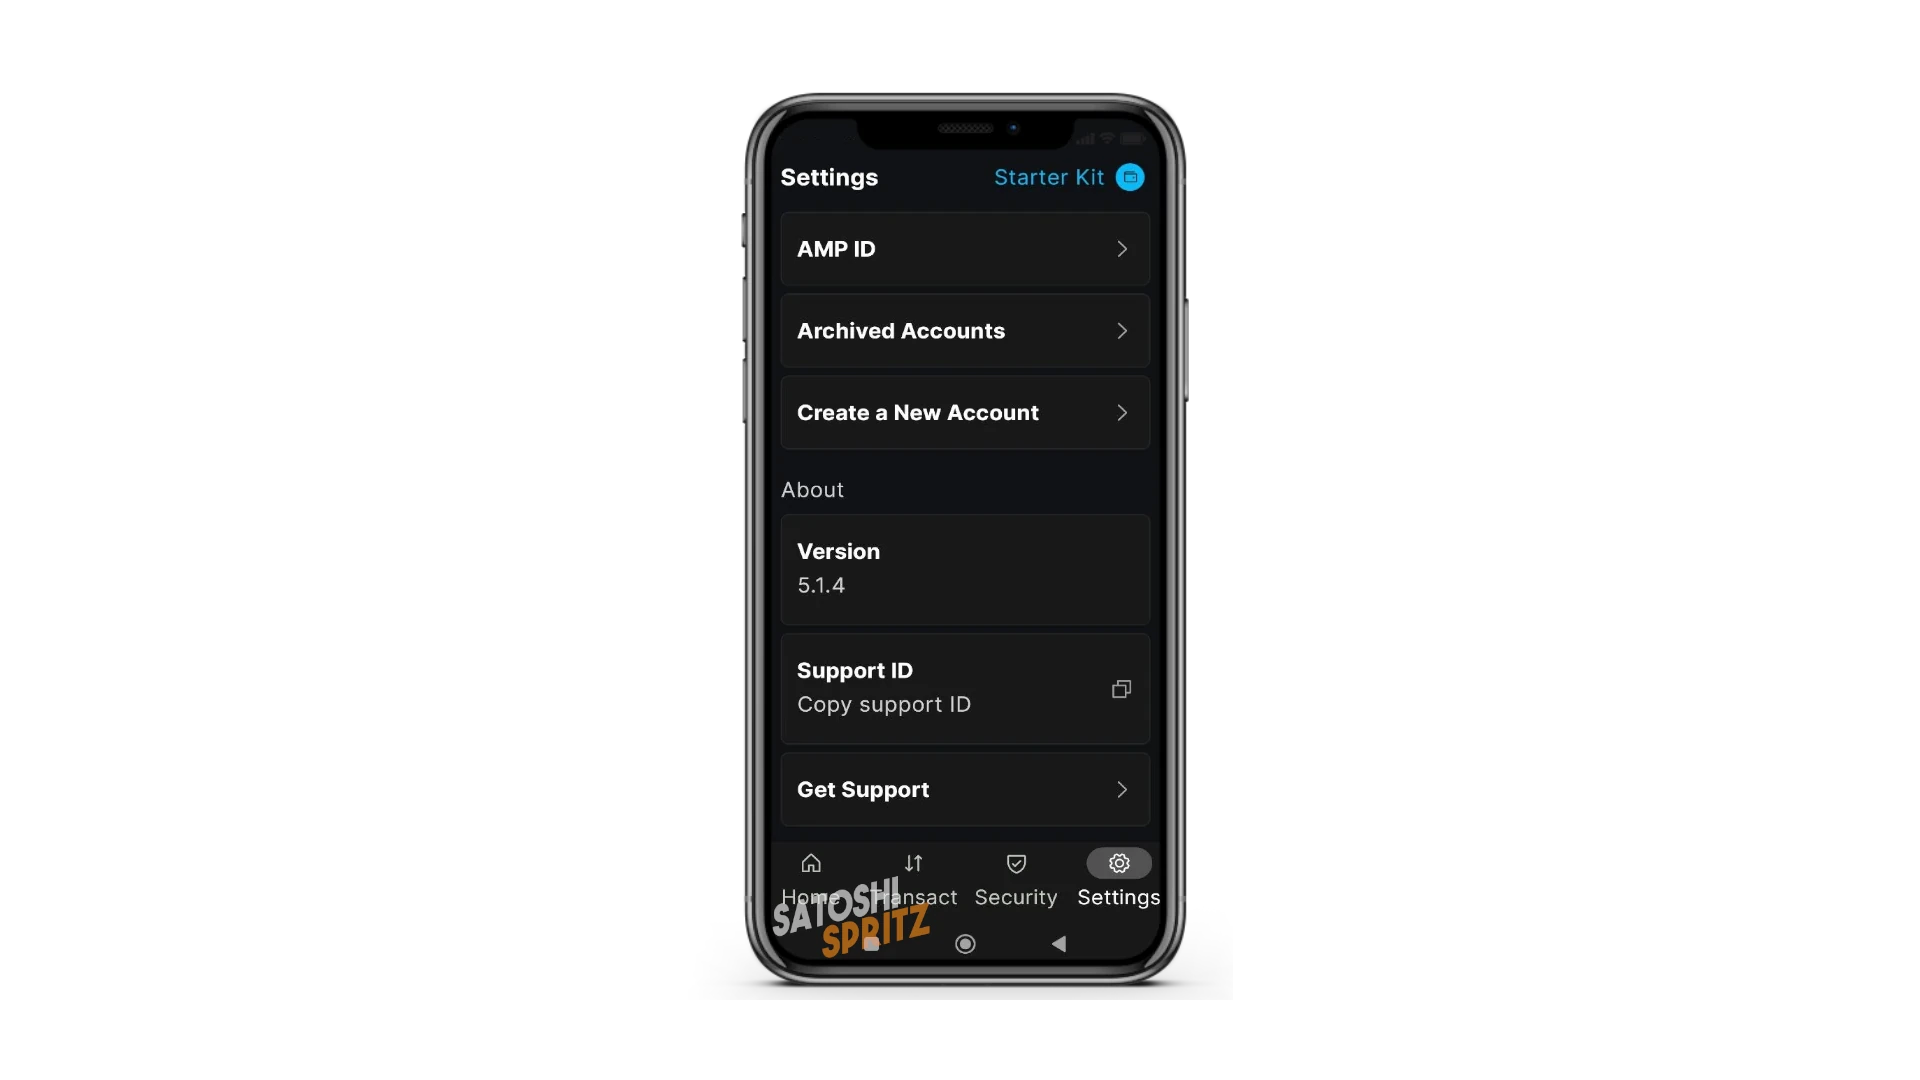
Finally, in the Settings menu you can check the currently used version of Blockstream App and check if it needs updating, as well as commands to request support directly in-app.
HOME Menu
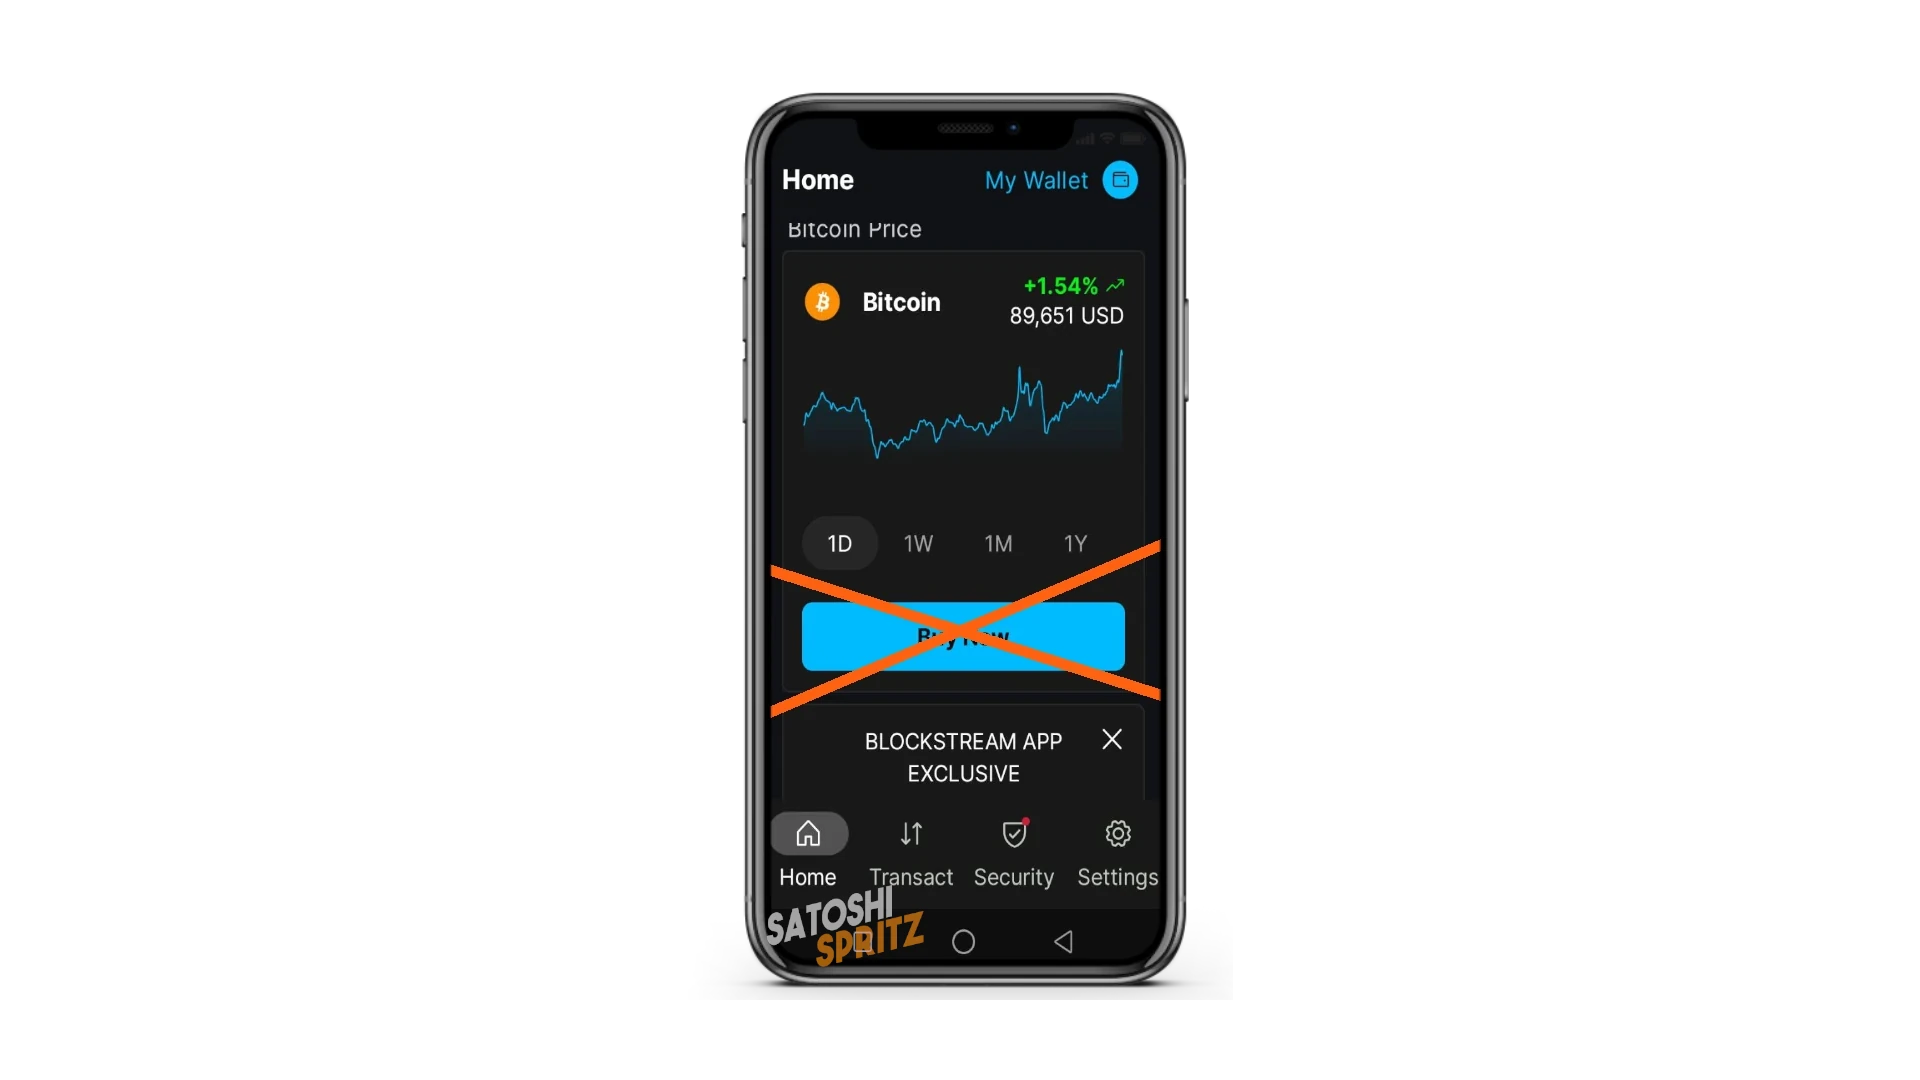
The Home of Blockstream App is the menu where your wallet opens at each new access.
Scrolling down, you’ll find the option to buy Bitcoin through an integrated exchange. Don’t use it.
Wallet Restoration
If during use you realize you need to change phones, or you need to use the Starter Kit wallet on more than one device, with Blockstream App know that you can do it.
To proceed, you just need to learn the wallet restoration procedure, as explained below, which includes the steps to take in case you lose access to the phone where you started using the wallet.
Your funds, in fact, are not “on the device” phone, or “in the wallet”. Funds are on the Bitcoin network, whether Onchain, Lightning or Liquid. The wallet, to be precise: the public and private keys of your wallet, are the tool to access the addresses used and - with them - the associated balance.
It’s for this procedure that you transcribed the 12 words and put them in a safe place… You did it, right? Because without those words, you’ll no longer have access to your funds.
a. New Blockstream App Installation
First, install Blockstream App again with the procedure shown at the beginning. A new release may have arrived in the meantime, proceed with the most updated one.
Launch Blockstream App on the new device and proceed by both clicking Get Started and declining the data collection offer.
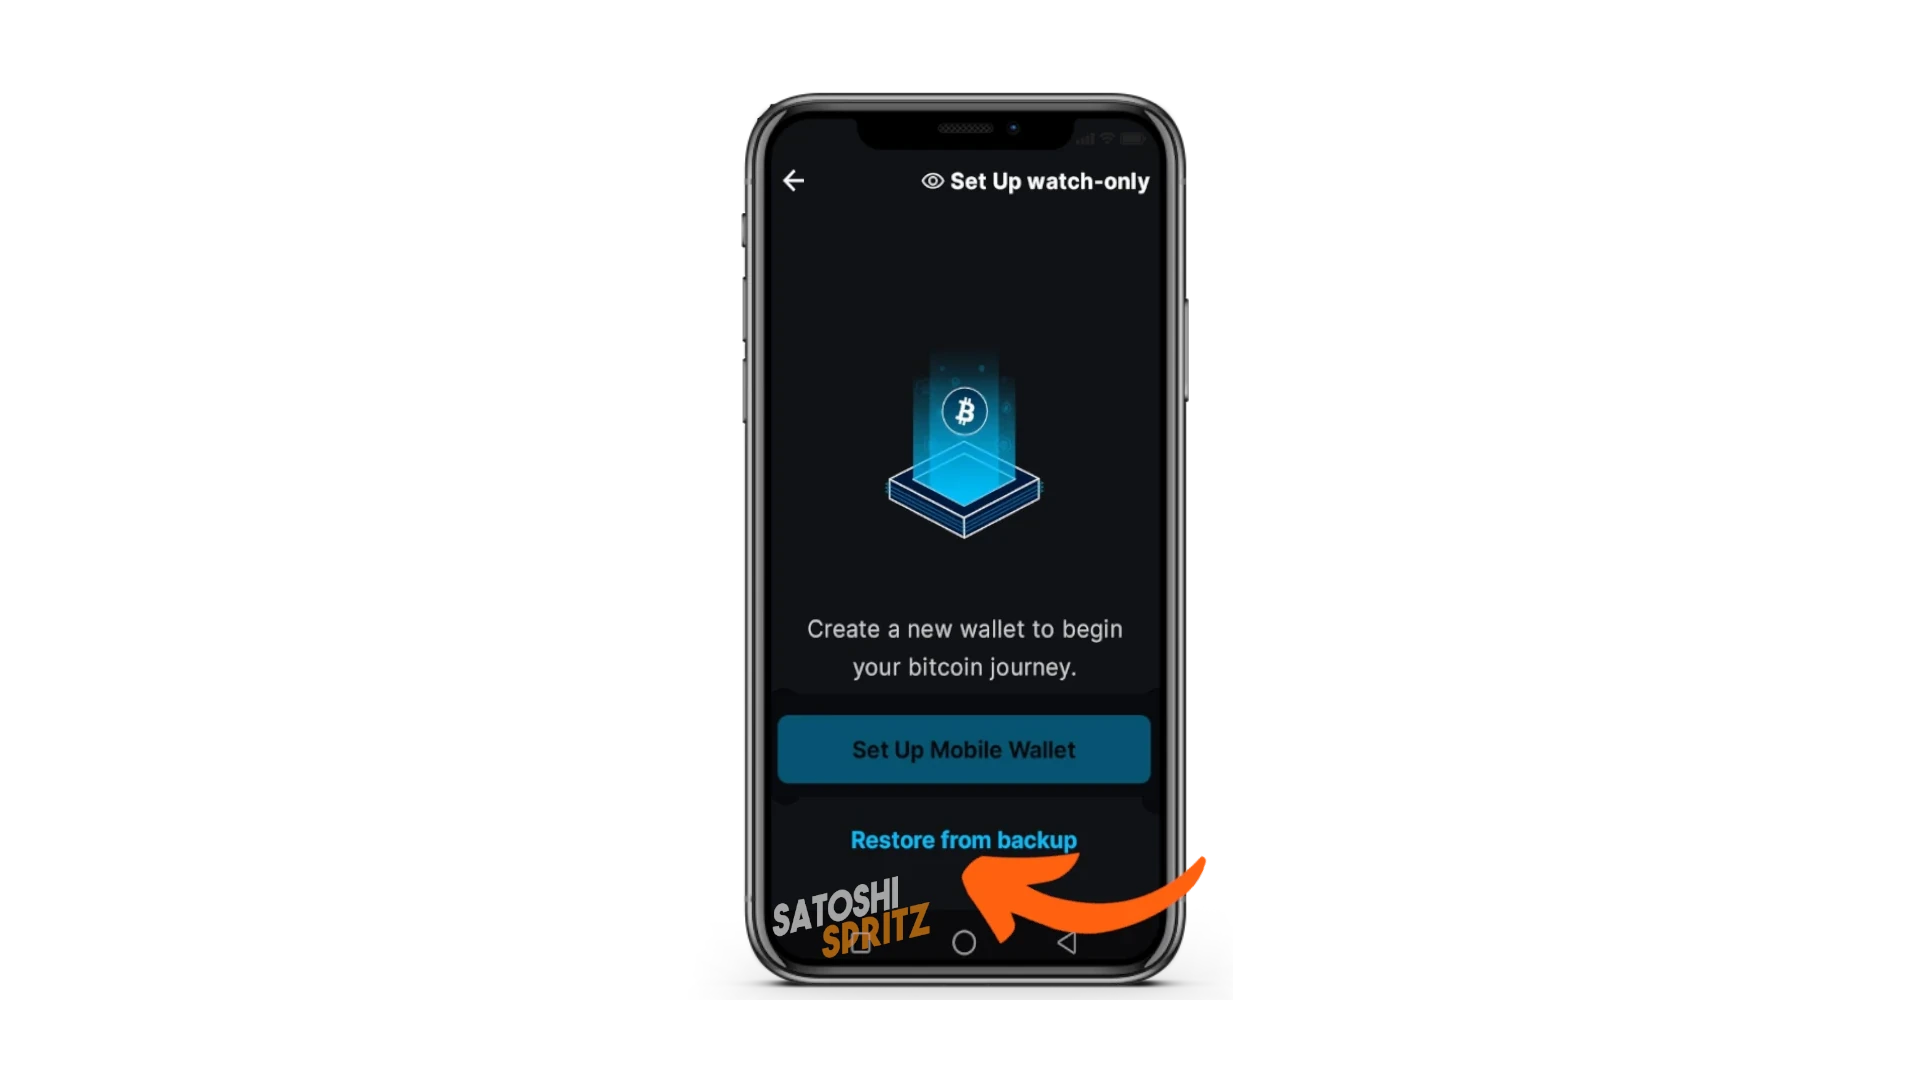
b. Restore from backup
The similarities with the first installation stop here.
When the wallet creation screen arrives, instead of choosing Set Up Mobile Wallet as you did the first time, choose Restore from backup.
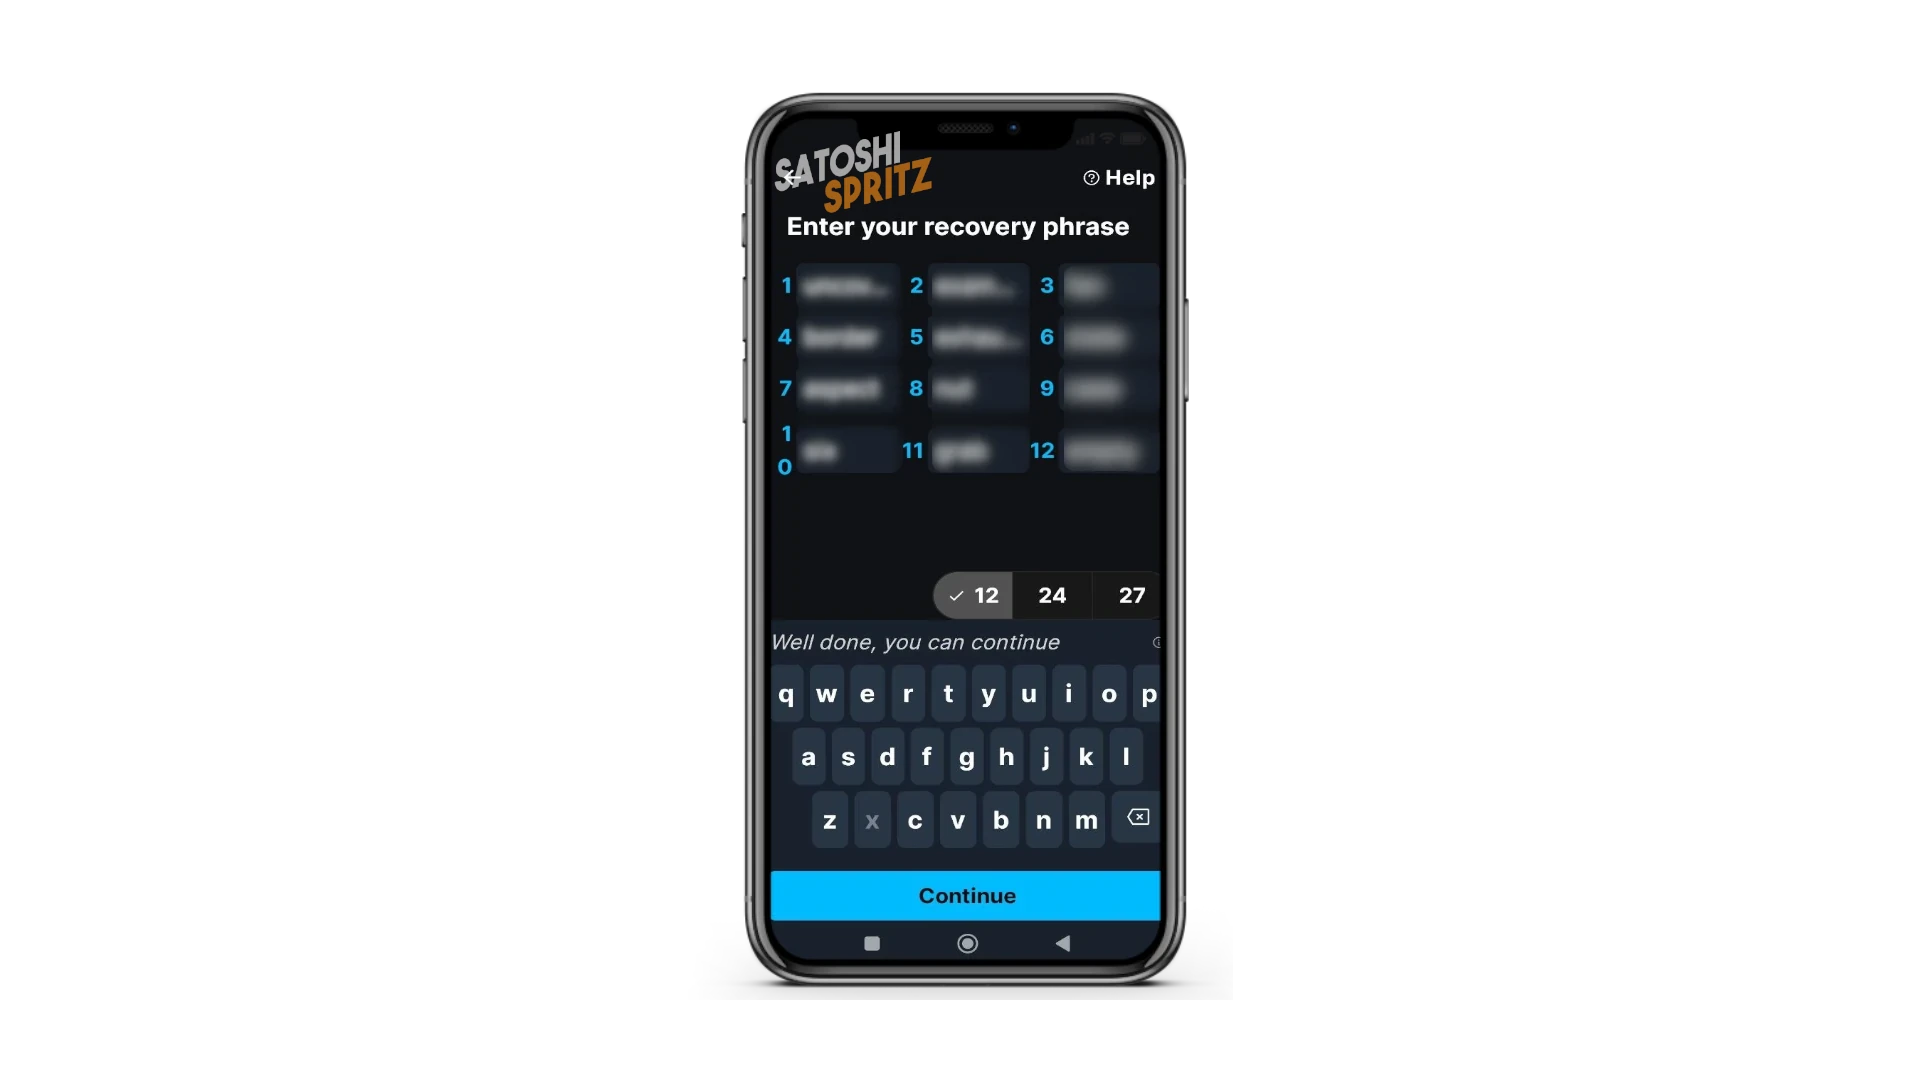
If you’re using Bitcoin’s main network, i.e., the one that uses real funds, in the next screen choose Mainnet.
The screen appears with the boxes where to enter the Recovery phrase words. Rewrite them in order and correctly, then select Continue to recreate the wallet on the new device.
The wallet restoration phase may take a few minutes, wait patiently for it to complete successfully. At the end of the process, you’ll find your wallet again, with the balance and transaction history.
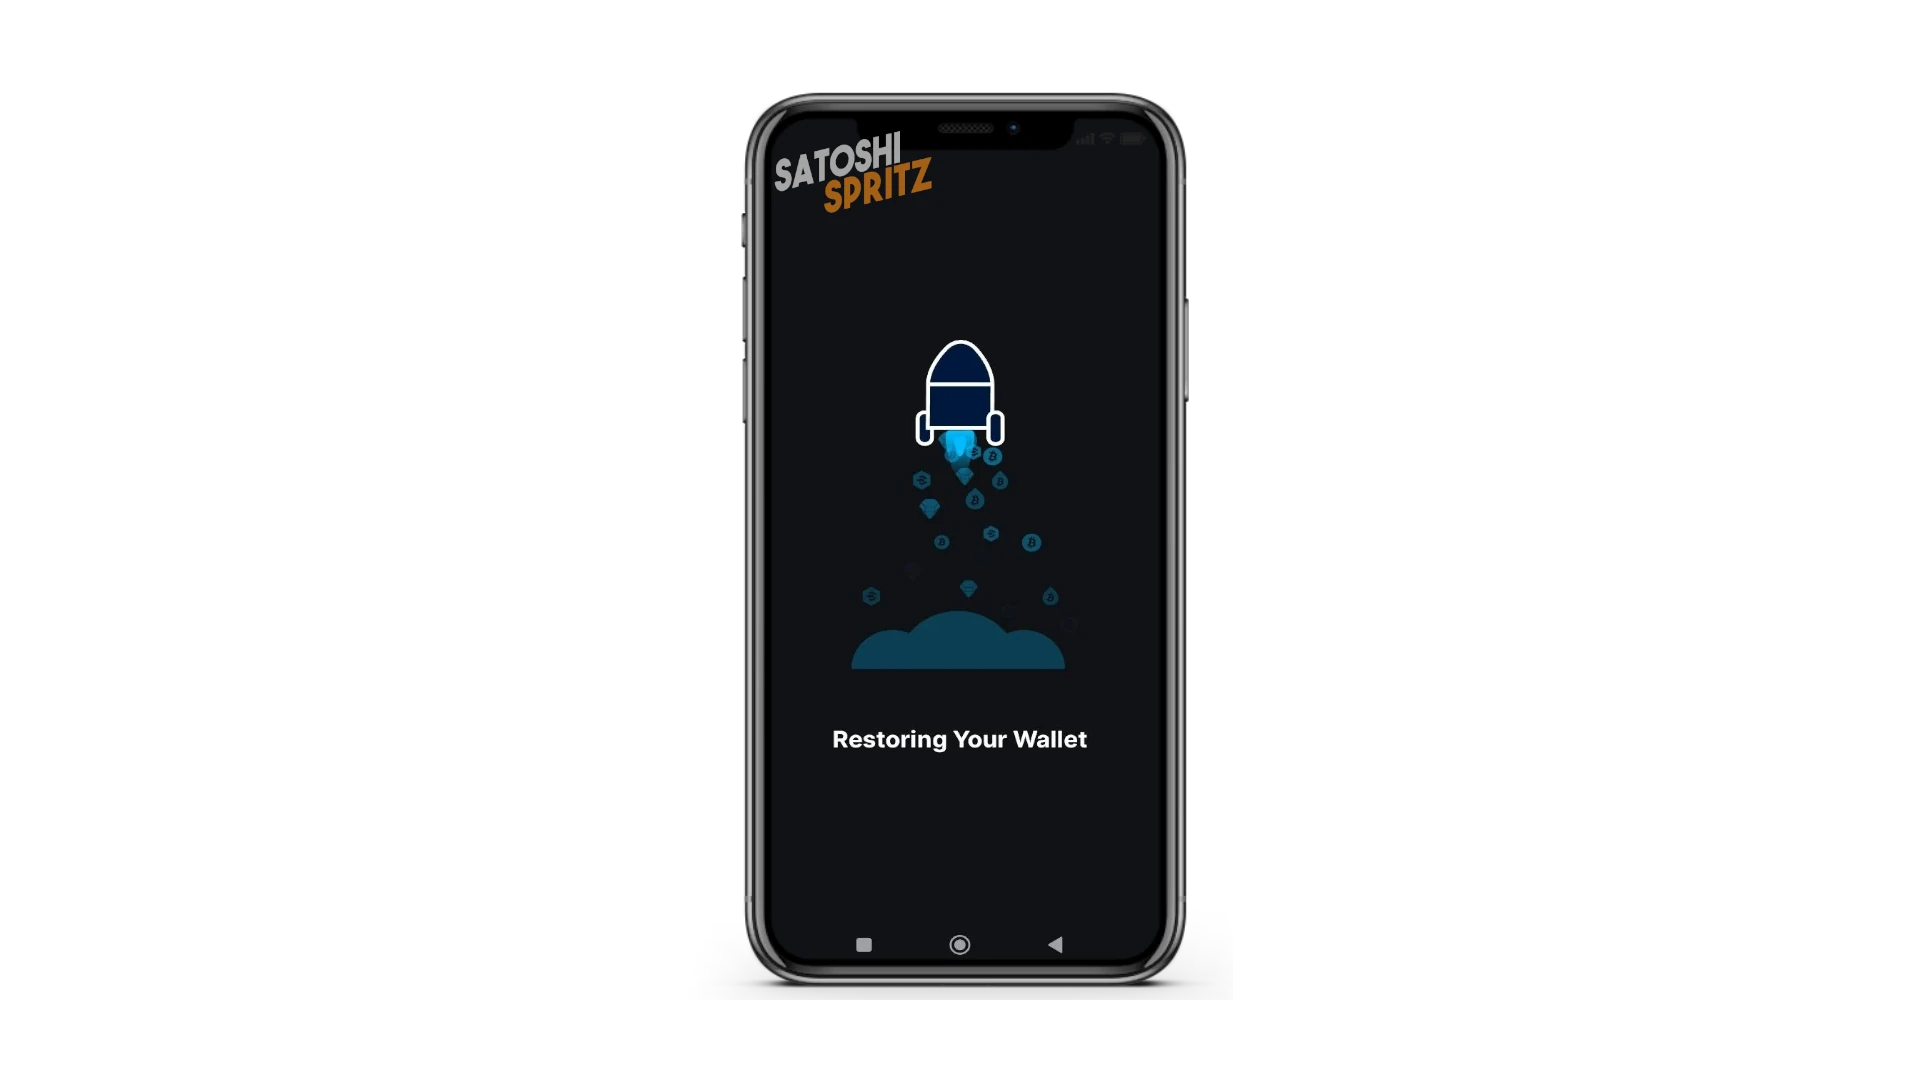
⚠️ The wallet recreated on the new device is 100% active. This means it also has the private keys to spend. Remember this in case you want to leave it to some collaborator for your business.
Rather use the POS link for collaborators, because it was created with only the public key (the descriptor).
How to continue learning?