Officine Bitcoin
Lezioni online Bitcoin-only
This project is maintained by valerio-vaccaro
Officine Bitcoin Bitcoin-only lesson This project is maintained by valerio-vaccaro
🌍 Traduzioni
🇨🇳 中文 🇬🇧 English 🇪🇸 Español 🇵🇹 Português 🇷🇺 Русский 🇫🇷 Français 🇩🇪 Deutsch 🇮🇹 Italiano 🇭🇺 Magyar 🏳️ Milanés 🏳️ Veneto
Understanding Manual Coin Control
Introduction
The robustness of the Bitcoin protocol is guaranteed by simple core concepts. Among these, transparency stands out: all Bitcoin transactions are public and easily verifiable by anyone. While this feature is a cornerstone of the protocol, as it prevents fraud and ensures the genuineness of funds, it can also pose a challenge for confidentiality. Have you ever wondered if so much transparency can affect your privacy?
You should. While accumulating non-KYC satoshis is quite simple, your privacy is most at risk during the spending phase.
What happens when you spend a UTXO
Spending Bitcoin is not simply transferring value to someone else.
By consuming one of your UTXOs, you must satisfy the conditions imposed for protocol transparency, because you must prove ownership of those funds. You must therefore:
- expose your public key;
- produce a digital signature.
The moment of spending is therefore the most critical: spending bitcoin is an act to be done consciously and with as much control as possible.
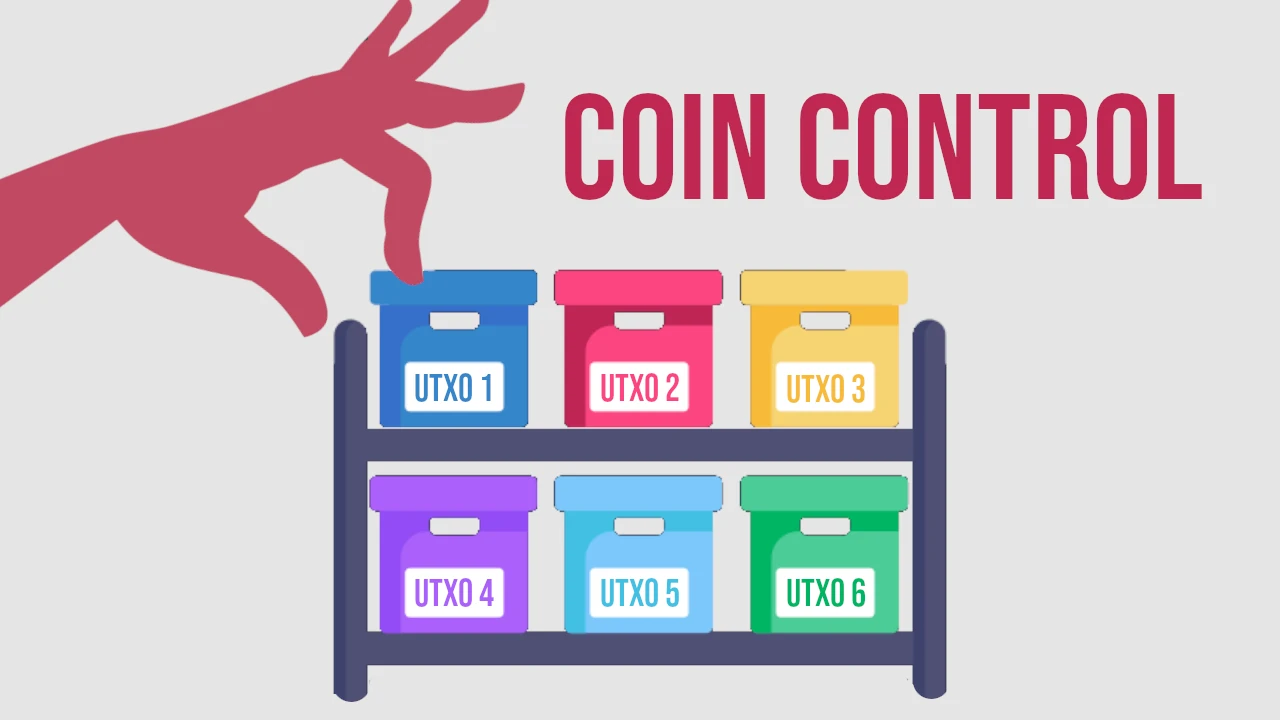
Coin Control
In the Bitcoin protocol, elements like “account” or “monetary unit” do not exist. The concept of UTXO is not the focus of this lesson, but I invite you to ask questions to your trusted Satoshi Spritz or request a lesson here on Officine Bitcoin.
What you need to know is that with Bitcoin, what you accumulate and later spend are small or large accounting units measured in satoshis, represented by unspent transaction outputs, the UTXOs, also called coins.
When you use UTXOs to create a transaction, they are completely destroyed and new UTXOs are created in their place.
Software wallets are developed to make this choice automatically, using coins selected “randomly” with the sole criterion of covering the required spending amount.
Coin Control, also called Coin Selection, is a feature of some software wallets that allows you to manually select the UTXOs to spend when building your transaction.
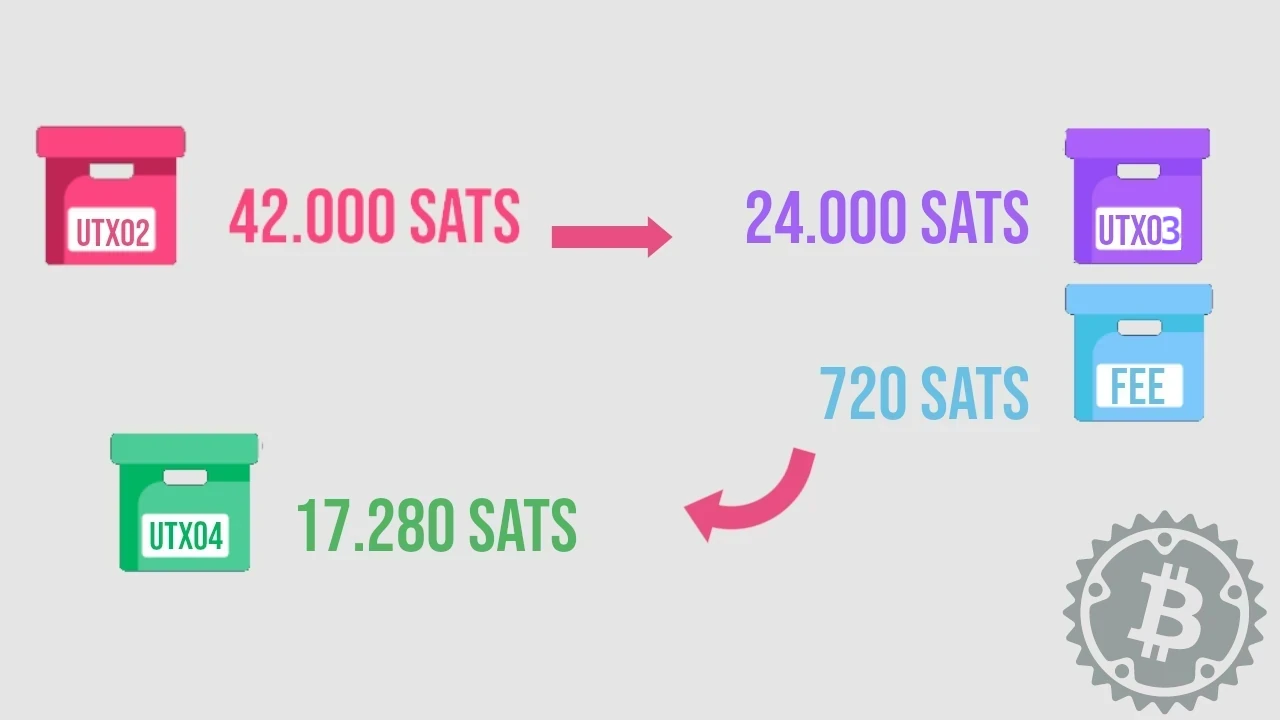
Suppose you have a wallet with 3 UTXOs, respectively 21,000, 42,000, and 63,000 satoshis.
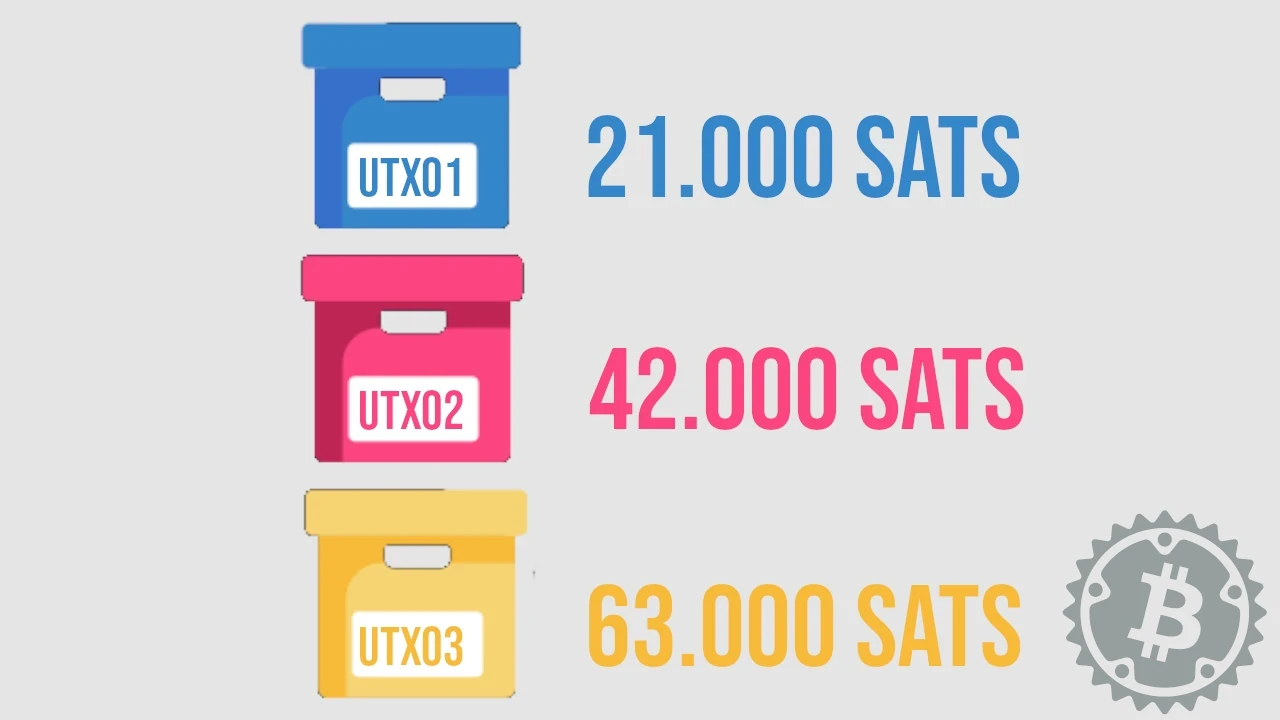
If you need to spend 24,000 sats and let the software select automatically, a good wallet might choose to combine UTXO1 + UTXO2 to pay the 24k sats and miner fees, creating a change that returns to an internal address of the originating wallet.
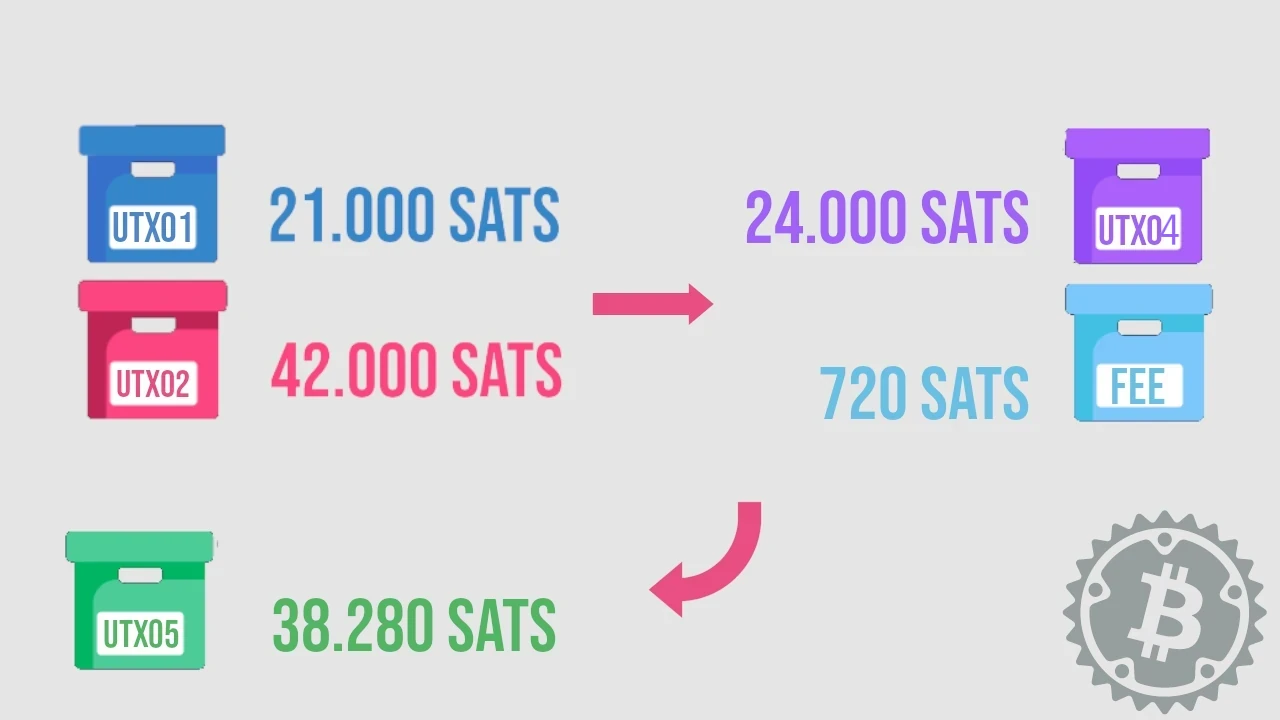
After the transaction, the new situation in the wallet, counting only the UTXOs, can be summarized as follows.
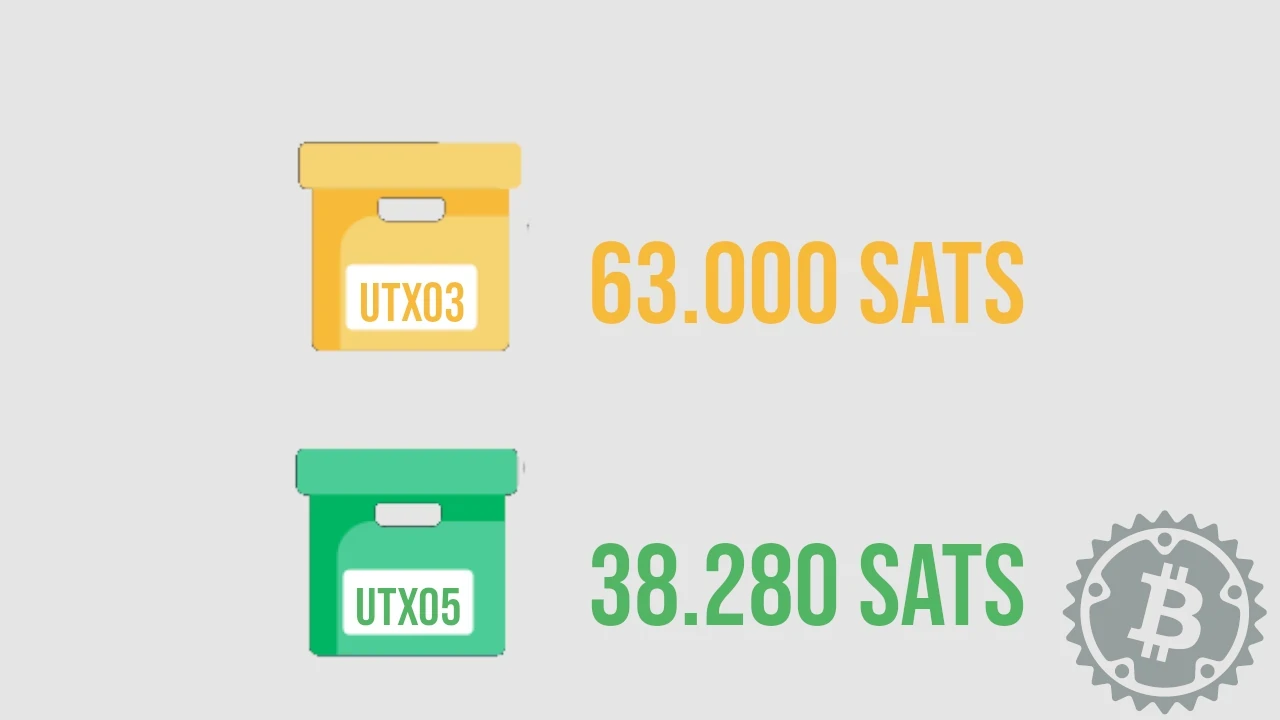
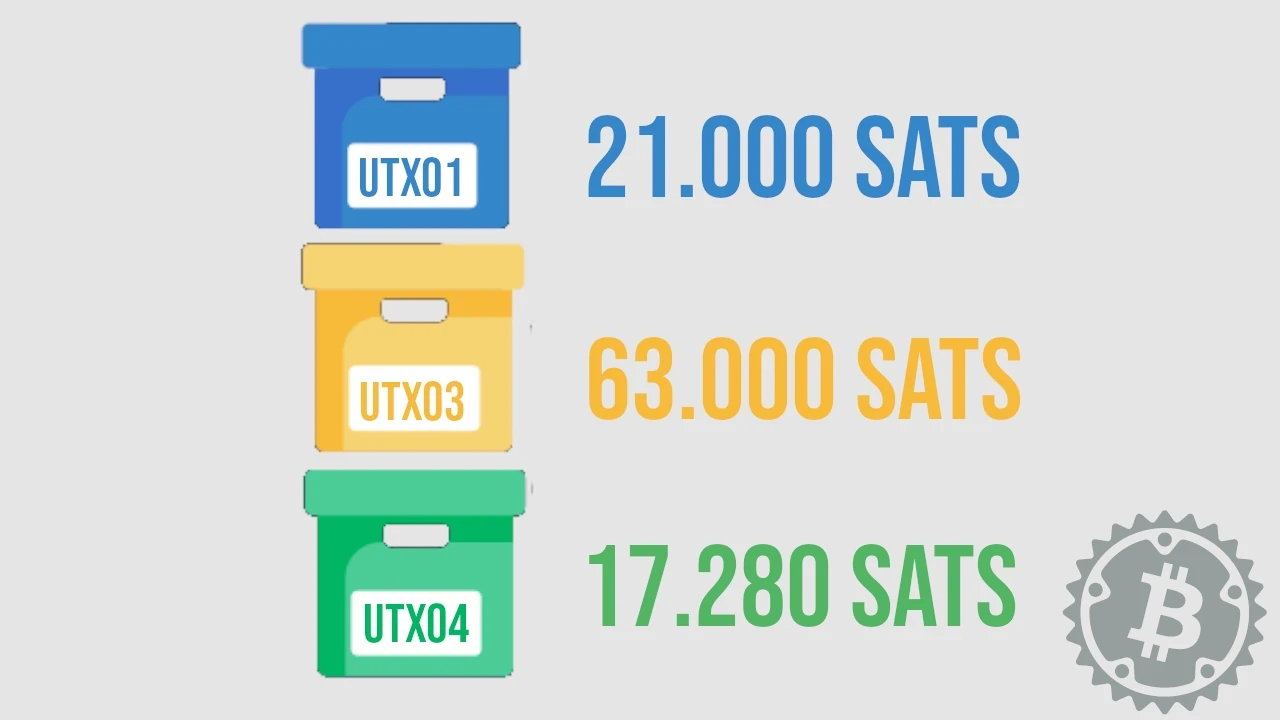
With the right software and your awareness, however, you could have made a different and more correct choice. For example, by selecting only UTXO2 (42,000 sats).
With a final UTXO situation in your wallet that looks different.
Why manually select UTXOs?
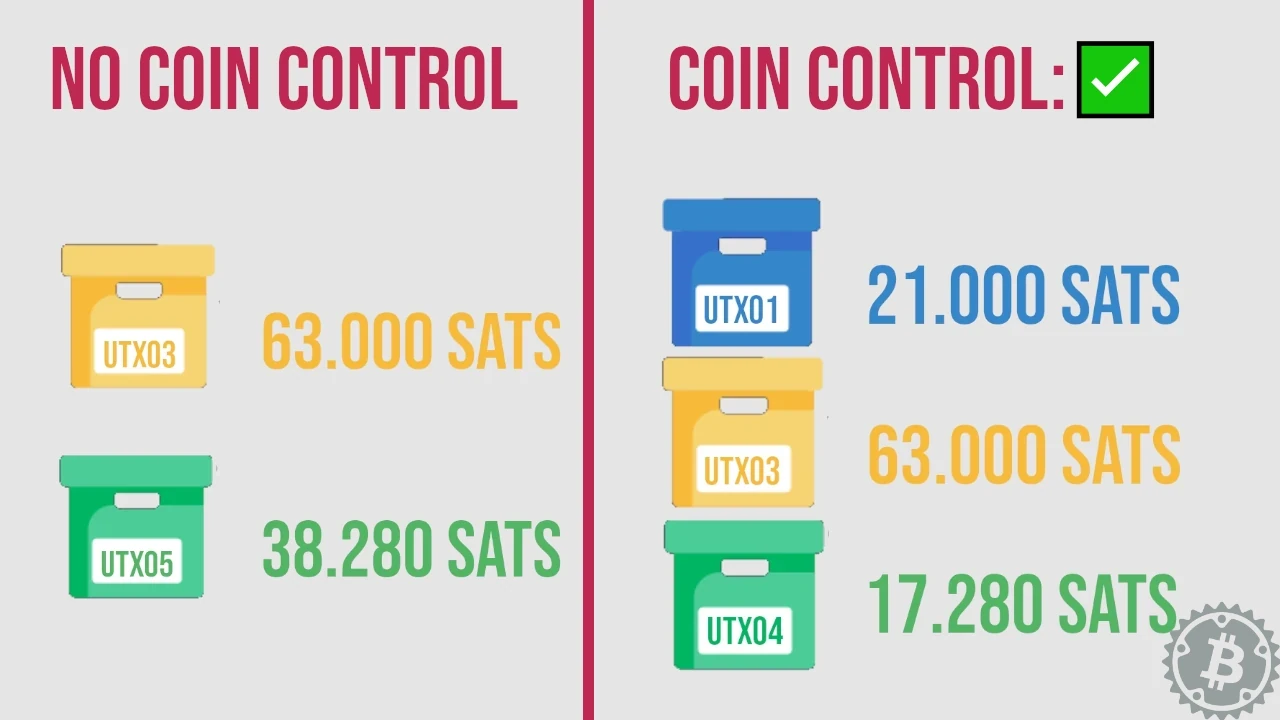
In our example, the balance is actually the same: 108,280 sats. After spending 24,000 sats, without coin control we would have 2 UTXOs in the wallet; with manual coin control we have 3 in total.
Why do all this?
There are, or could be, several reasons why we didn’t use UTXO1 and they are all at the root of why - when spending - activating manual coin control is a good practice to follow.
Privacy
The main advantage, when talking about manual coin selection, is greater privacy for the spender.
Let’s take our example again: spending 24,000 satoshis without coin control. Since the Bitcoin blockchain is a public ledger, an external observer can state, without a doubt, that the inputs UTXO1 of 21,000 sats and UTXO2 of 42,000 sats, as well as the change, UTXO5 of 38,280 sats all belong to the same user.
By manually selecting UTXO2, instead, UTXO1 remains completely private, sitting in the UTXO set waiting to be spent at a more appropriate time.
UTXO1 could come from a KYC source, for example a payment received for goods and services, while the other UTXOs do not.
If it were your wallet, would you want an external observer to be able to trace your identity with such certainty? Wallets that implement manual UTXO selection allow, for example, the segregation of one or more UTXOs, a function to use when such situations arise.
Although I believe KYC funds should be kept in a separate wallet from non-KYC bitcoin, if this is your case, segregating some of your addresses is a fundamental help, which you could get by learning to manually select your spending inputs.
Fee savings
Selecting the correct UTXO for a spend allows you to optimize fees. Again, in our example, the software wallet selected two UTXOs to cover the spend. Two UTXOs mean two signatures to show the network, so a higher transaction weight in terms of vBytes.
Using manual coin control, you can select just one that is enough to cover the amount, saving fees because the transaction “weight” decreases.
When fees are high, but you are forced to spend bitcoin on-chain (e.g. to open a Lightning Network channel), coin control becomes the right economic incentive to use.
Change aggregation
When making a payment and using Bitcoin on-chain, the possibility of receiving change almost always becomes a certainty. Each change is itself a small loss of privacy, as it reveals to the network one of your addresses that can be associated with your original input.
Considering that the best HD wallets generate special addresses for change, you can easily recognize them and “segregate” all the change from various transactions; when these reach a certain amount you can manually select and consolidate them, or swap them on the Lightning Network (my favorite method) to regain the privacy lost during spending.
Spending from a cold wallet
A cold wallet is a tool with which you can reasonably achieve a good degree of security, to store any amount of funds to keep aside for a long time. However, unforeseen events may occur, requiring you to access your savings and cover unexpected expenses.
My advice is never to spend directly from the cold wallet, to avoid receiving change among the same wallet’s addresses. Learn to manually select the UTXOs needed to cover the expense, transfer them to a hot wallet, and prepare your transaction from there. Any change, then, you can send back to a cold wallet address (if the amount is appropriate), or use it for other purposes.
Practical demonstration
After this long introduction, let’s see how to put coin control into practice with various desktop and mobile software. We will always use the same HD wallet, imported into each of the chosen tools, to show you the small differences between them.
Desktop Wallets
Sparrow
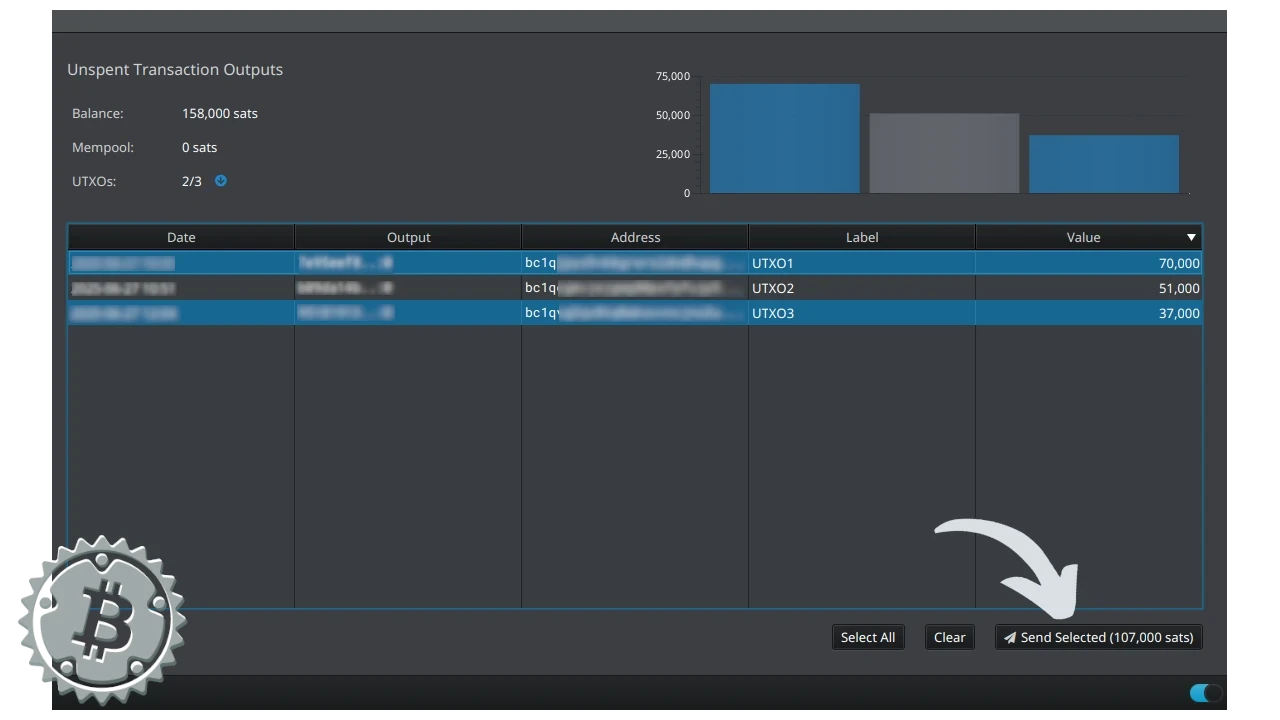
If you use Sparrow, open your wallet and select UTXOs from the left menu. You will see the list of all UTXOs associated with your wallet.
Simply click on one and then choose Send Selected. Sparrow also shows you the total selected for spending, next to the command.
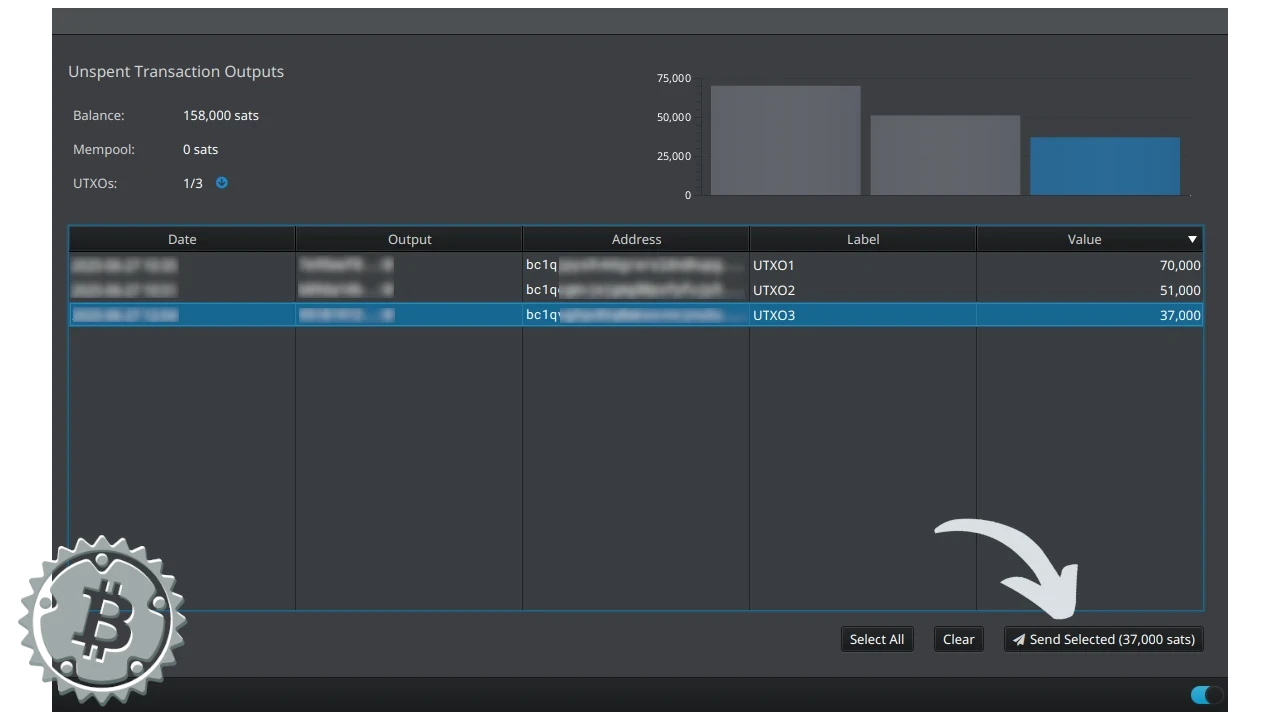
You can also select more than one. Use the CTRL key to select non-adjacent UTXOs in the list.
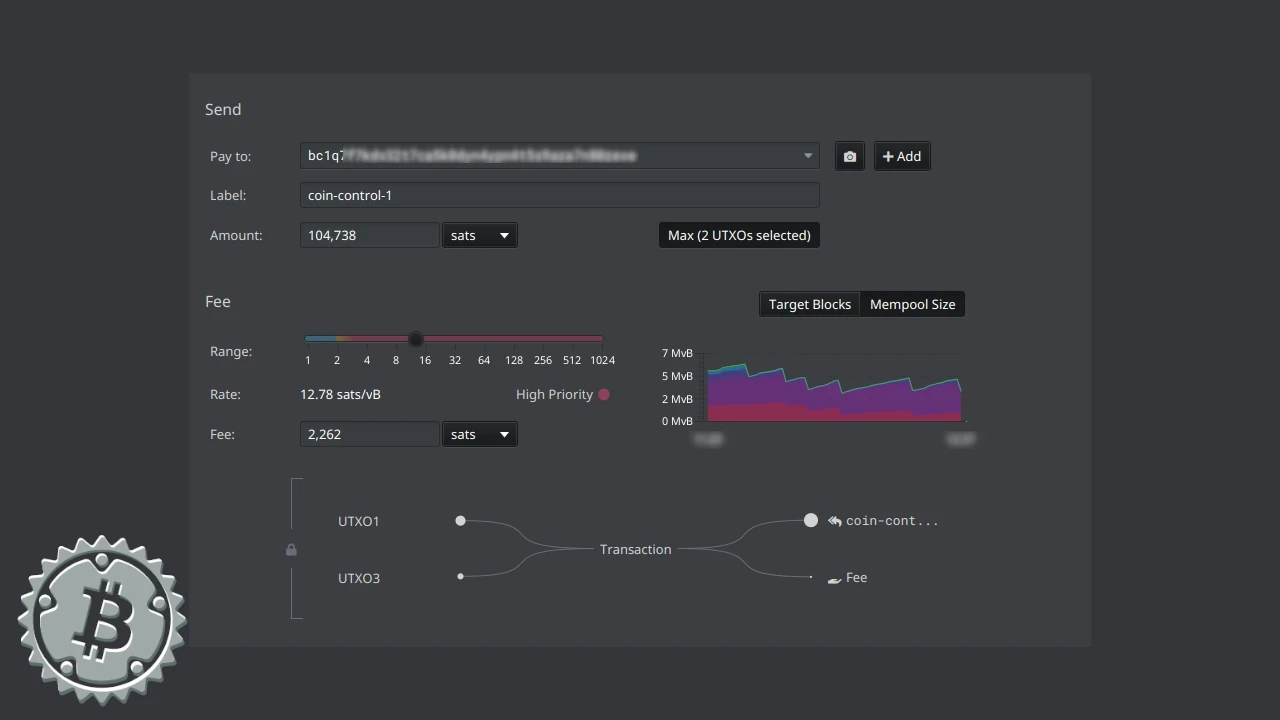
After manually selecting the UTXOs, Sparrow will clearly show you, graphically, how your transaction is built, which you can finalize and complete.
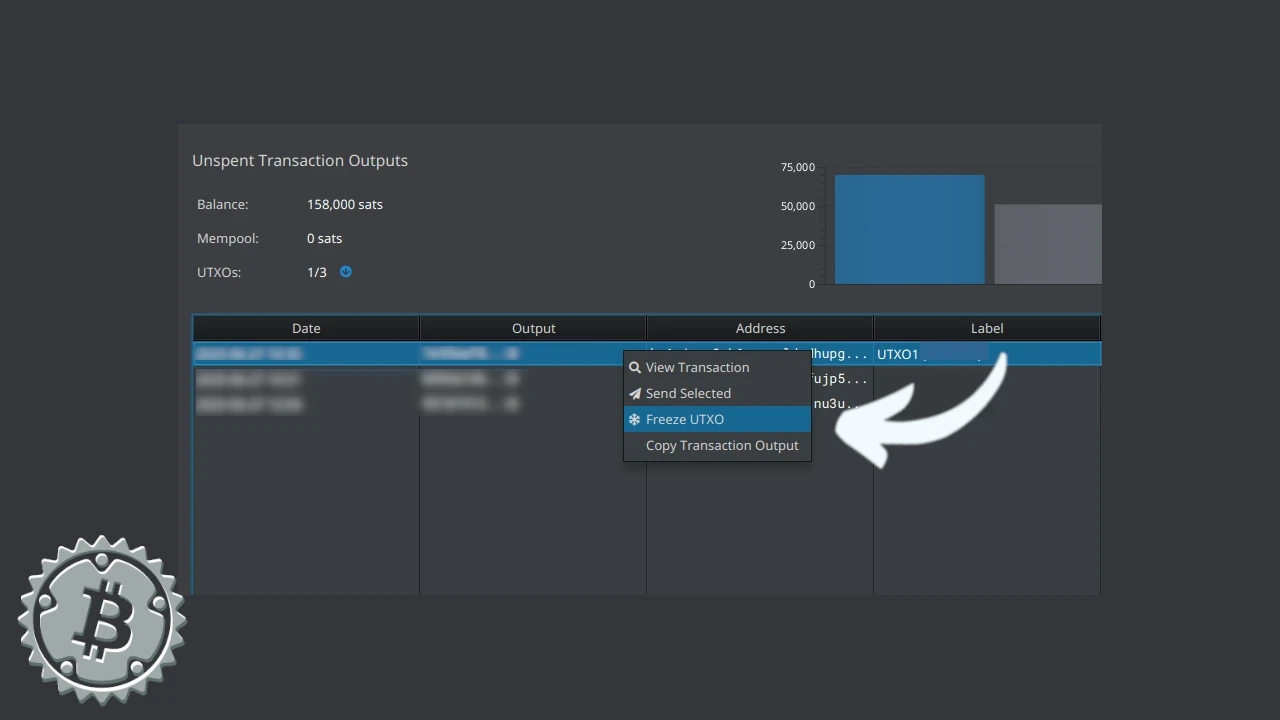
UTXO Segregation
Segregating funds means “locking” them within the wallet so they cannot be used as transaction inputs.
Sparrow allows this feature, accessible from the UTXOs menu. Hover over the UTXO to “lock” and right-click. Among the options, you will find Freeze. This is how you can segregate a UTXO with Sparrow Wallet.
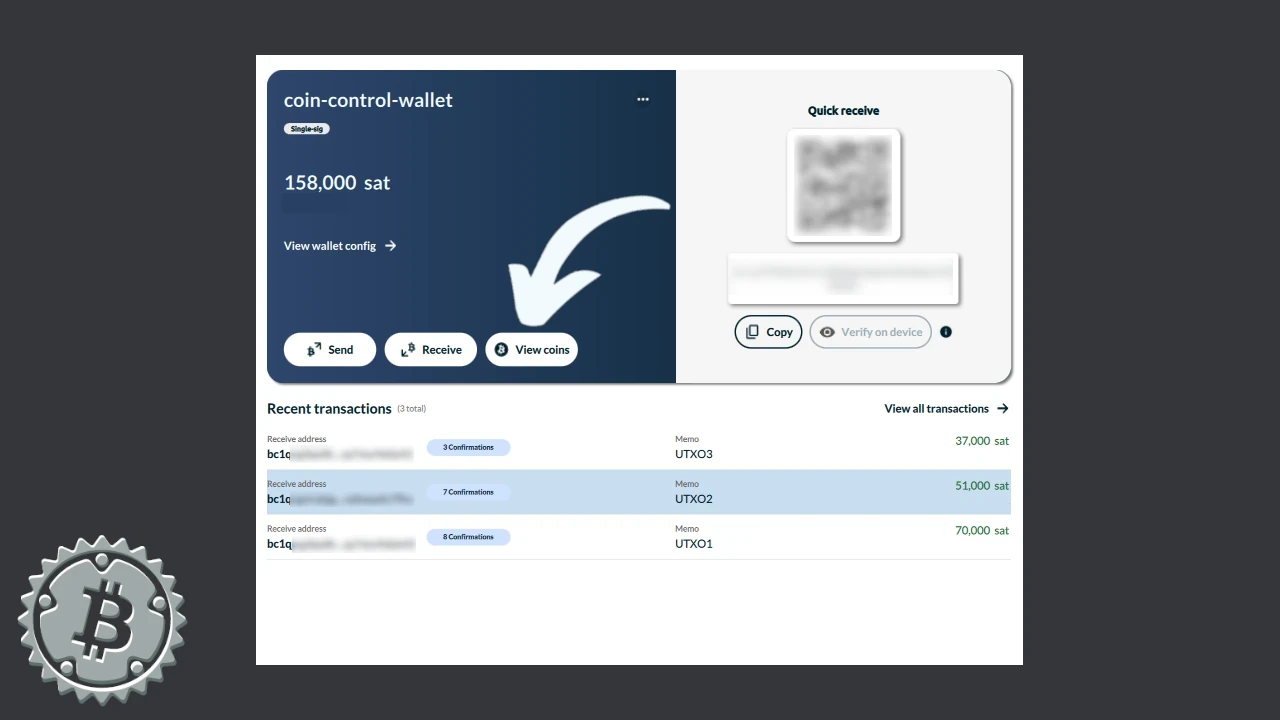
Electrum
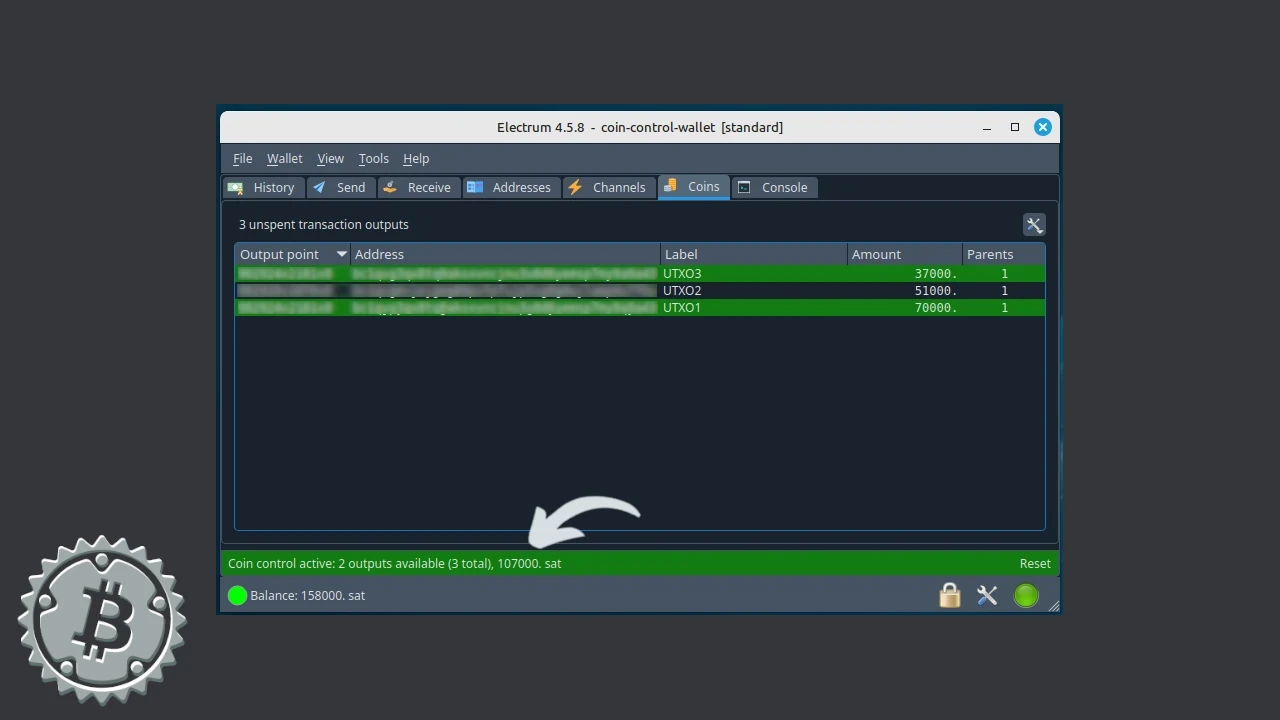
If your desktop wallet is Electrum, you can manually select UTXOs from both the Addresses and Coins menus. In both menus, selection is done by pointing the mouse at the UTXO and choosing Add to coin control after right-clicking.
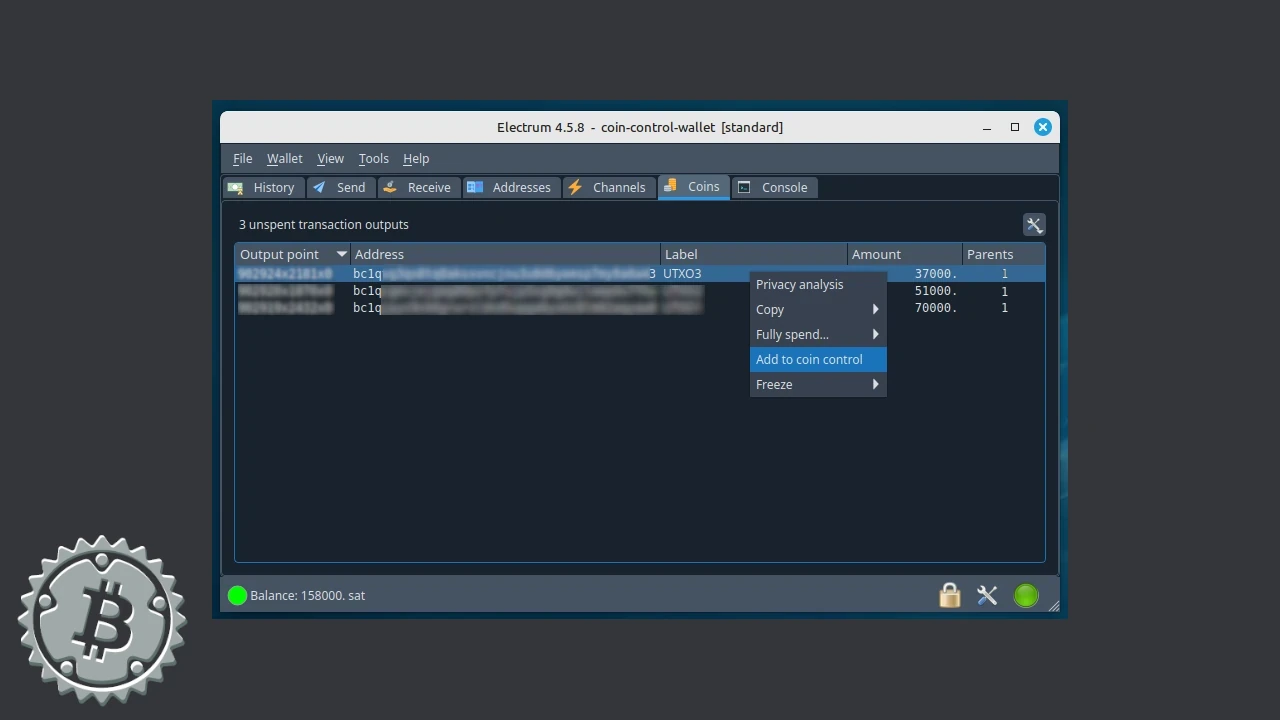
You can also select more than one UTXO, using the CTRL key if they are not adjacent.

Electrum will graphically highlight selected UTXOs in green, and at the bottom, a bar highlighted in the same color shows the available balance after coin control.
Once the output(s) are selected, you can build your transaction as usual from the Send menu.
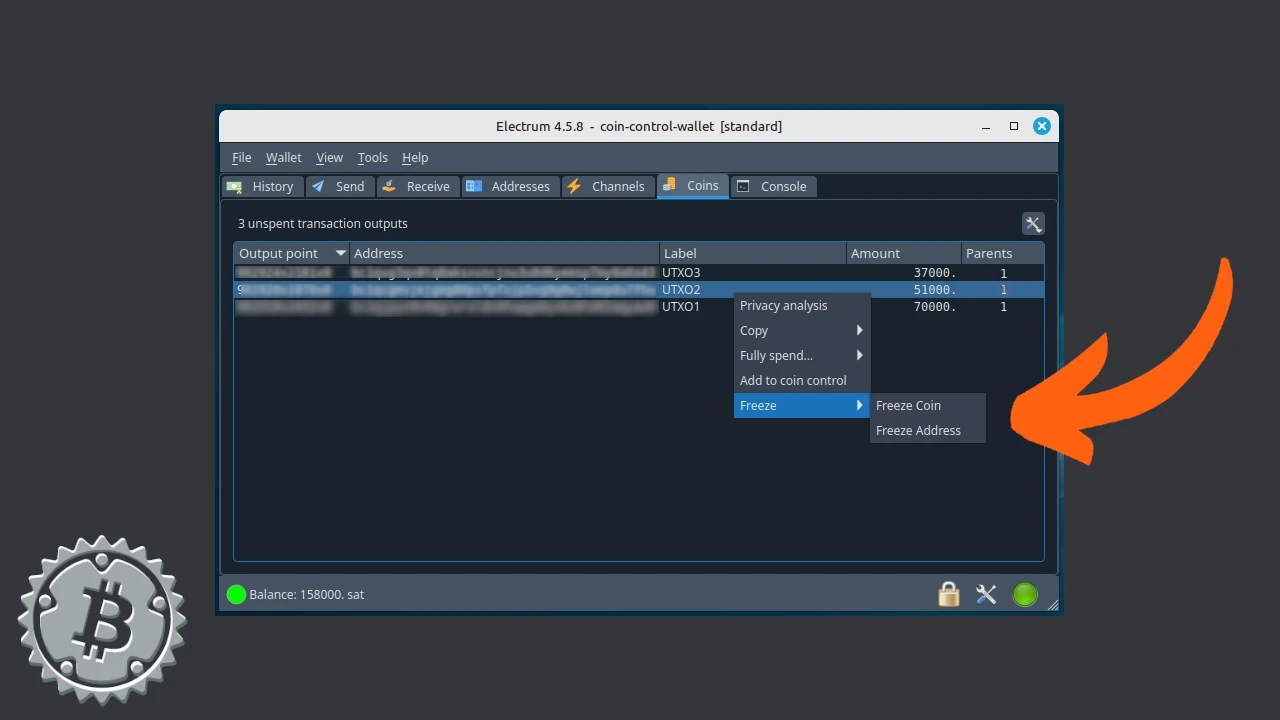
UTXO Segregation
Electrum provides this option in the Coins menu by selecting a specific UTXO and then choosing Freeze with the right mouse button. You can also “freeze” an address without funds from the Addresses menu, or the “coin” to prevent spending.
Nunchuk
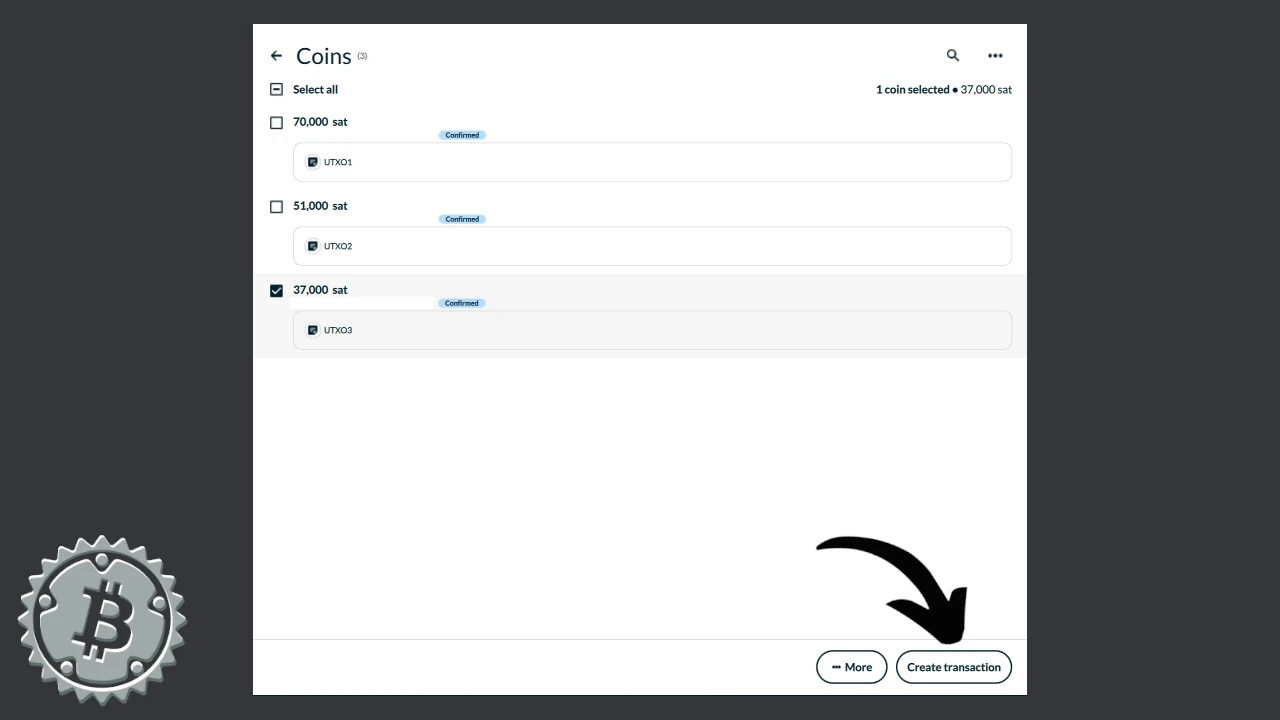
Nunchuk allows you to select UTXOs from the main menu once opened. Launch Nunchuk and click View coins.
A window opens with all your wallet’s UTXOs, where you can select one or more by ticking the box next to each amount. After selection, continue with Create transaction.
Then you can enter the destination address, set the amount and fees.
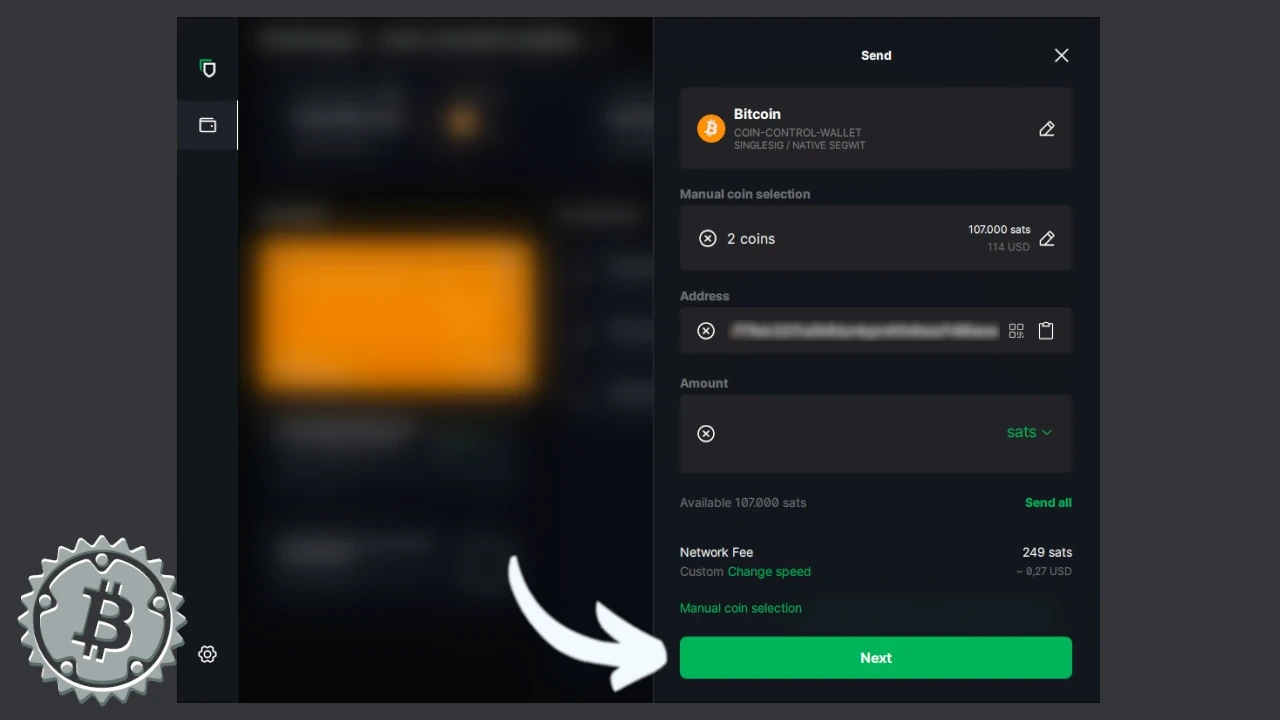
Blockstream App
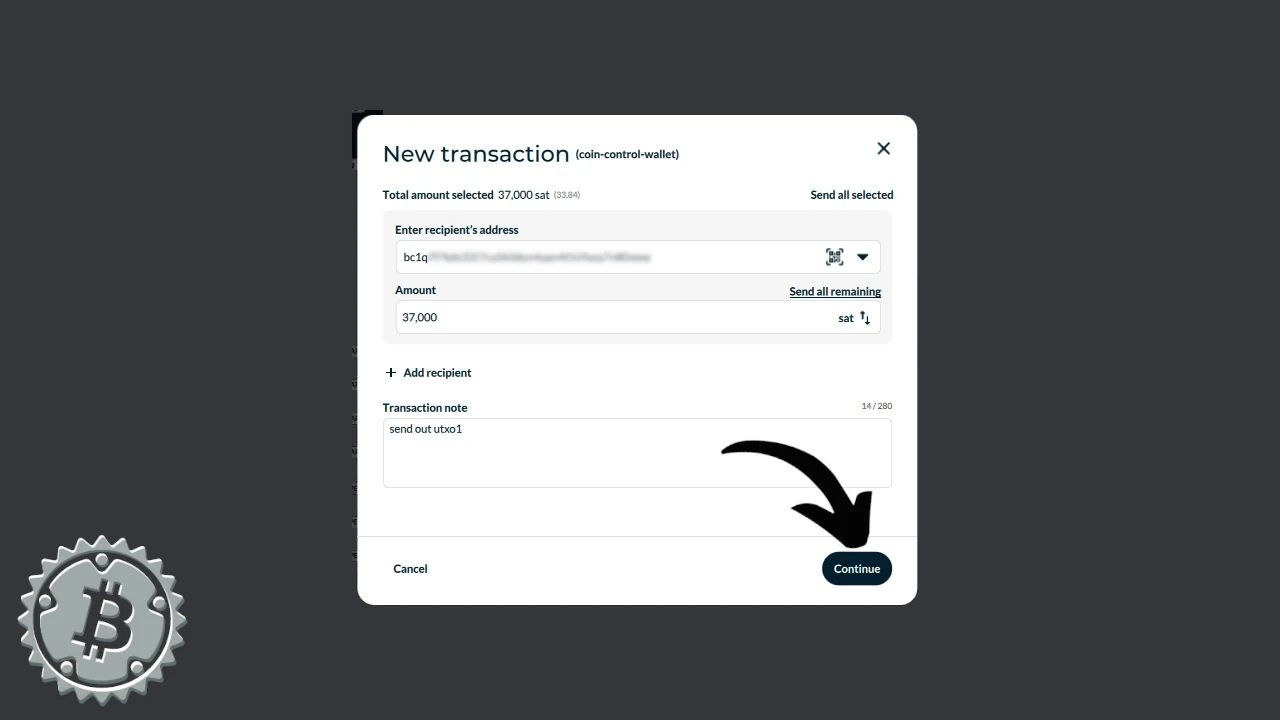
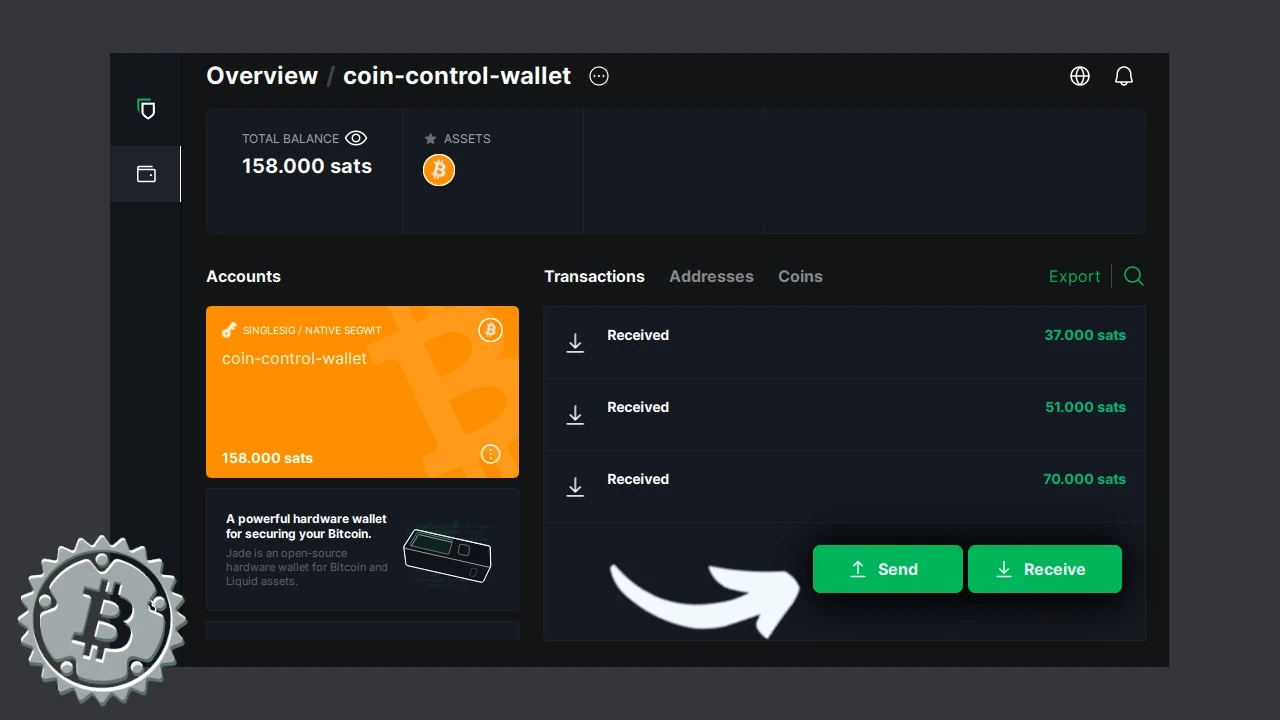
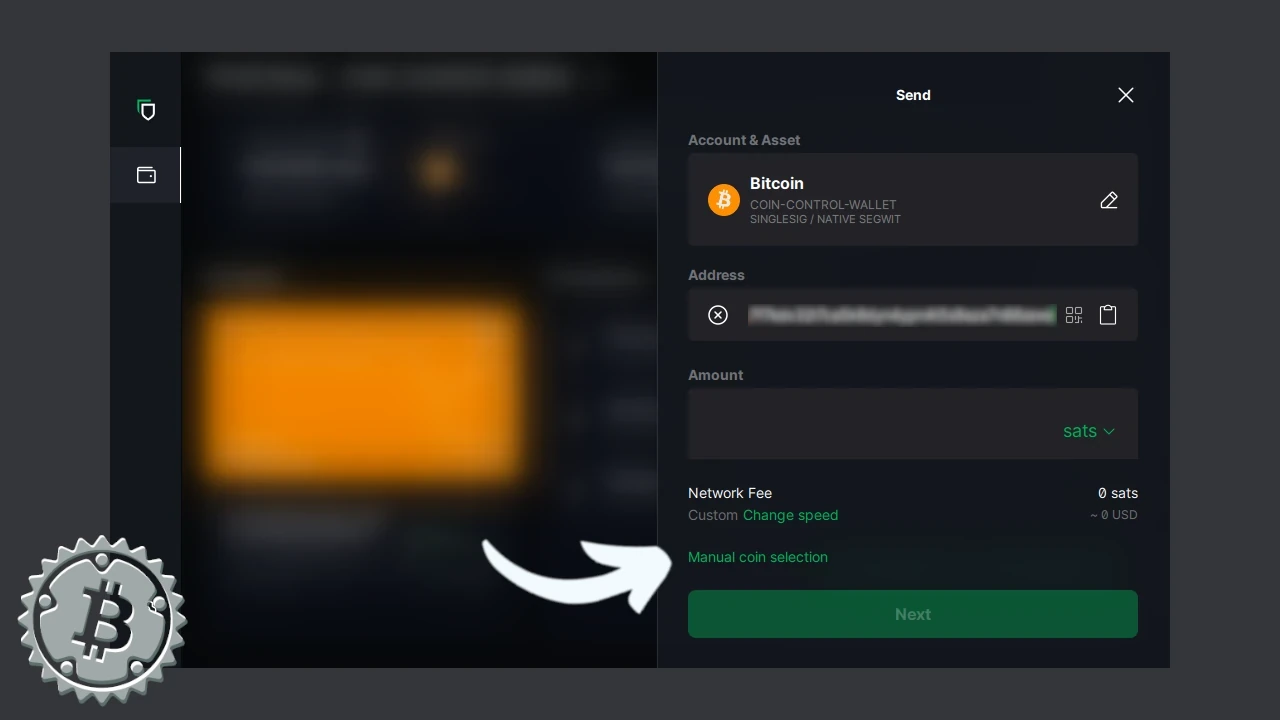
Blockstream App desktop, formerly known as Green, allows coin selection once you have started building the transaction. Open your wallet and click Send.
Paste the destination address in the appropriate field and then select Manual coin selection.
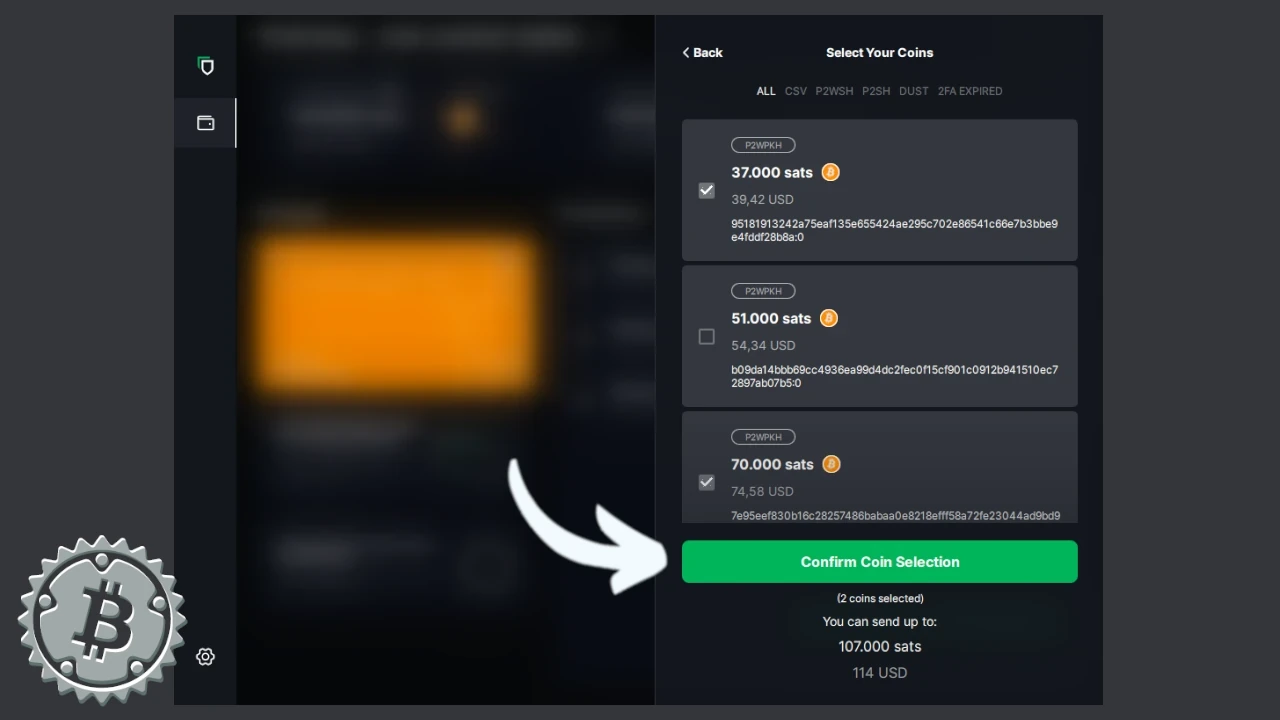
 A window opens where you can select one or more UTXOs. In the following example, we selected two coins. Then confirm the choice by clicking Confirm Coin Selection.
Set the amount and fees, then proceed as usual with your transaction.
⚠️ Note: In the Coins menu of Green, there are Lock/Unlock options that suggest the possibility of segregating UTXOs. This is only available in so-called multisig accounts; the feature is only activated for very small UTXOs, near the Dust threshold.
Mobile Wallets
Blue Wallet
Even on mobile, you can choose wallets that allow manual UTXO selection. Let’s look at Blue Wallet first.
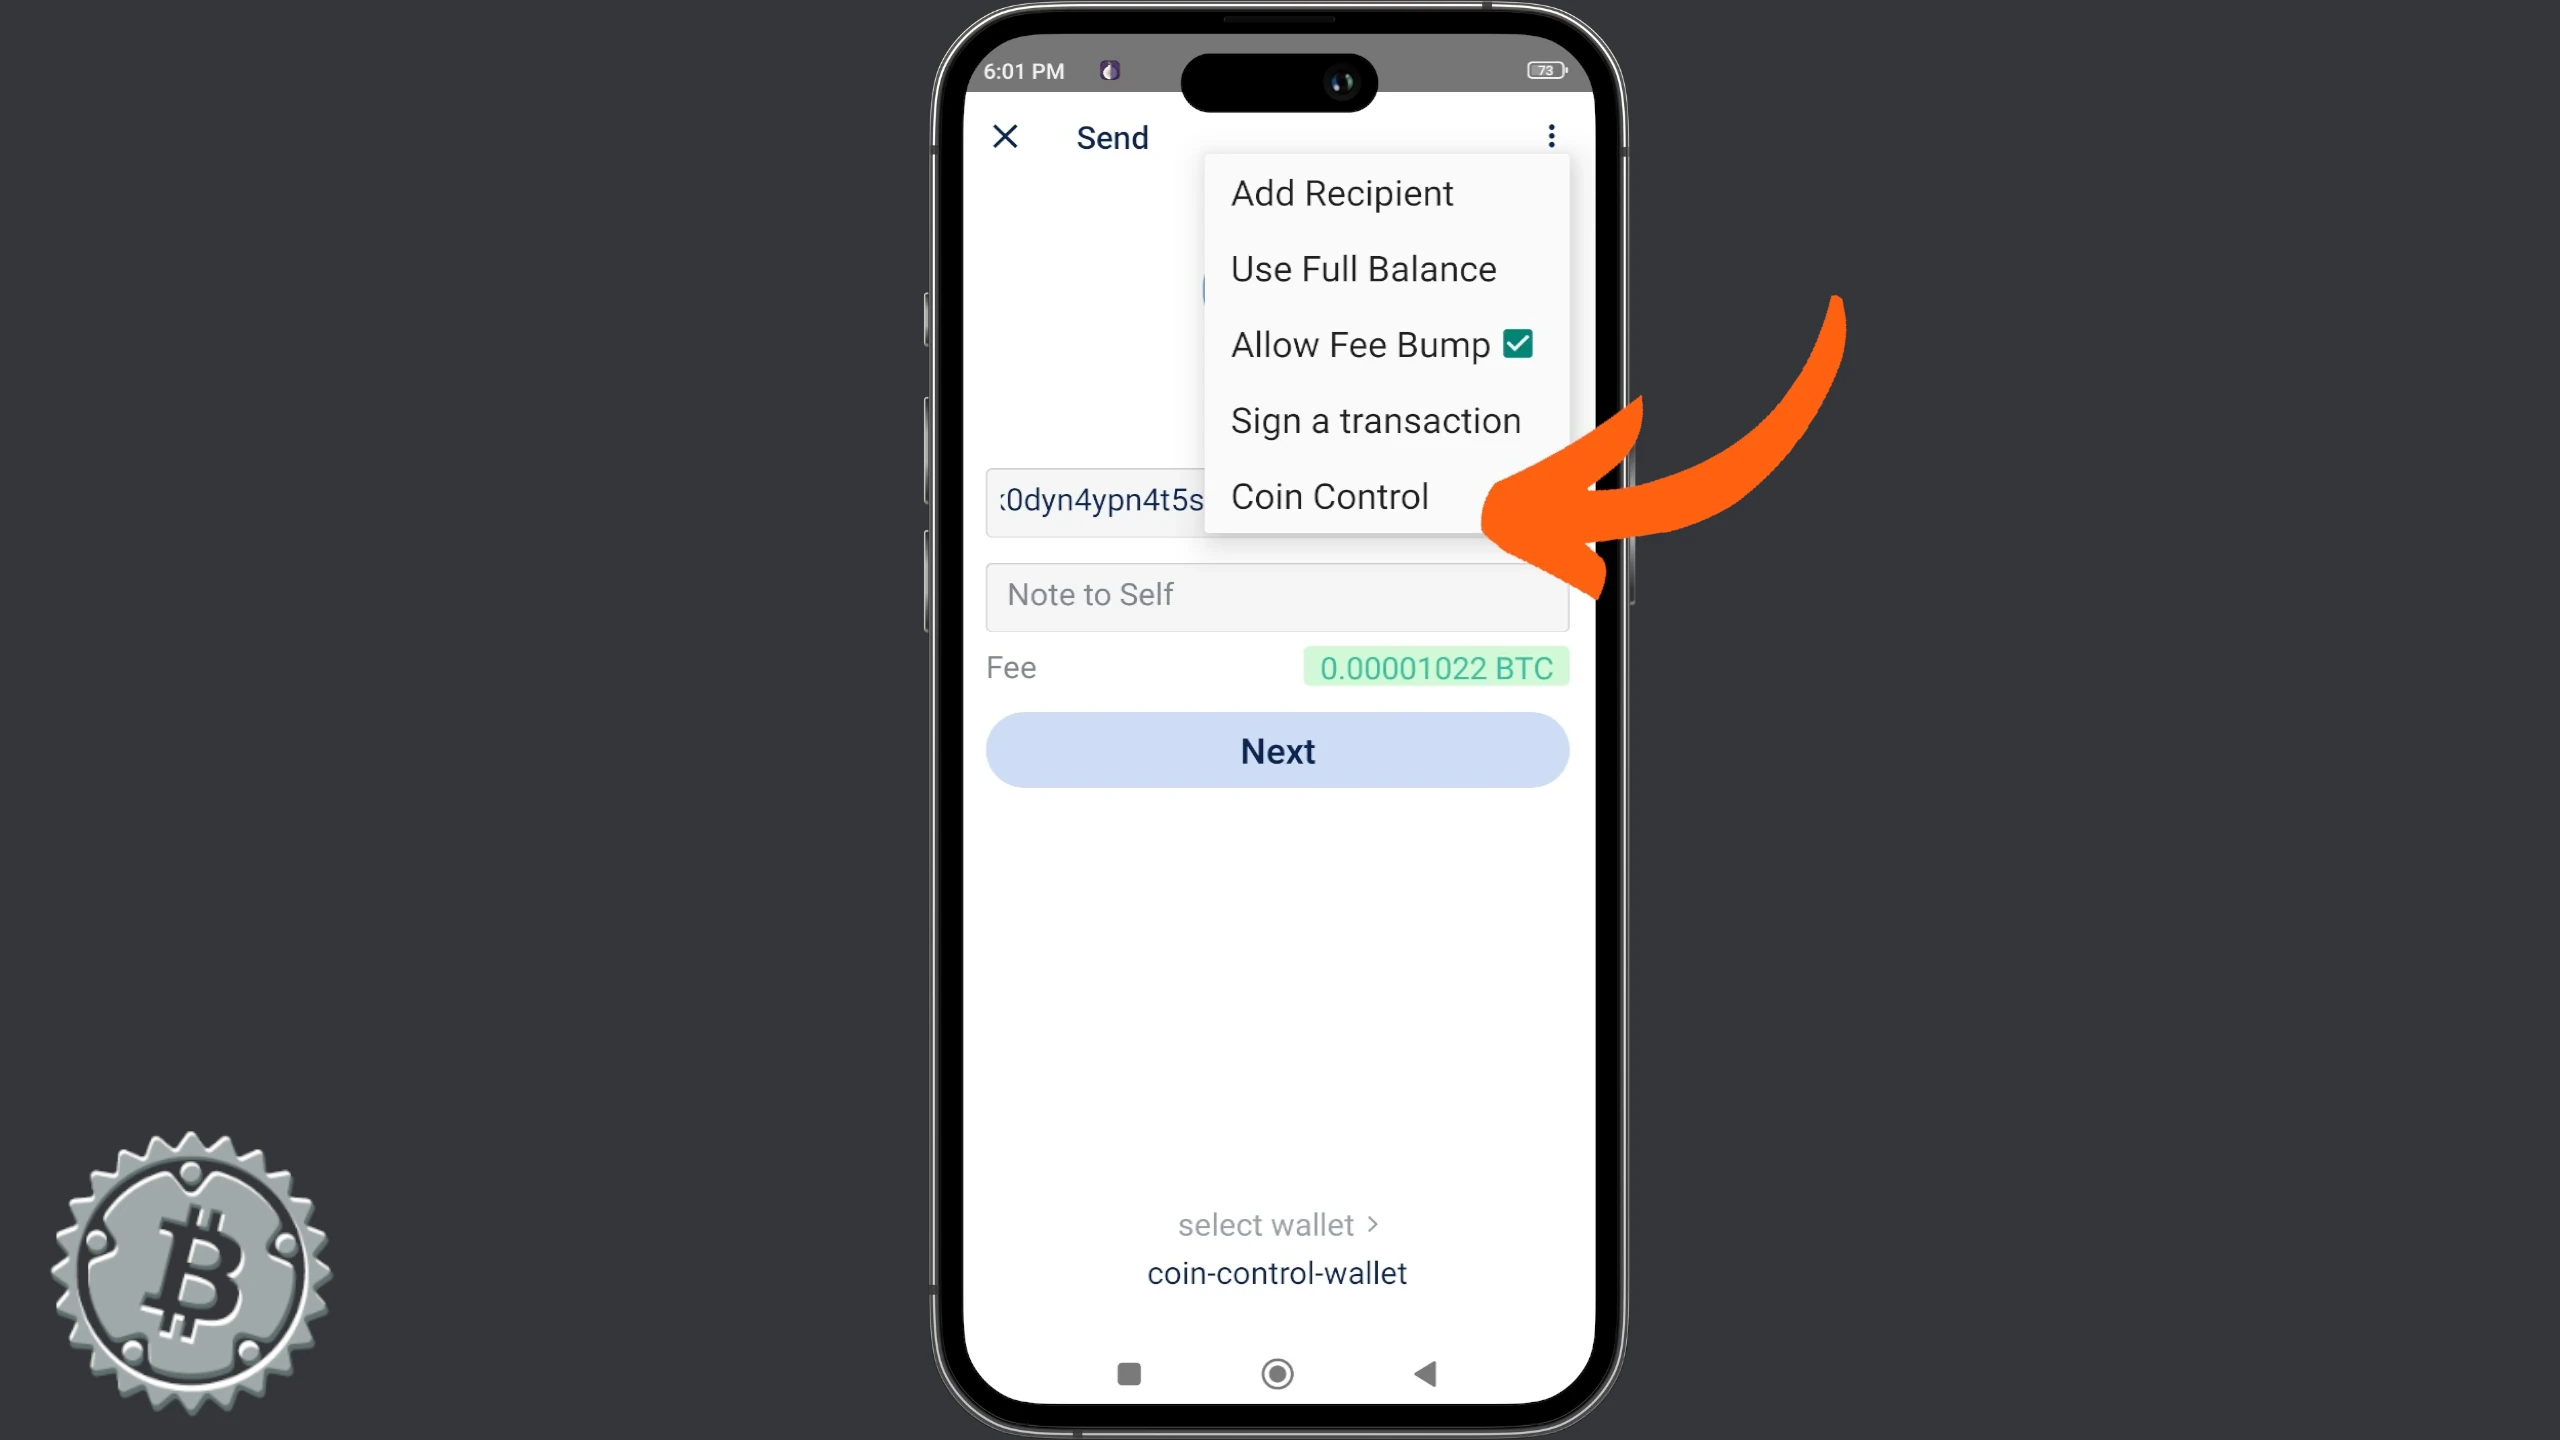
If you use this software, open your wallet and click to enter the command screens for one of your wallets. To access coin control, you must enter the spending phase, so click Send.
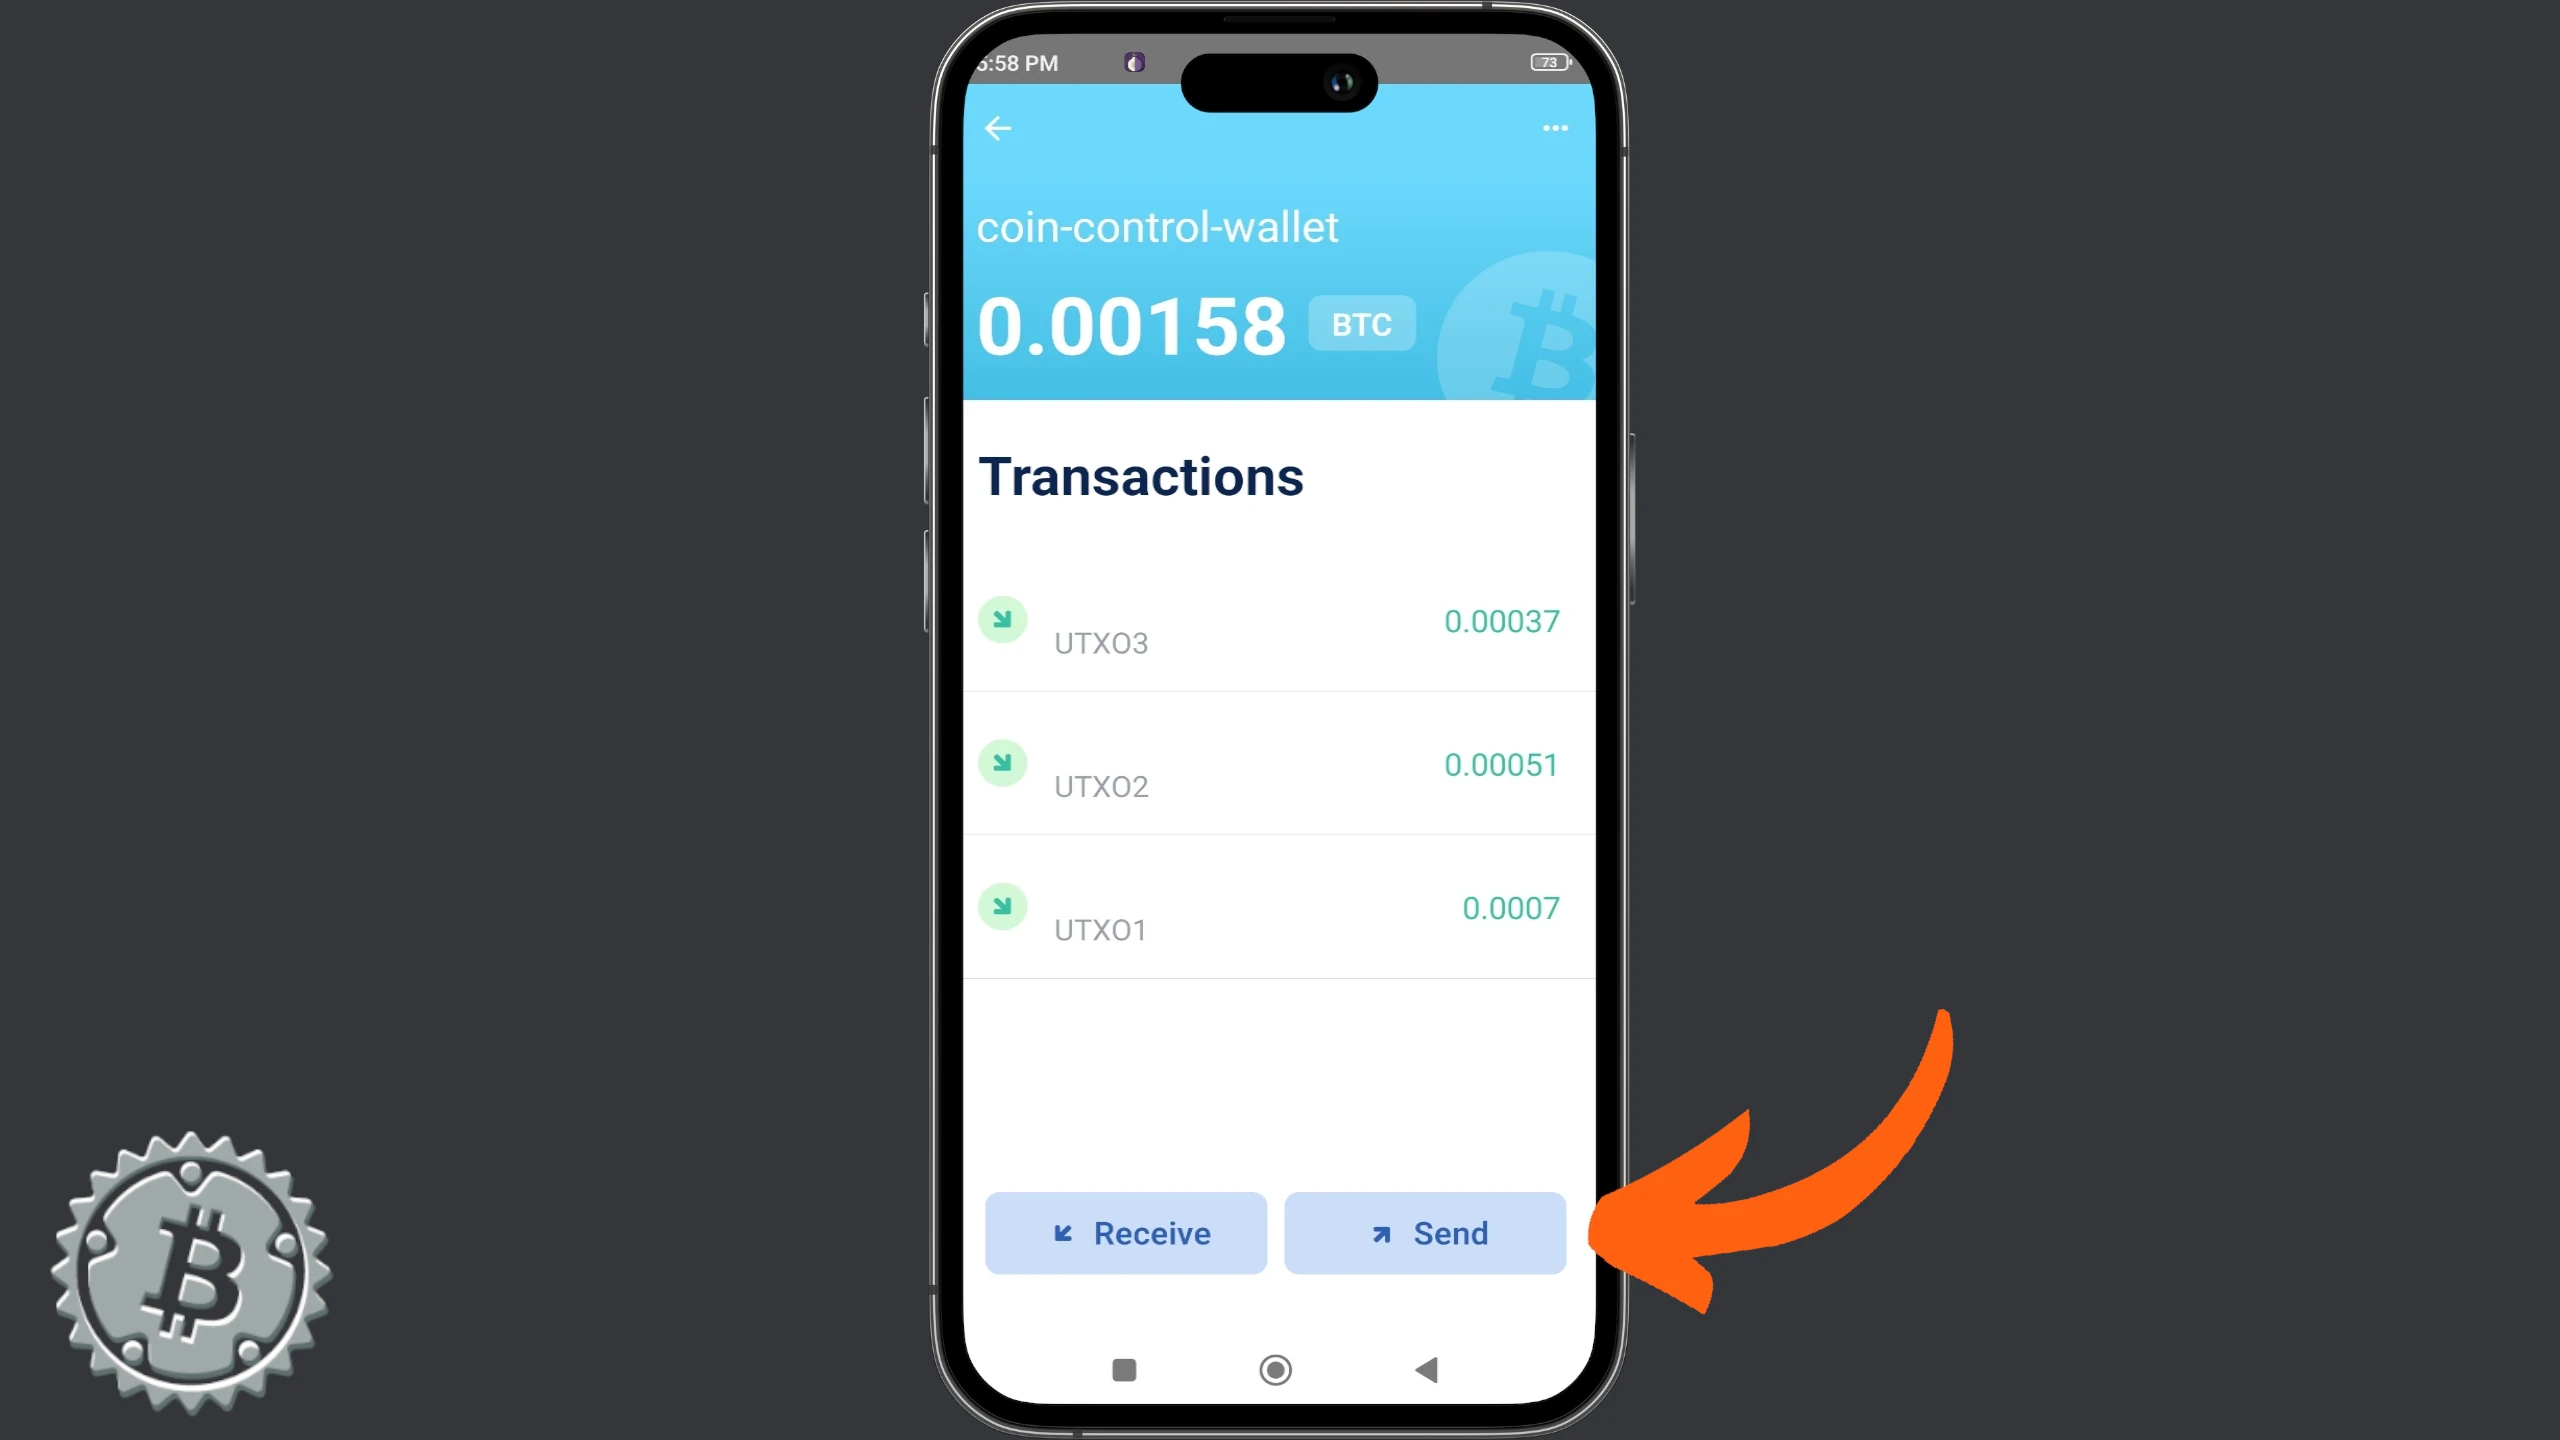
In the next screen, choose the menu indicated by the three dots at the top right. A drop-down window with several commands opens. Choose the last one: Coin Control.
At this point, Blue Wallet shows all your UTXOs. In addition to the amounts, they are graphically differentiated by different colors.
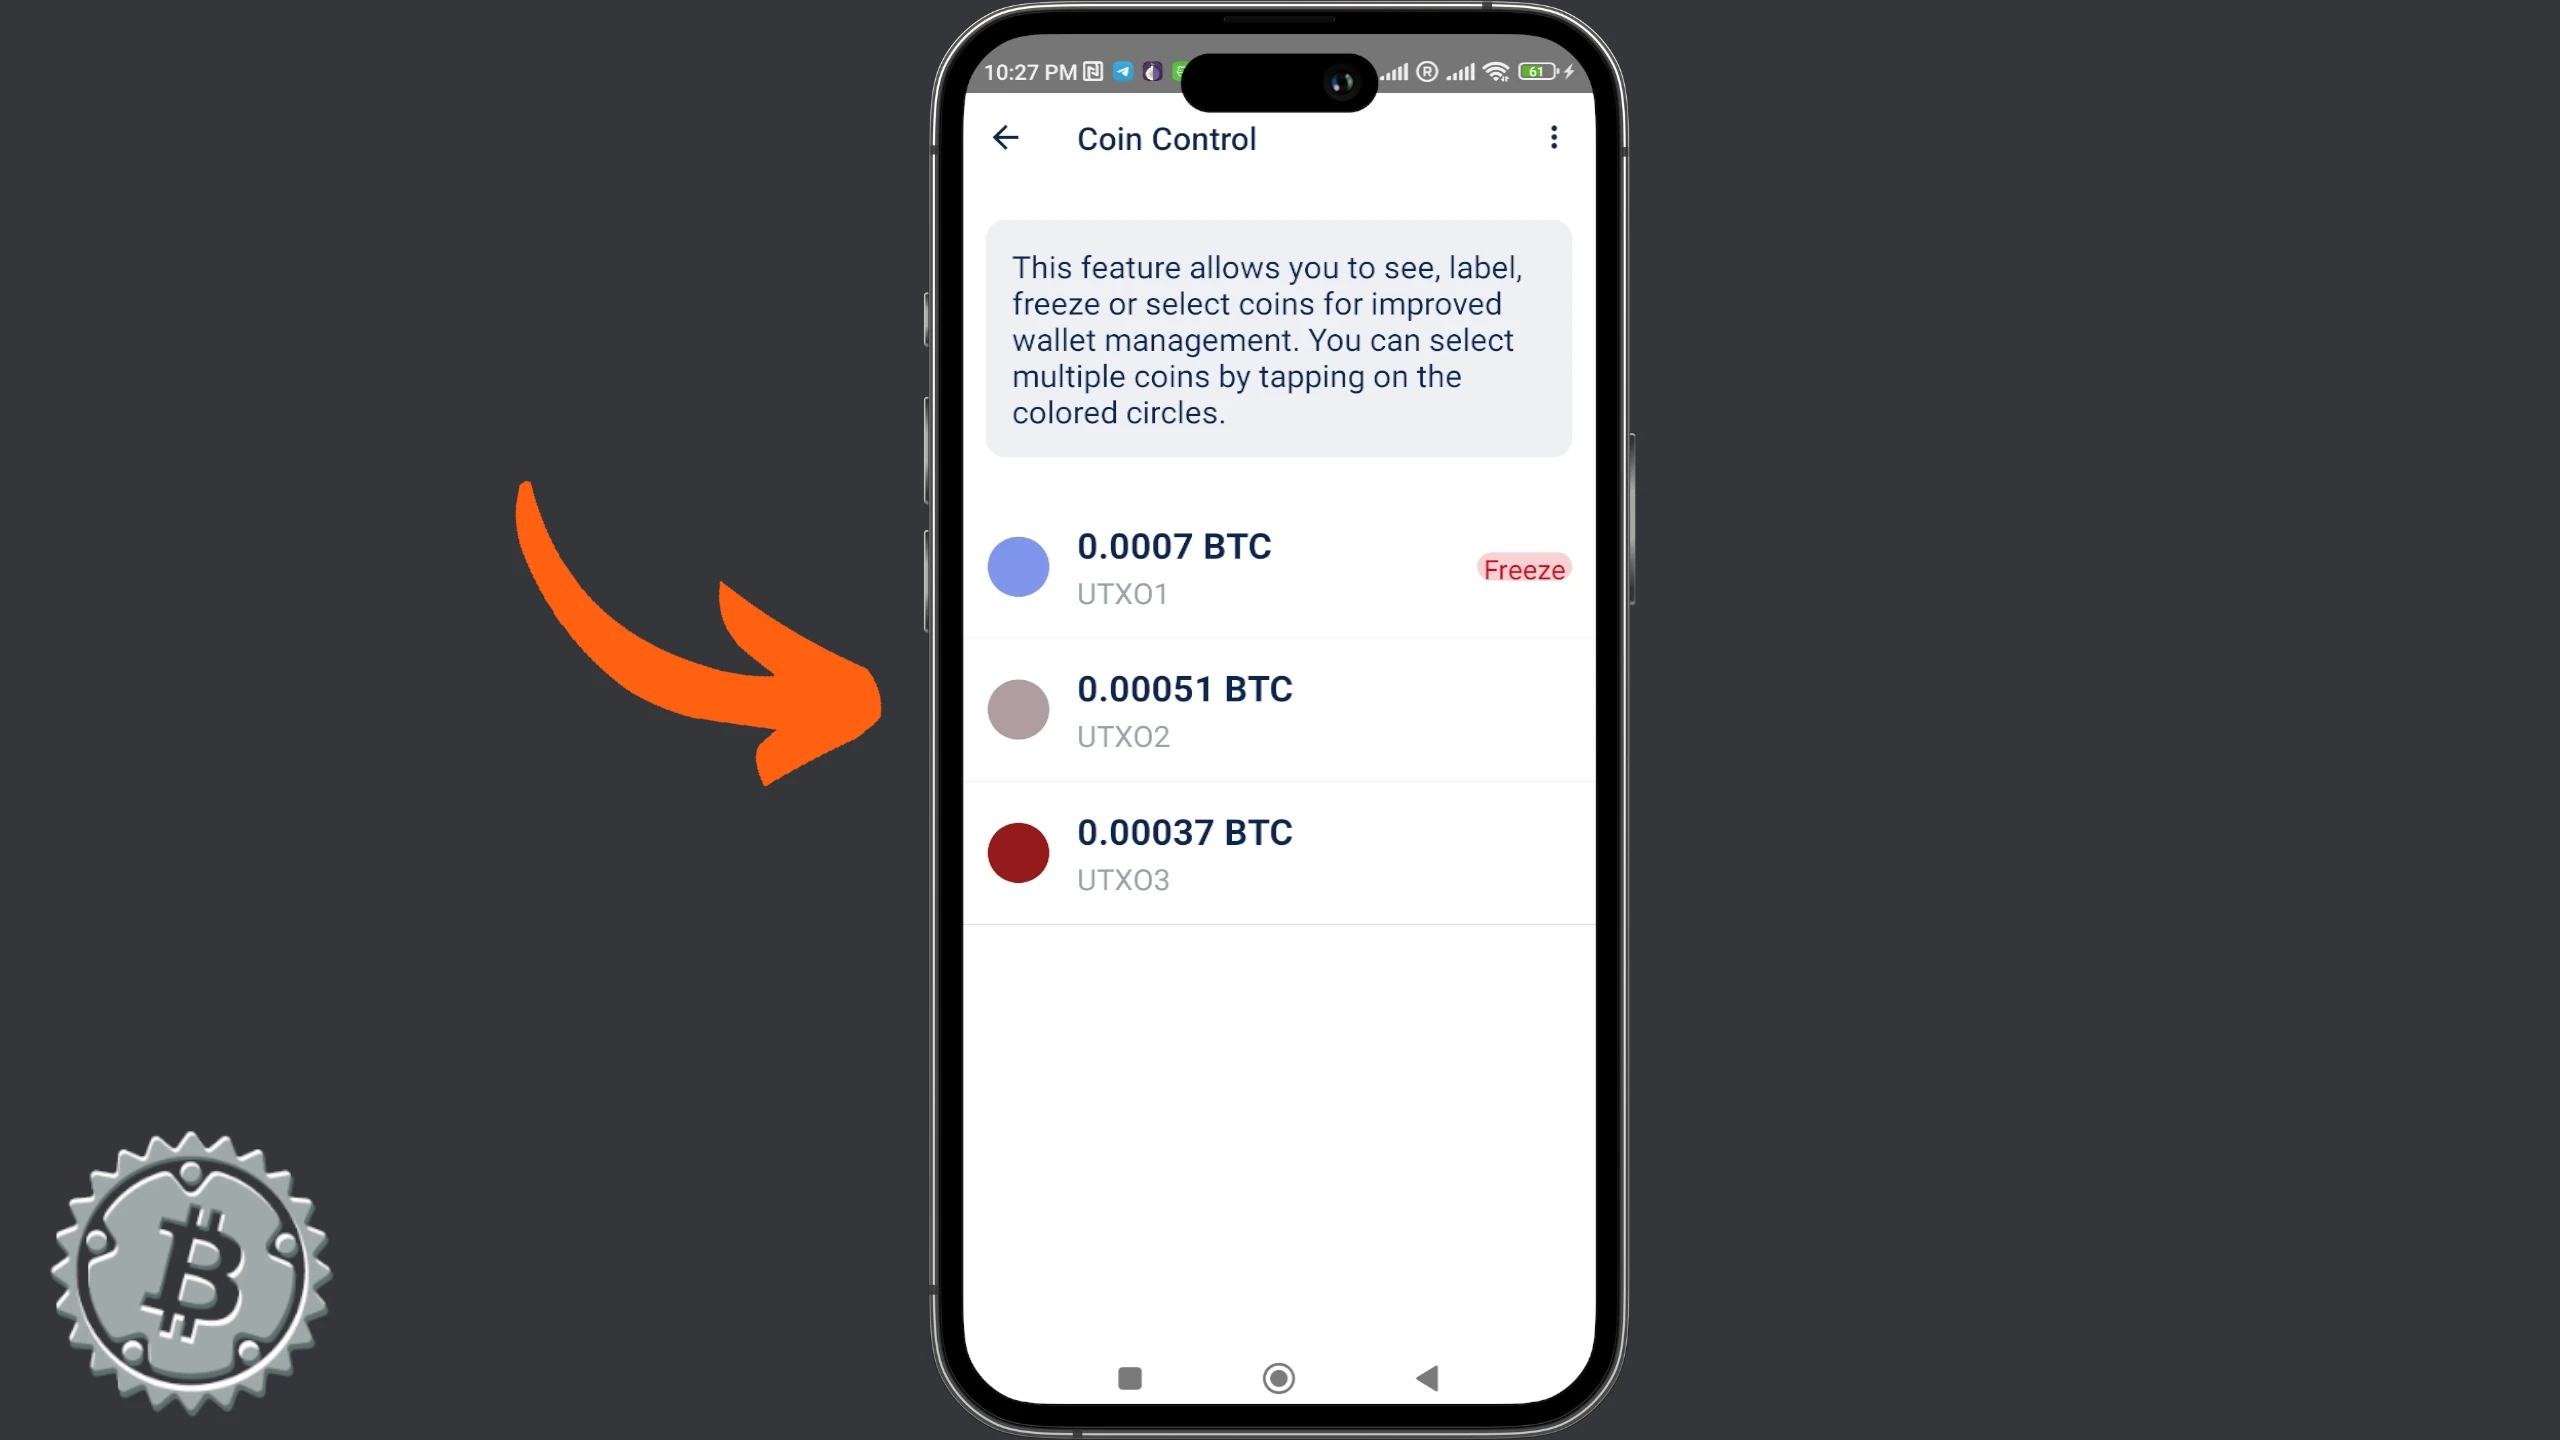
Select the UTXO, then select Use Coin.
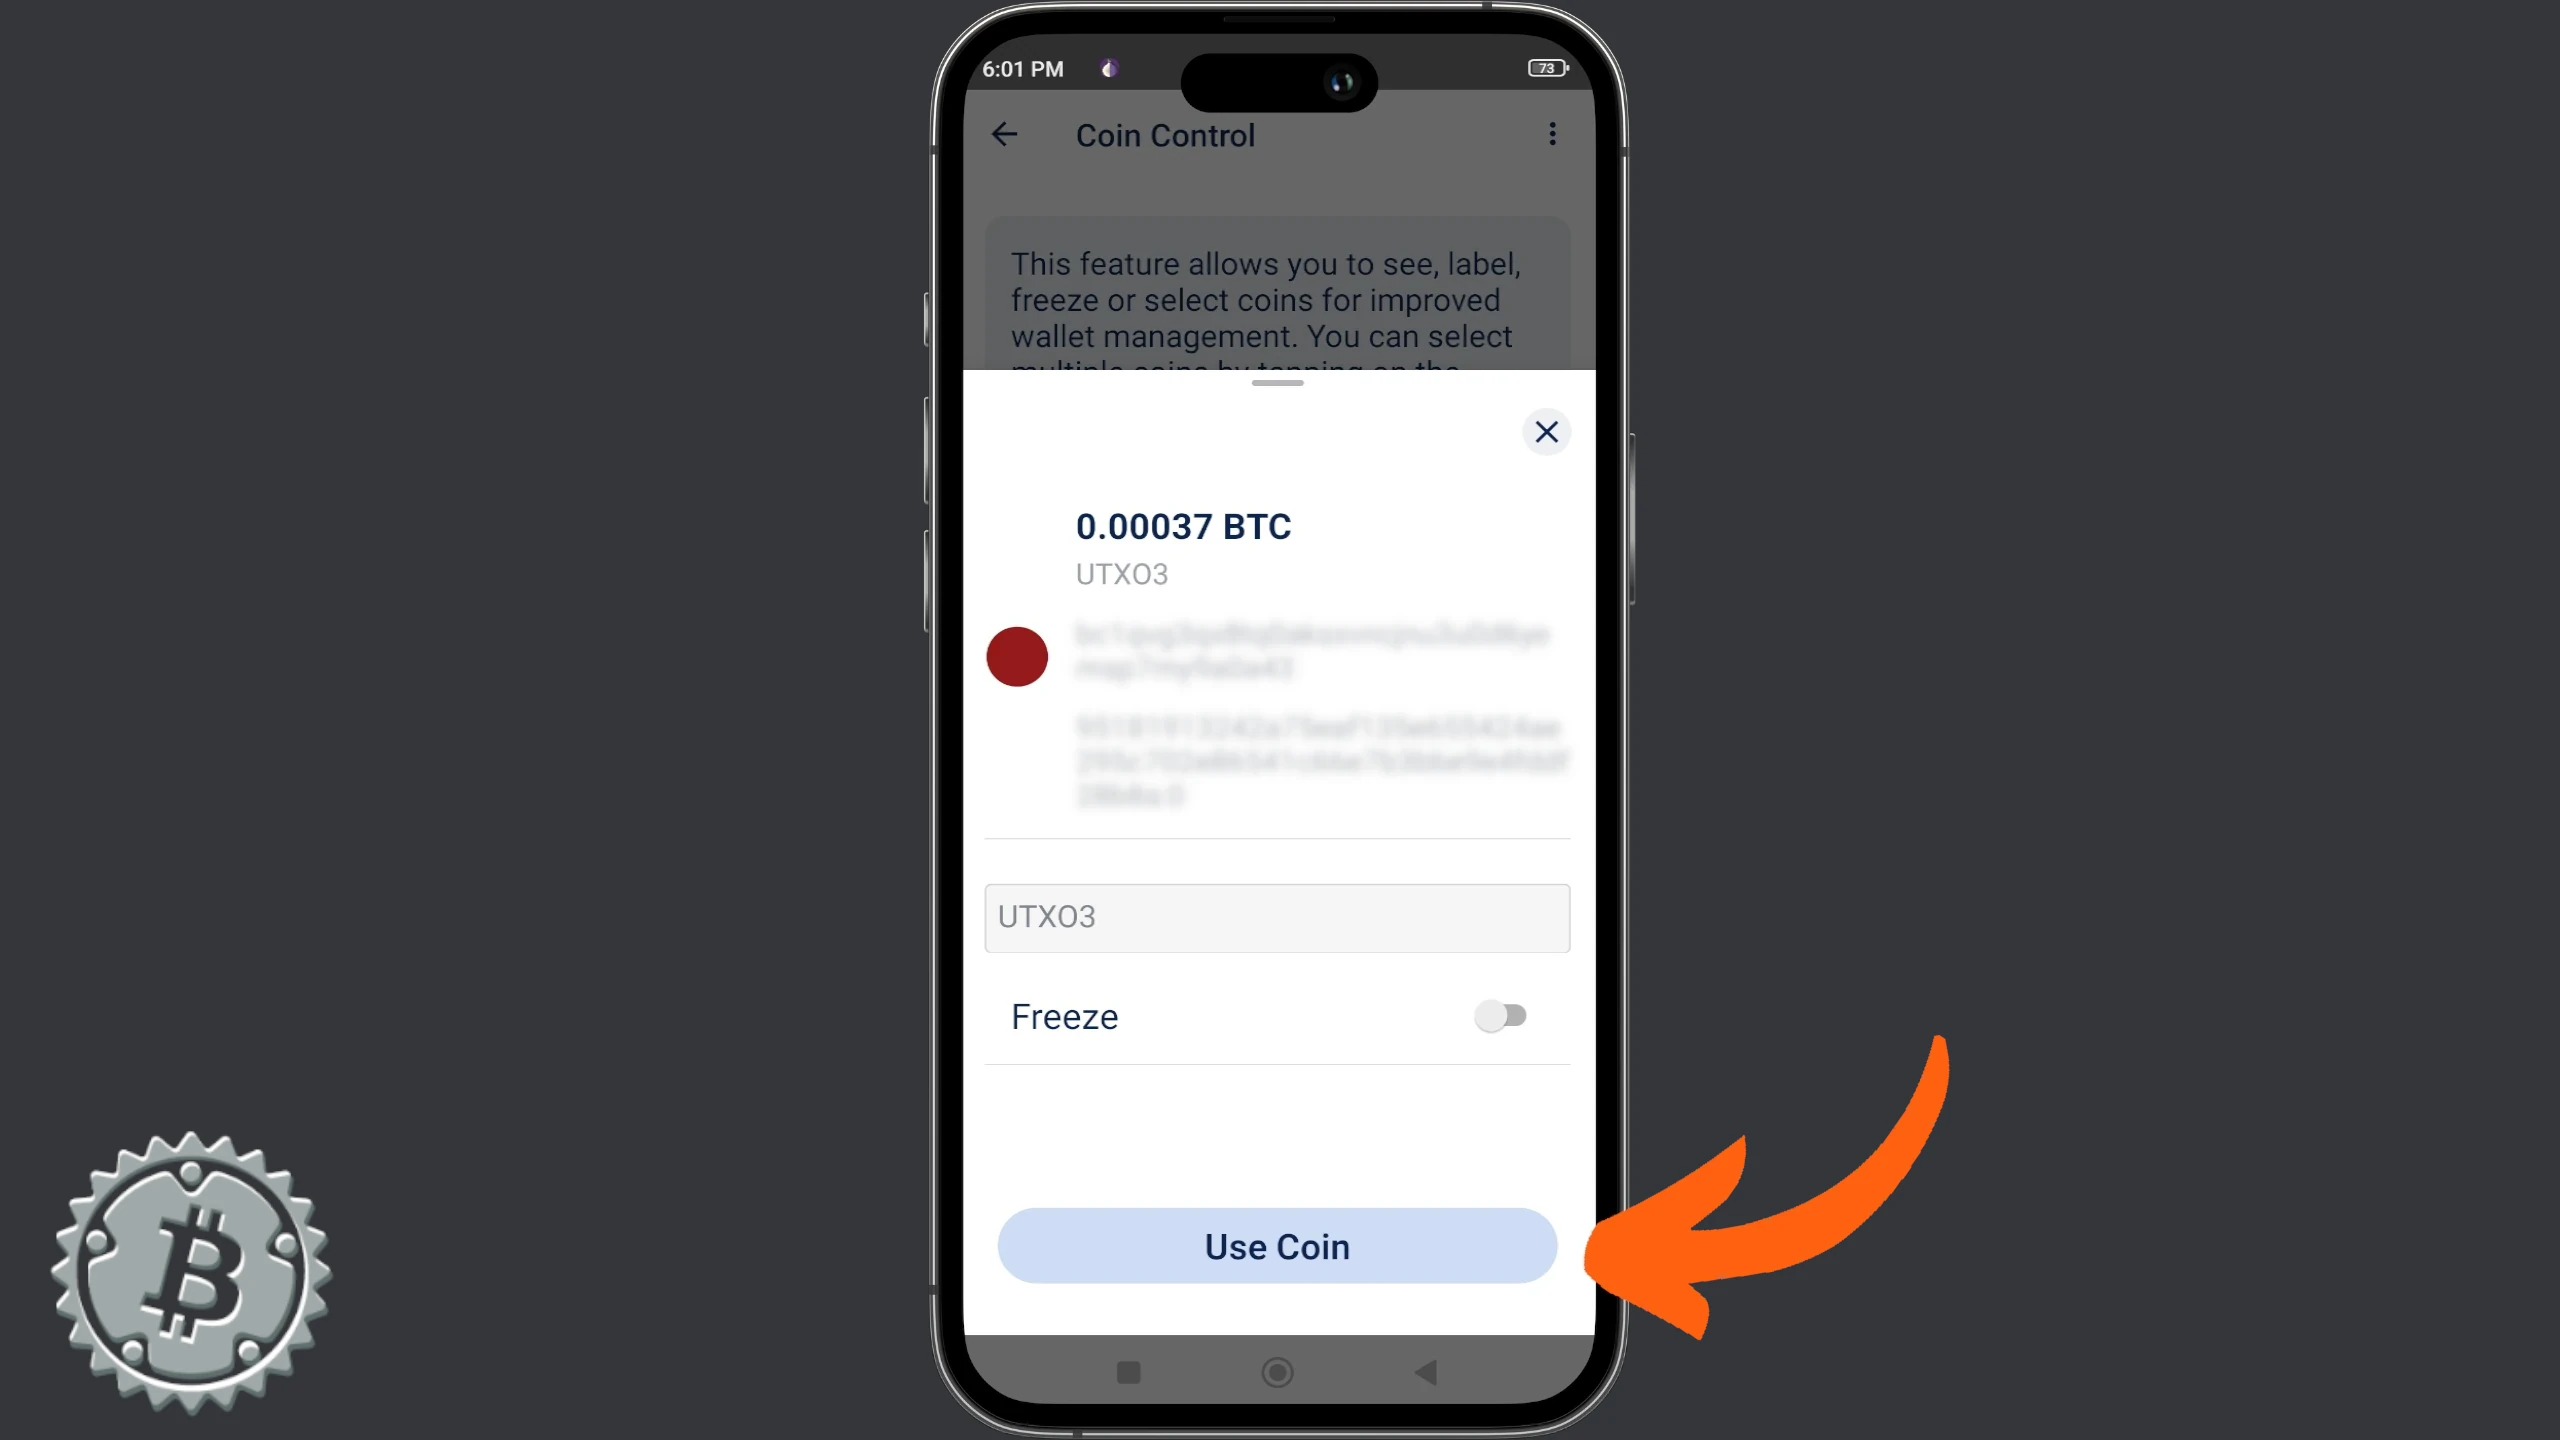
Blue Wallet takes you back to the Send window to continue building the transaction. Adjust the amount and fees, then choose Next.

Now you can complete the transaction as usual.
UTXO Segregation
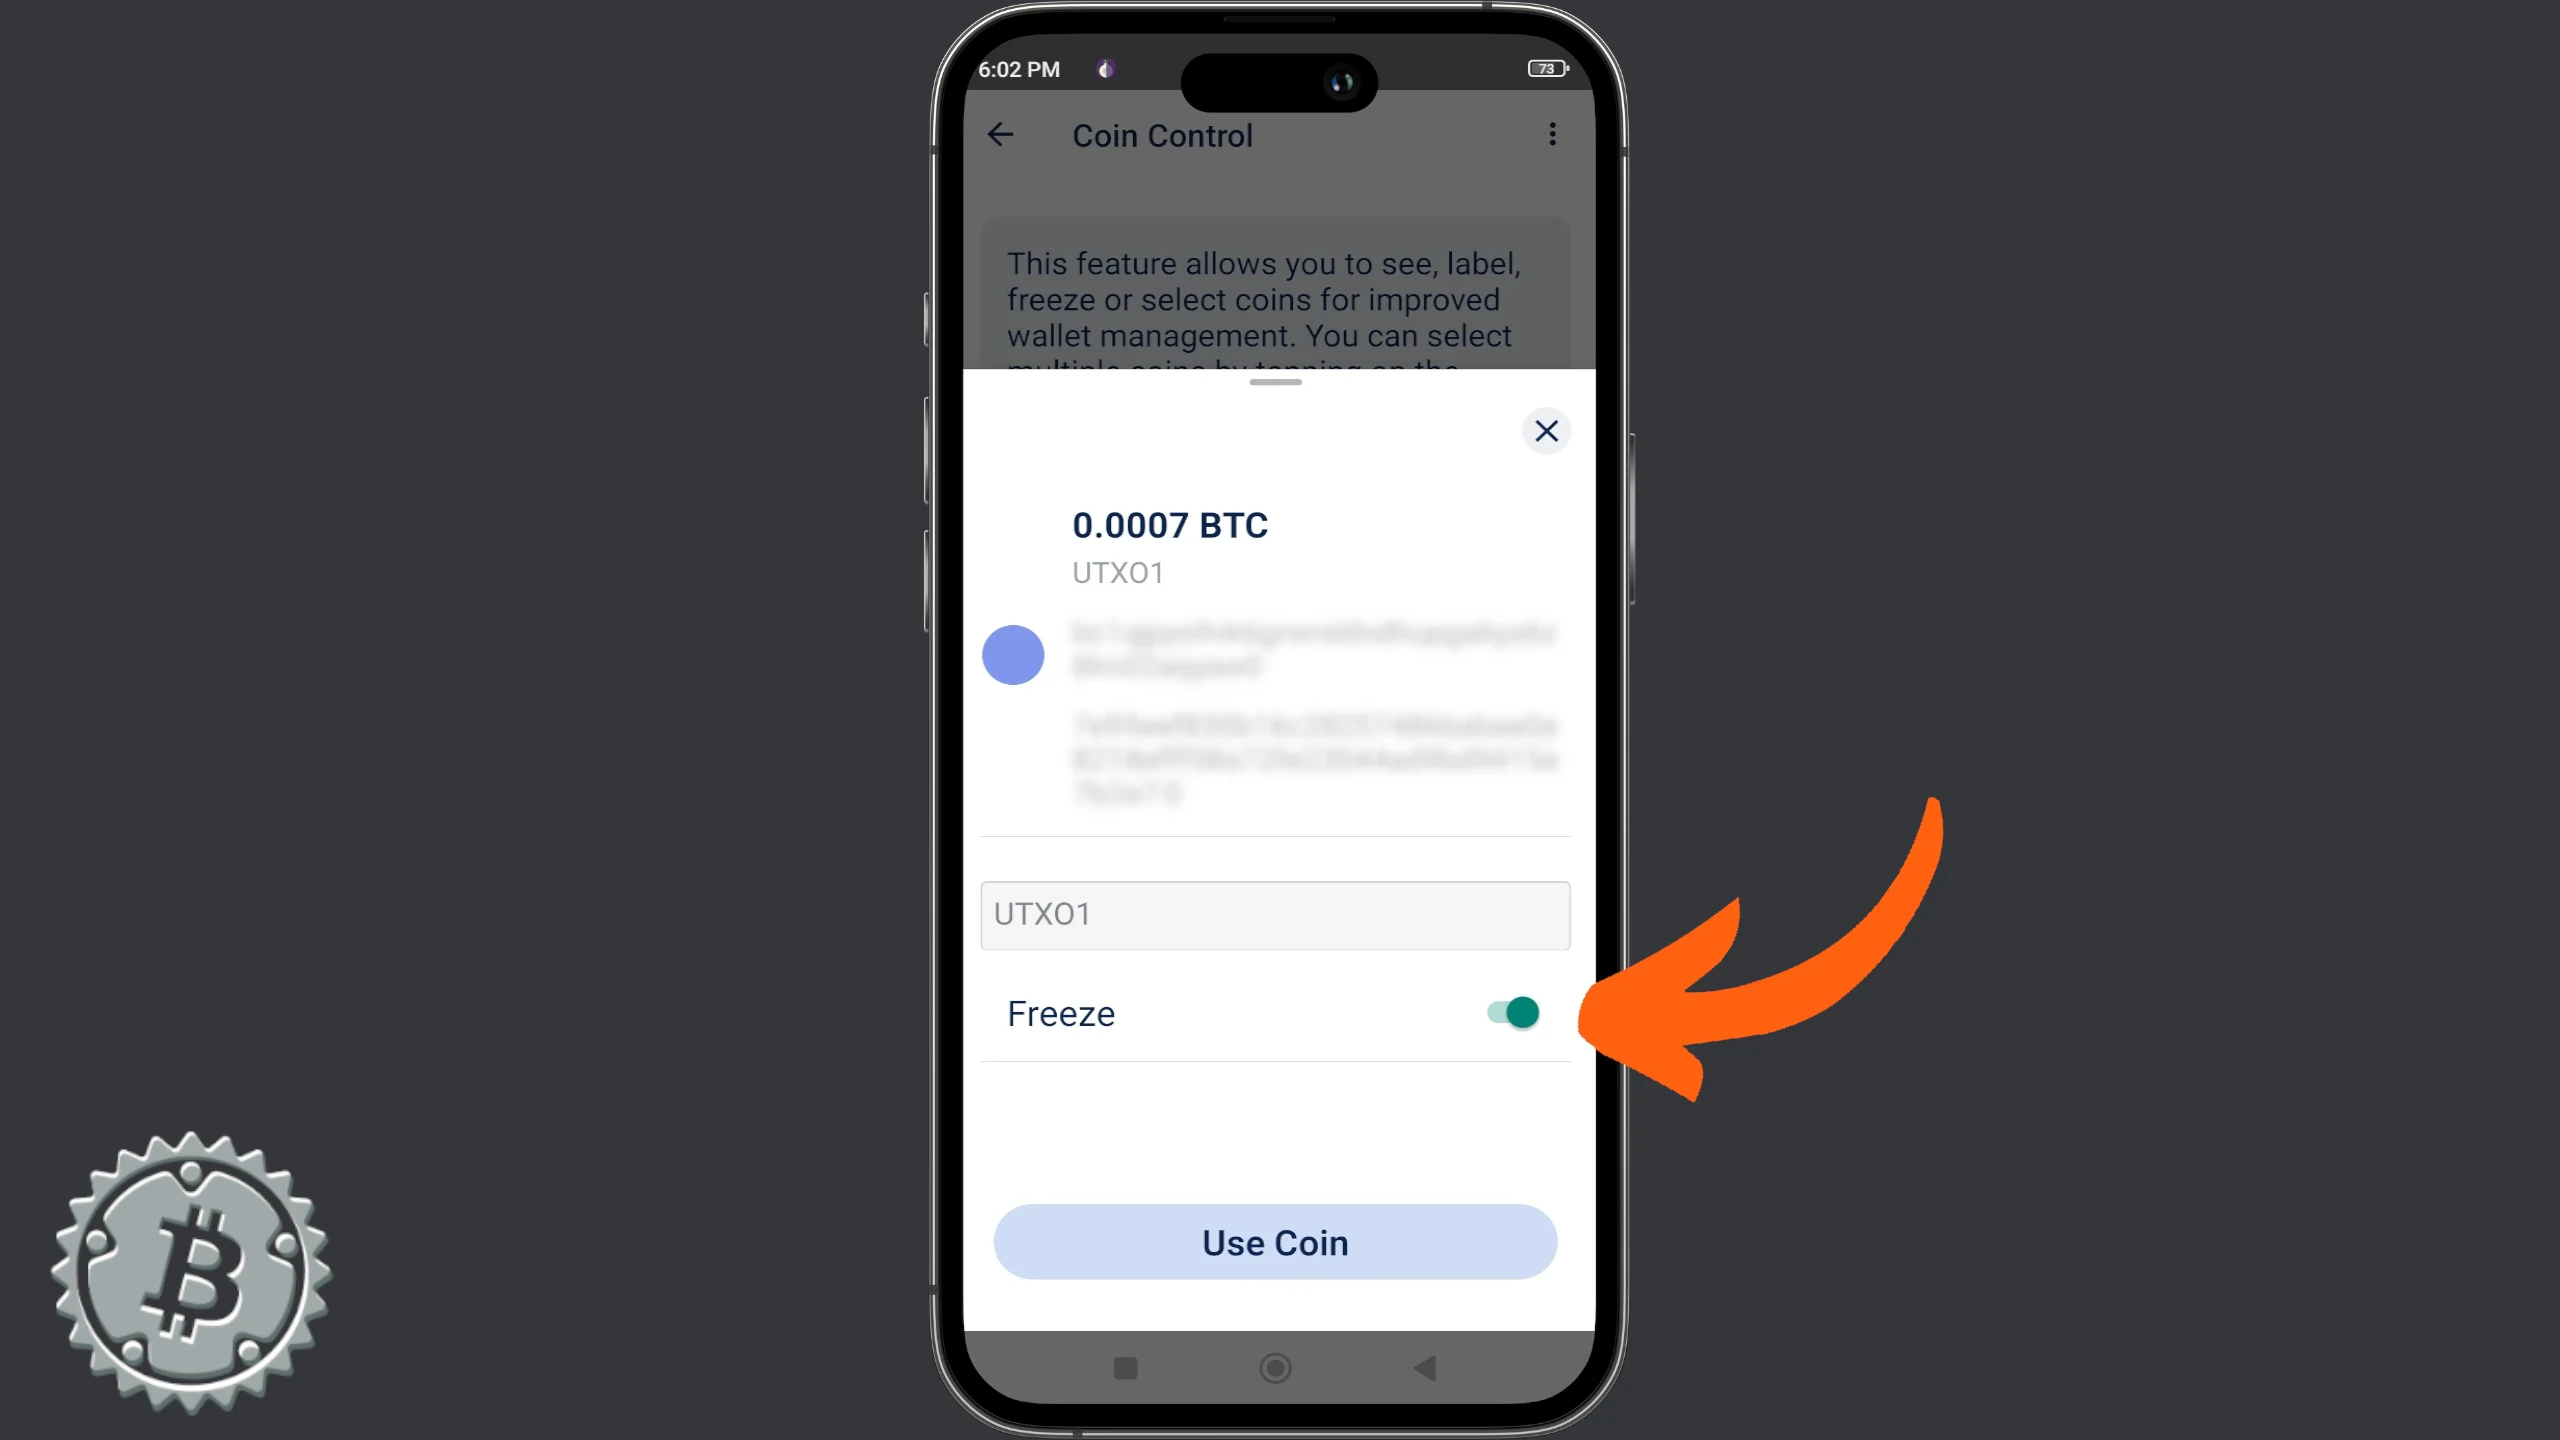
Blue Wallet also allows you to segregate UTXOs, making them unavailable for spending, which is a nice feature for a mobile wallet.
Access coin control as explained above and, after selecting the UTXO, choose Freeze instead of Use Coin.
Nunchuk
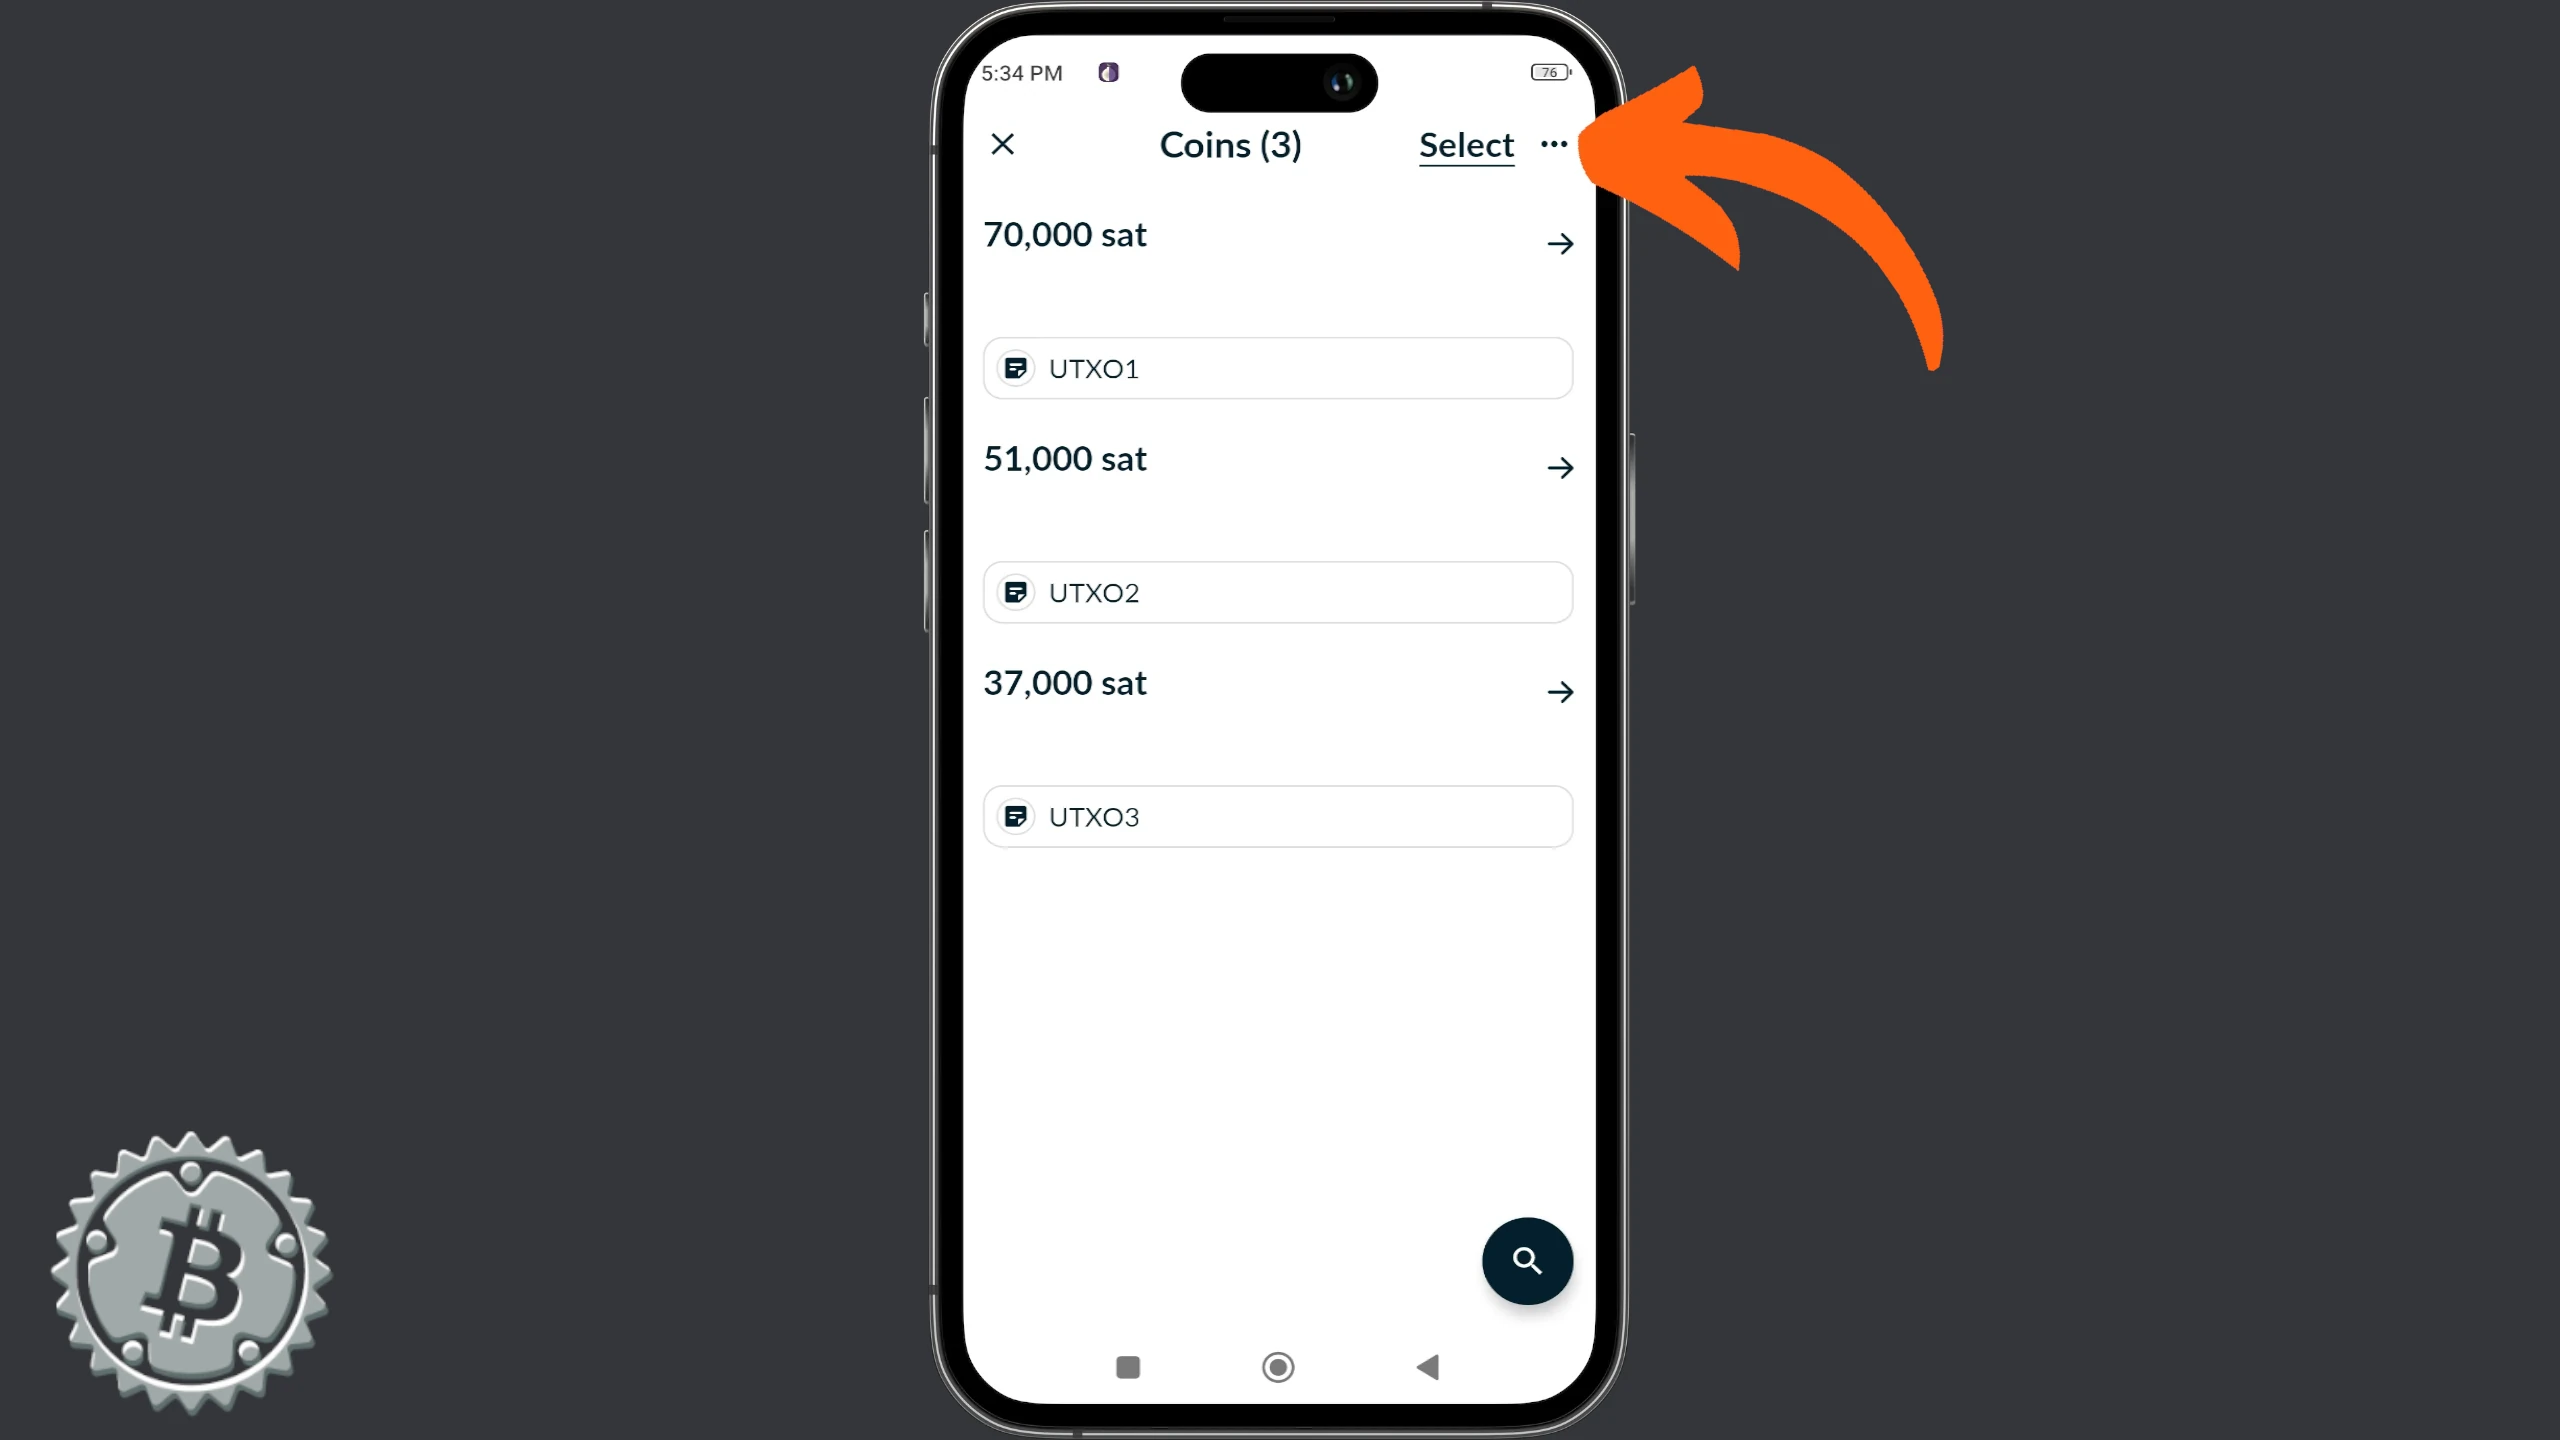
The mobile version of Nunchuk also allows users to perform coin control. If you use this app on mobile, open it and go to the Wallet menu. From here, choose View coins.

In the window with the list of UTXOs, click Select.
Next to each UTXO, the selection function appears. As in the desktop version, on Nunchuk mobile, manual selection is done by ticking the box next to the amount. The screen shows the number of selected UTXOs and the total amount available. Once finished, the ₿ symbol at the bottom left is the command to start building the transaction.
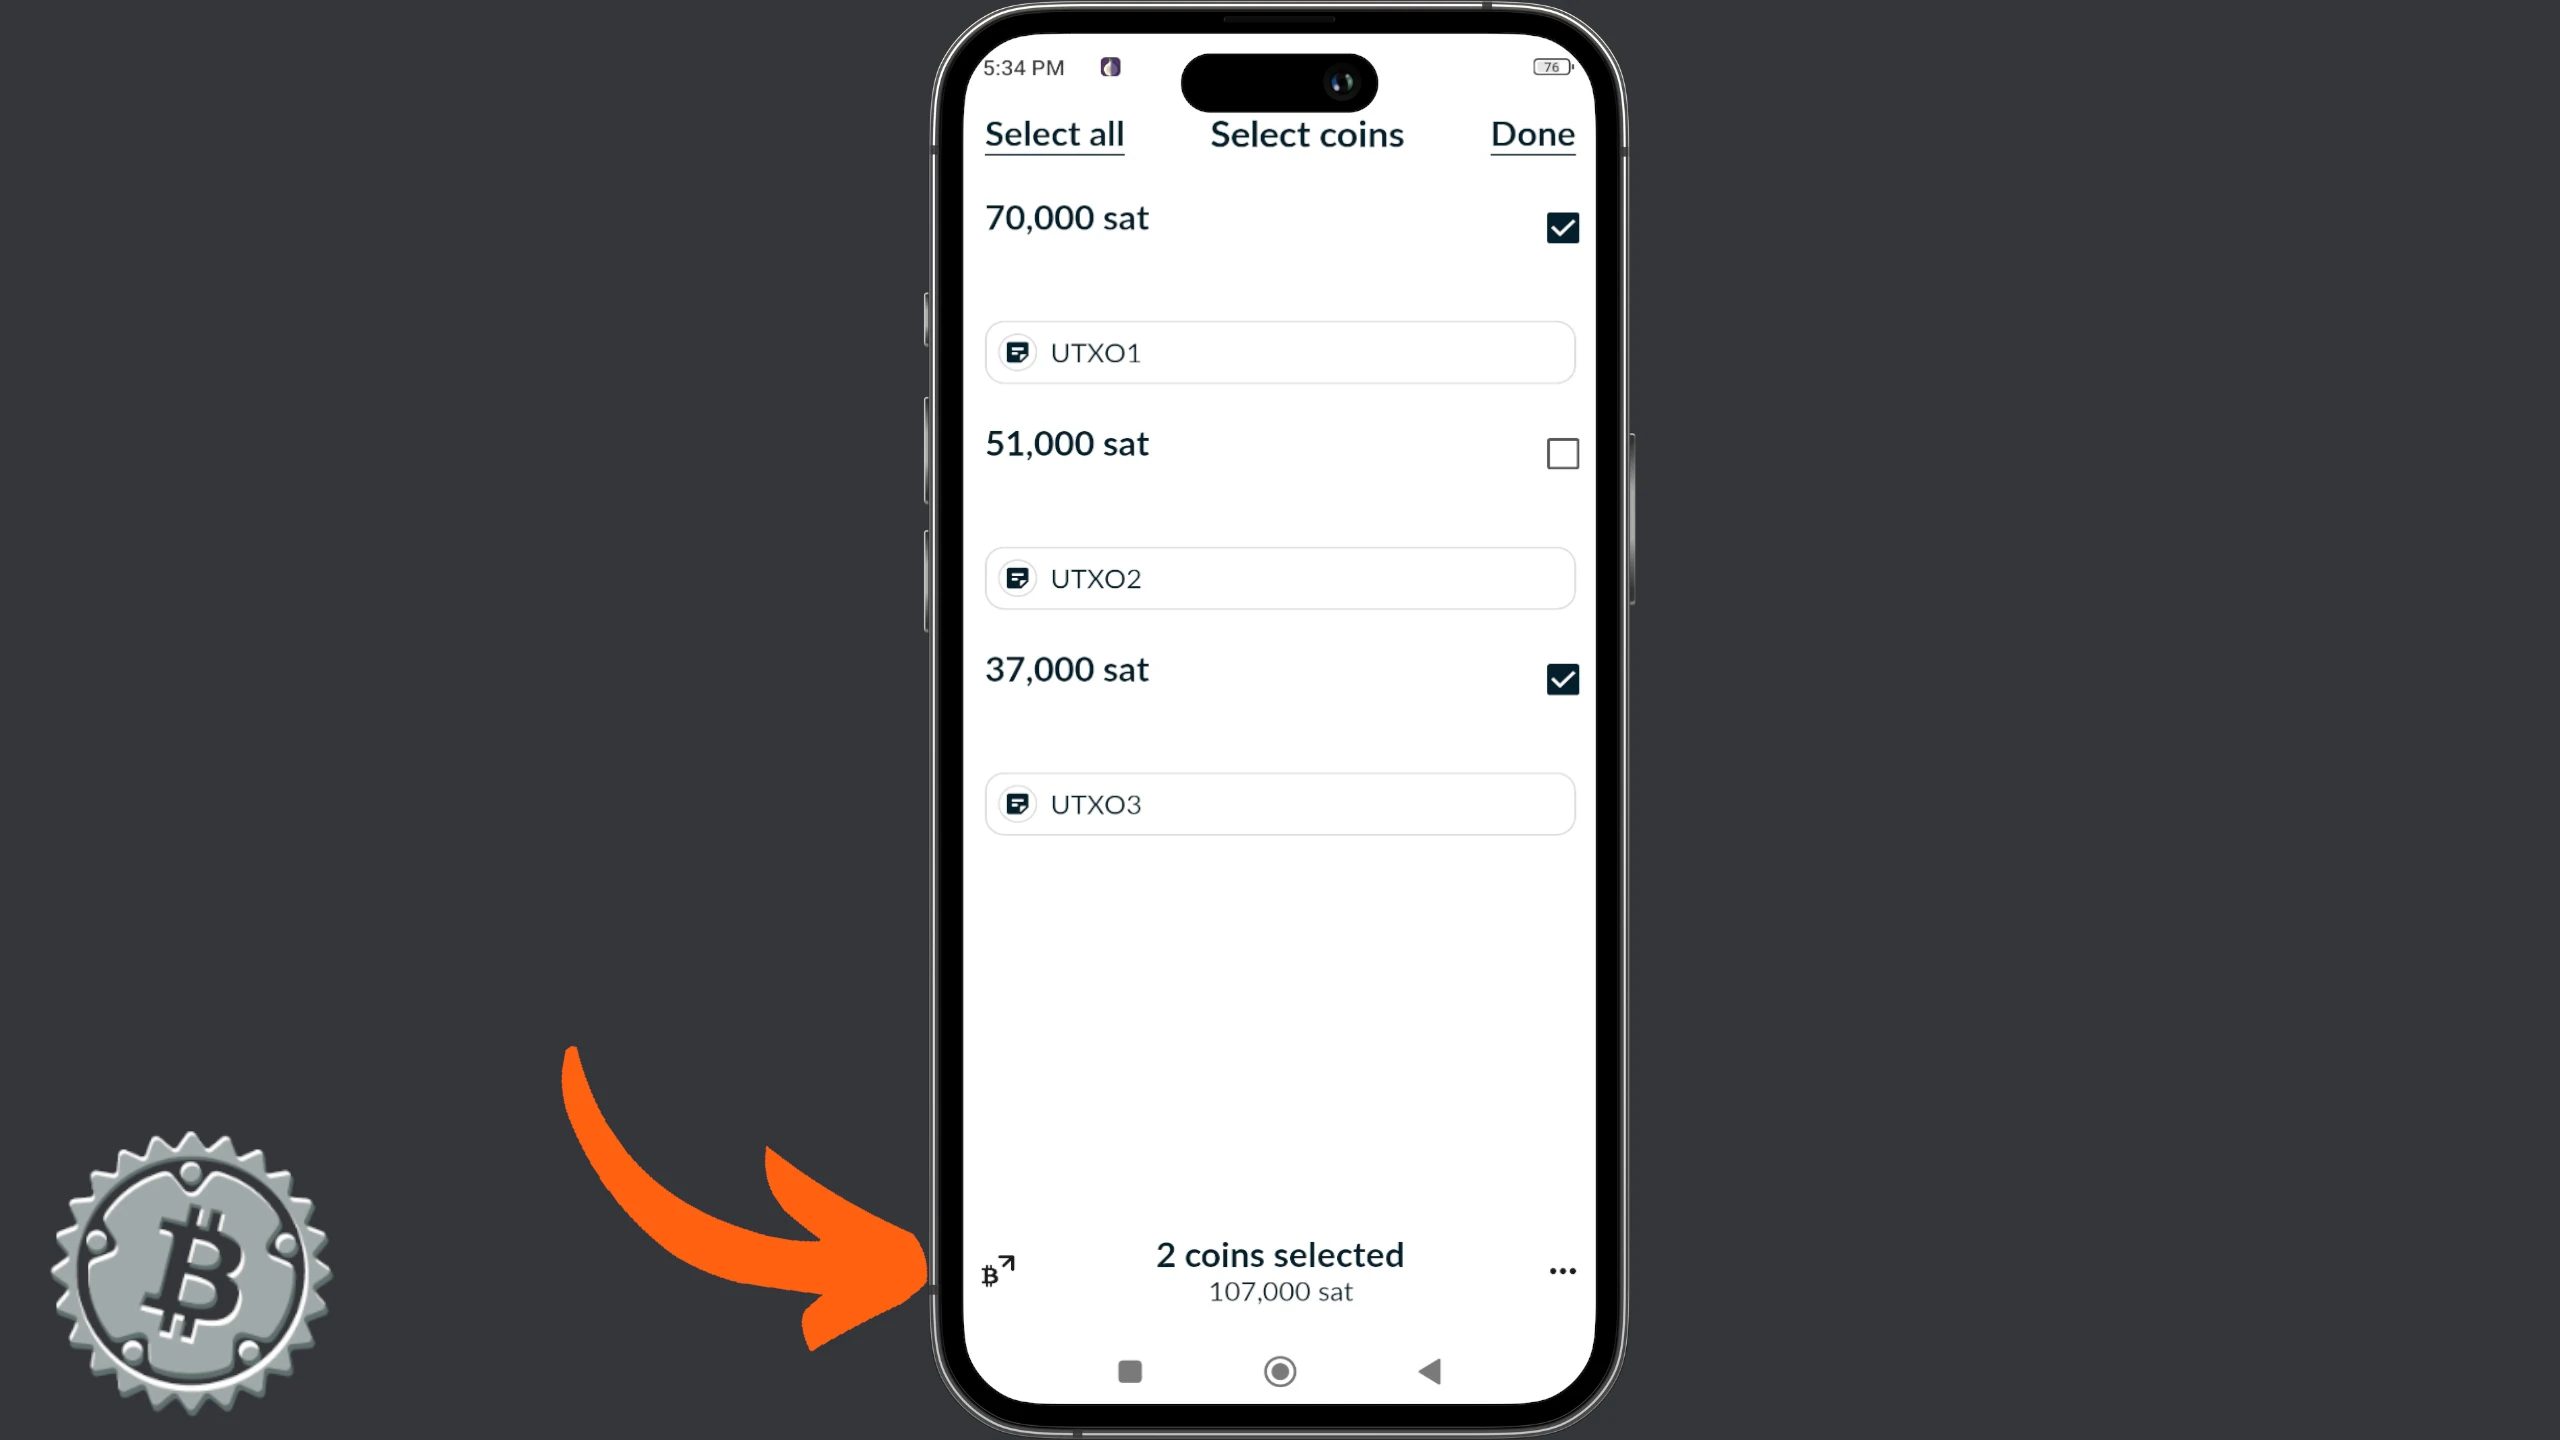
Now you can complete the transaction, choosing the amount and clicking Continue.
Continue as usual, pasting a destination address, a description, and customizing the fee settings.
Bitcoin Keeper
Bitcoin Keeper is the last wallet we’ll see in this guide. Let’s see its coin control feature with a single-sig wallet, even though such use is not the main purpose of this particular app.
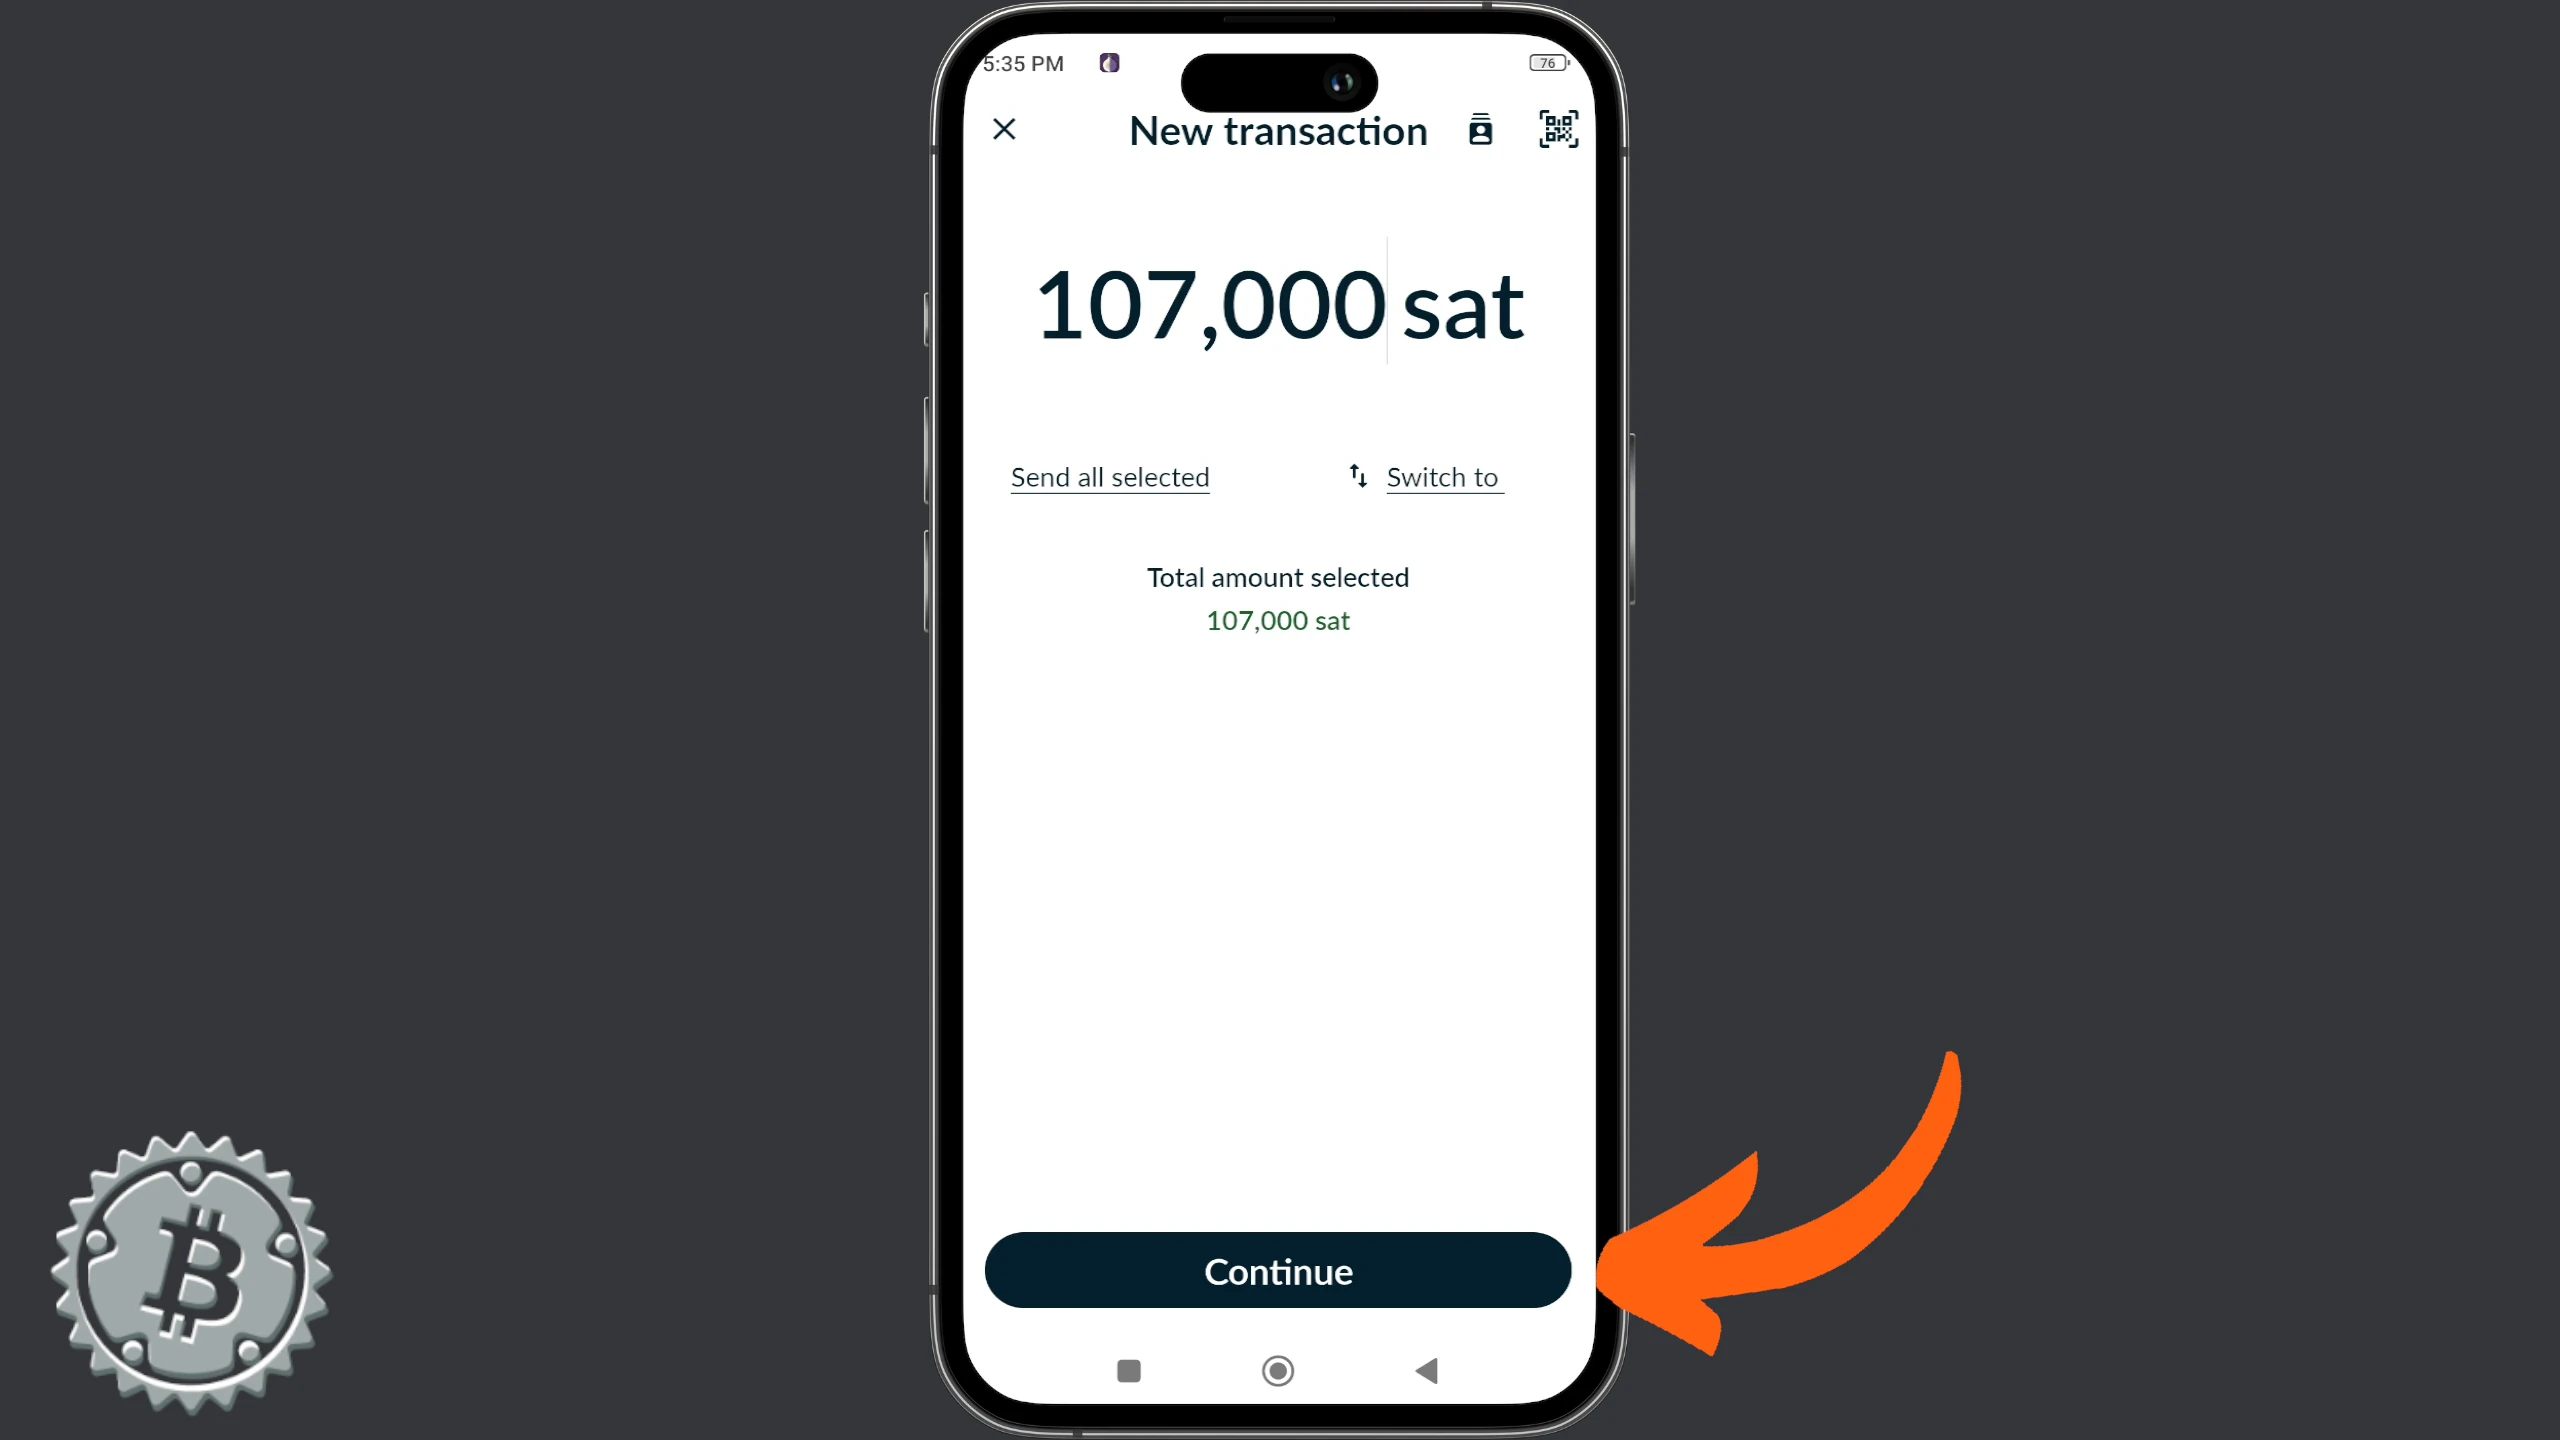
After setting up Keeper on your phone, launch it and open a wallet containing some UTXOs. In the center of the main screen, click View All Coins.
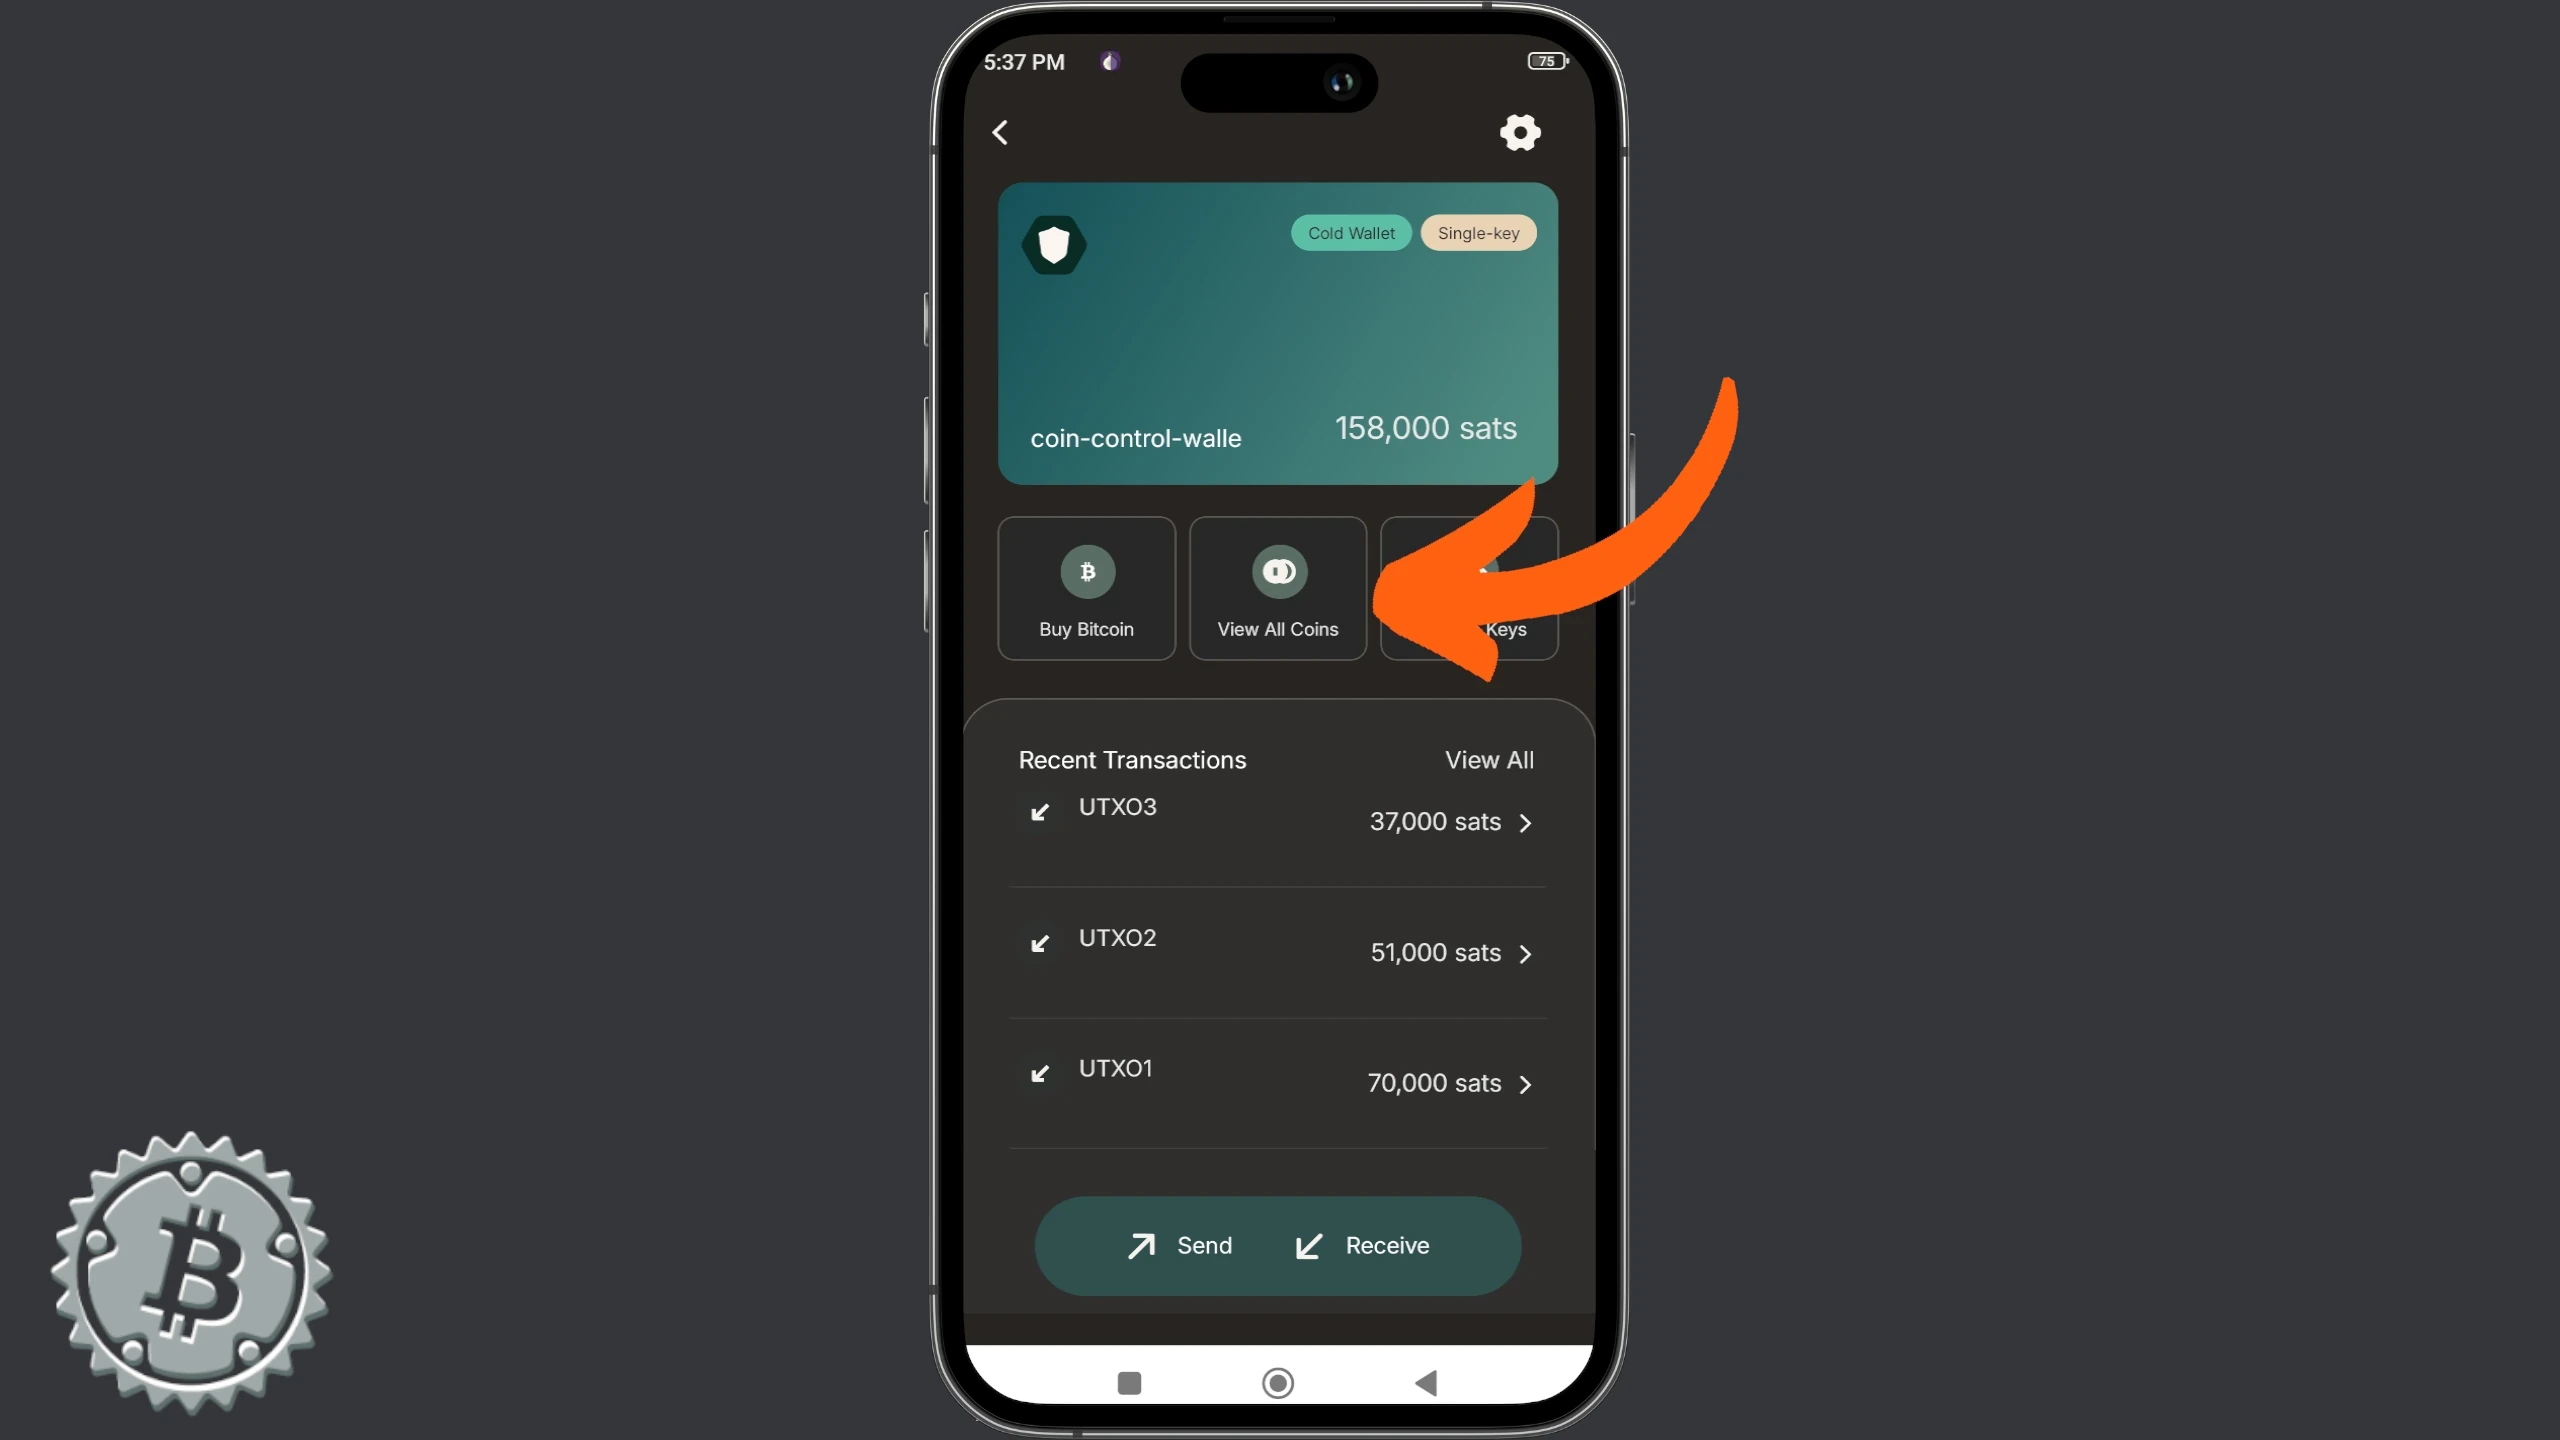
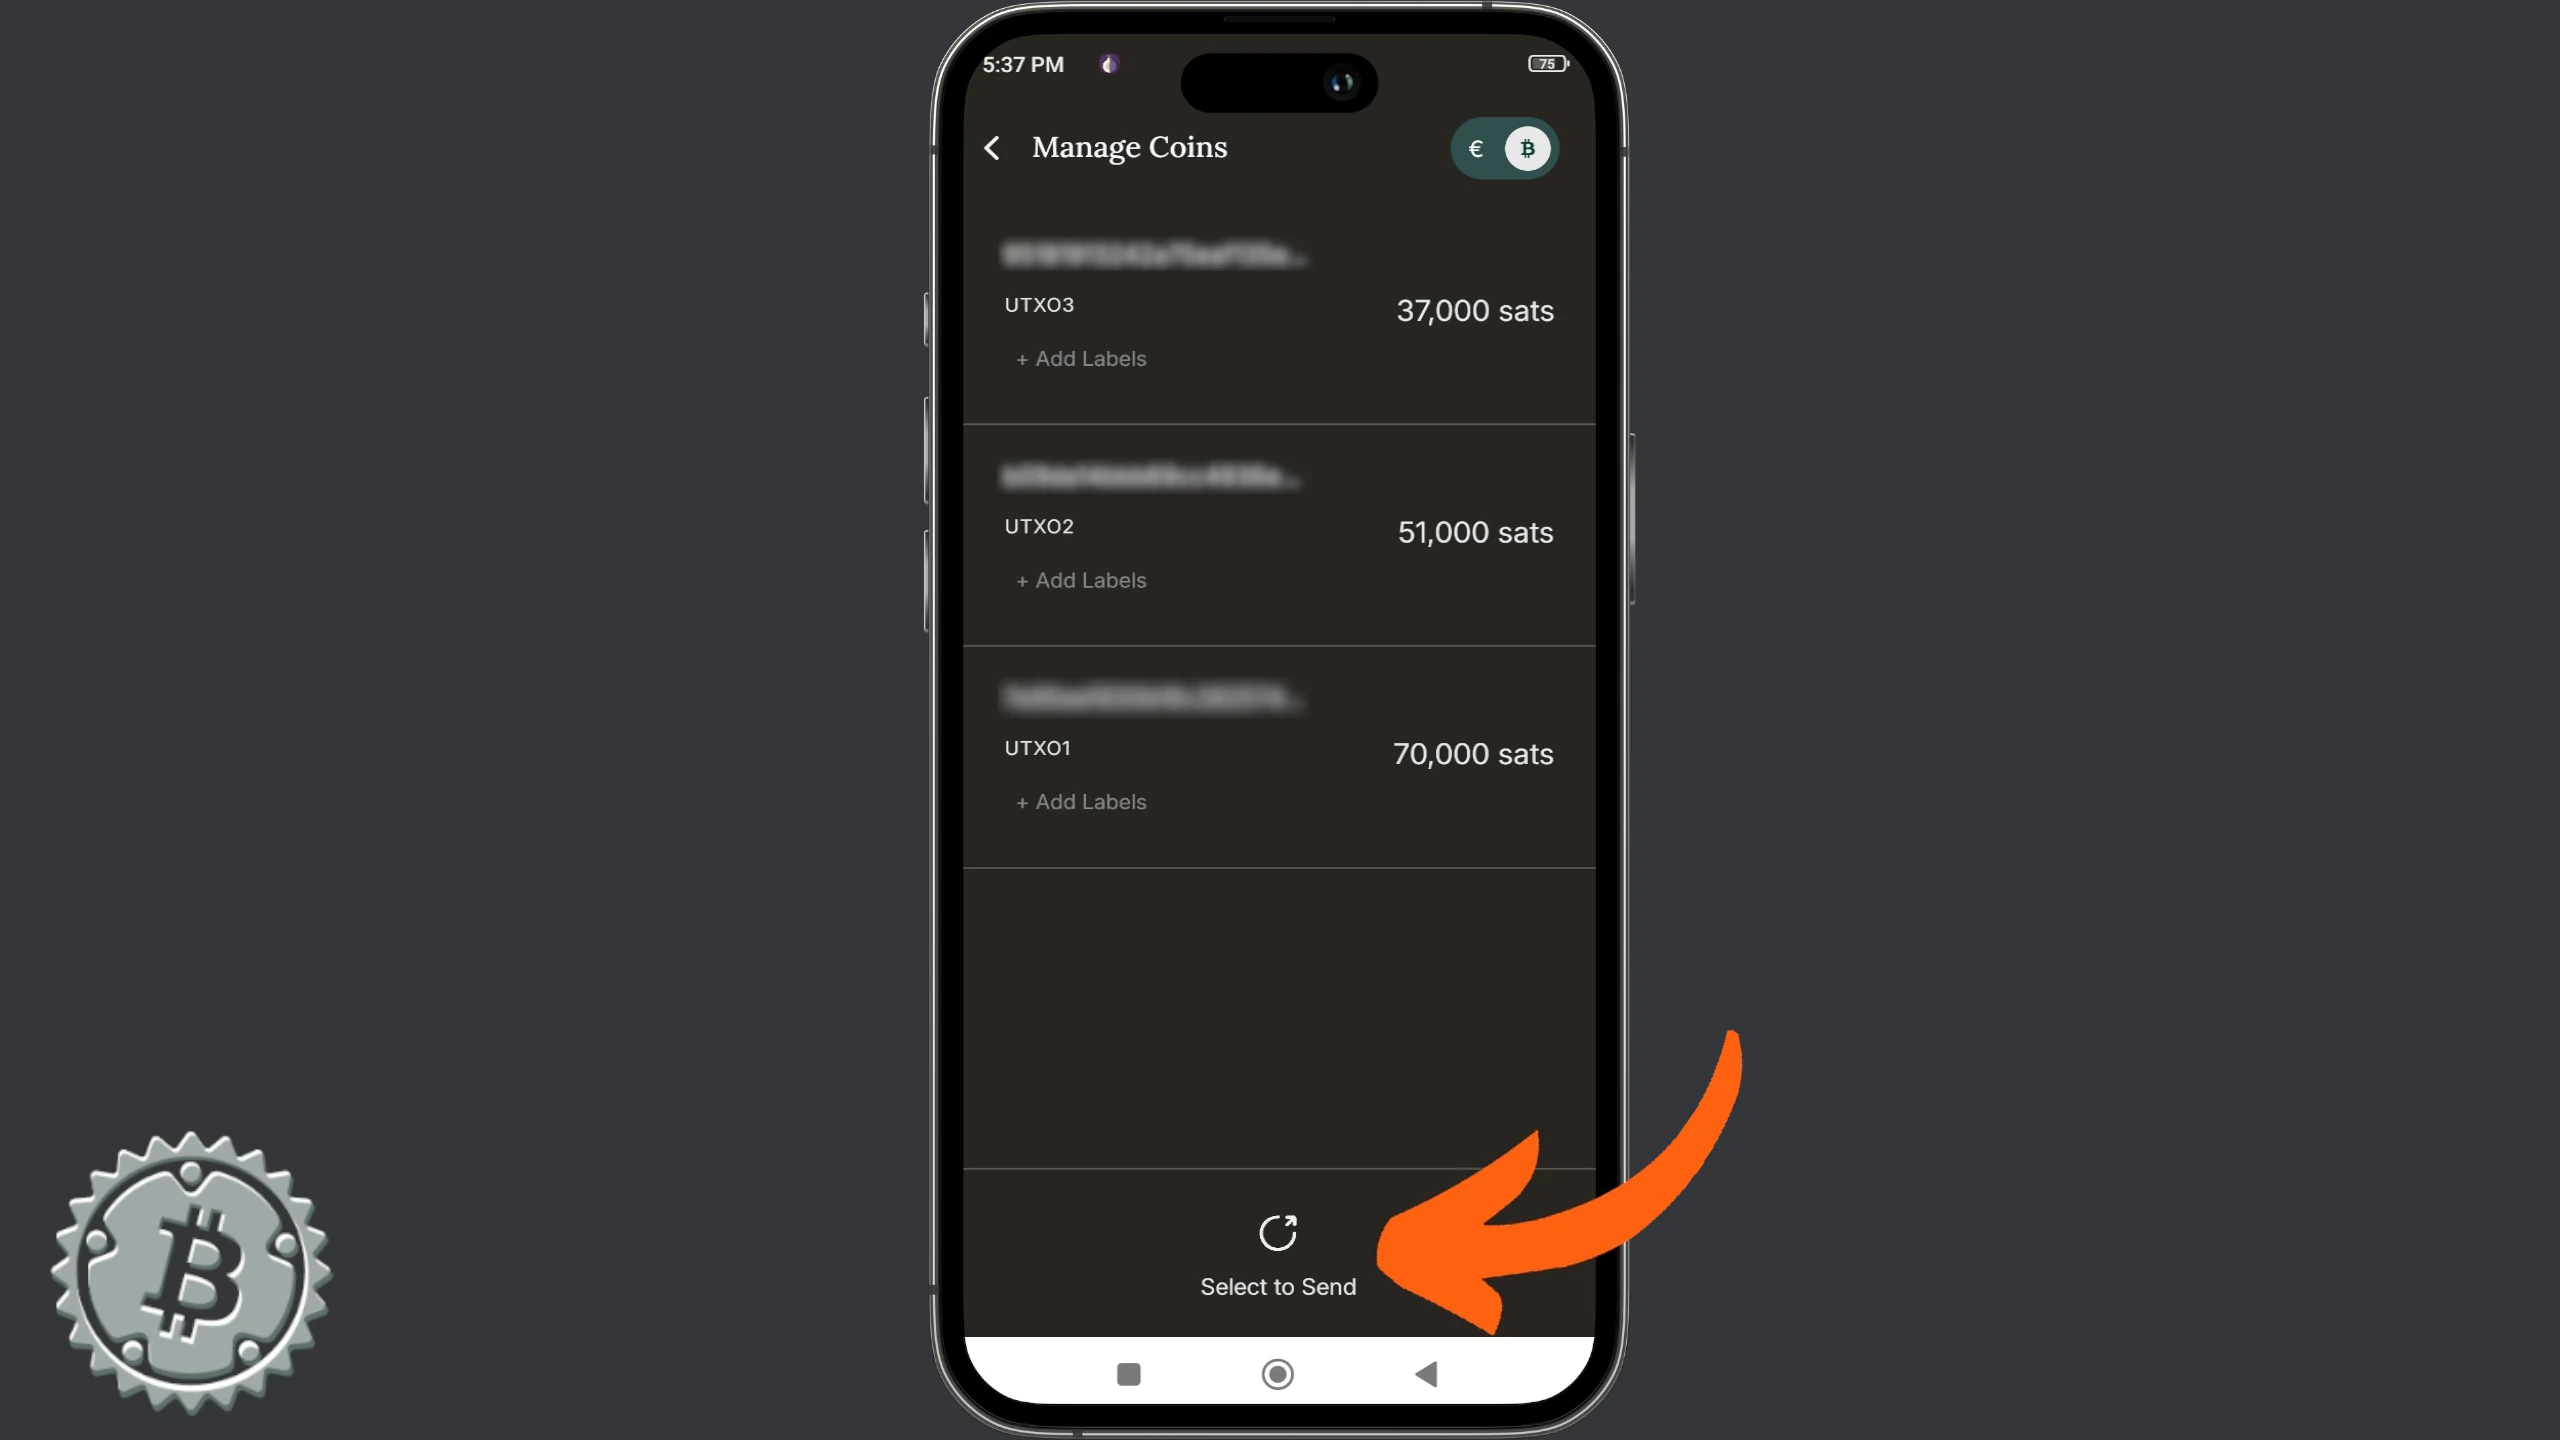
Keeper shows an overview of the UTXOs. To access the selection screen, click Select To Control.
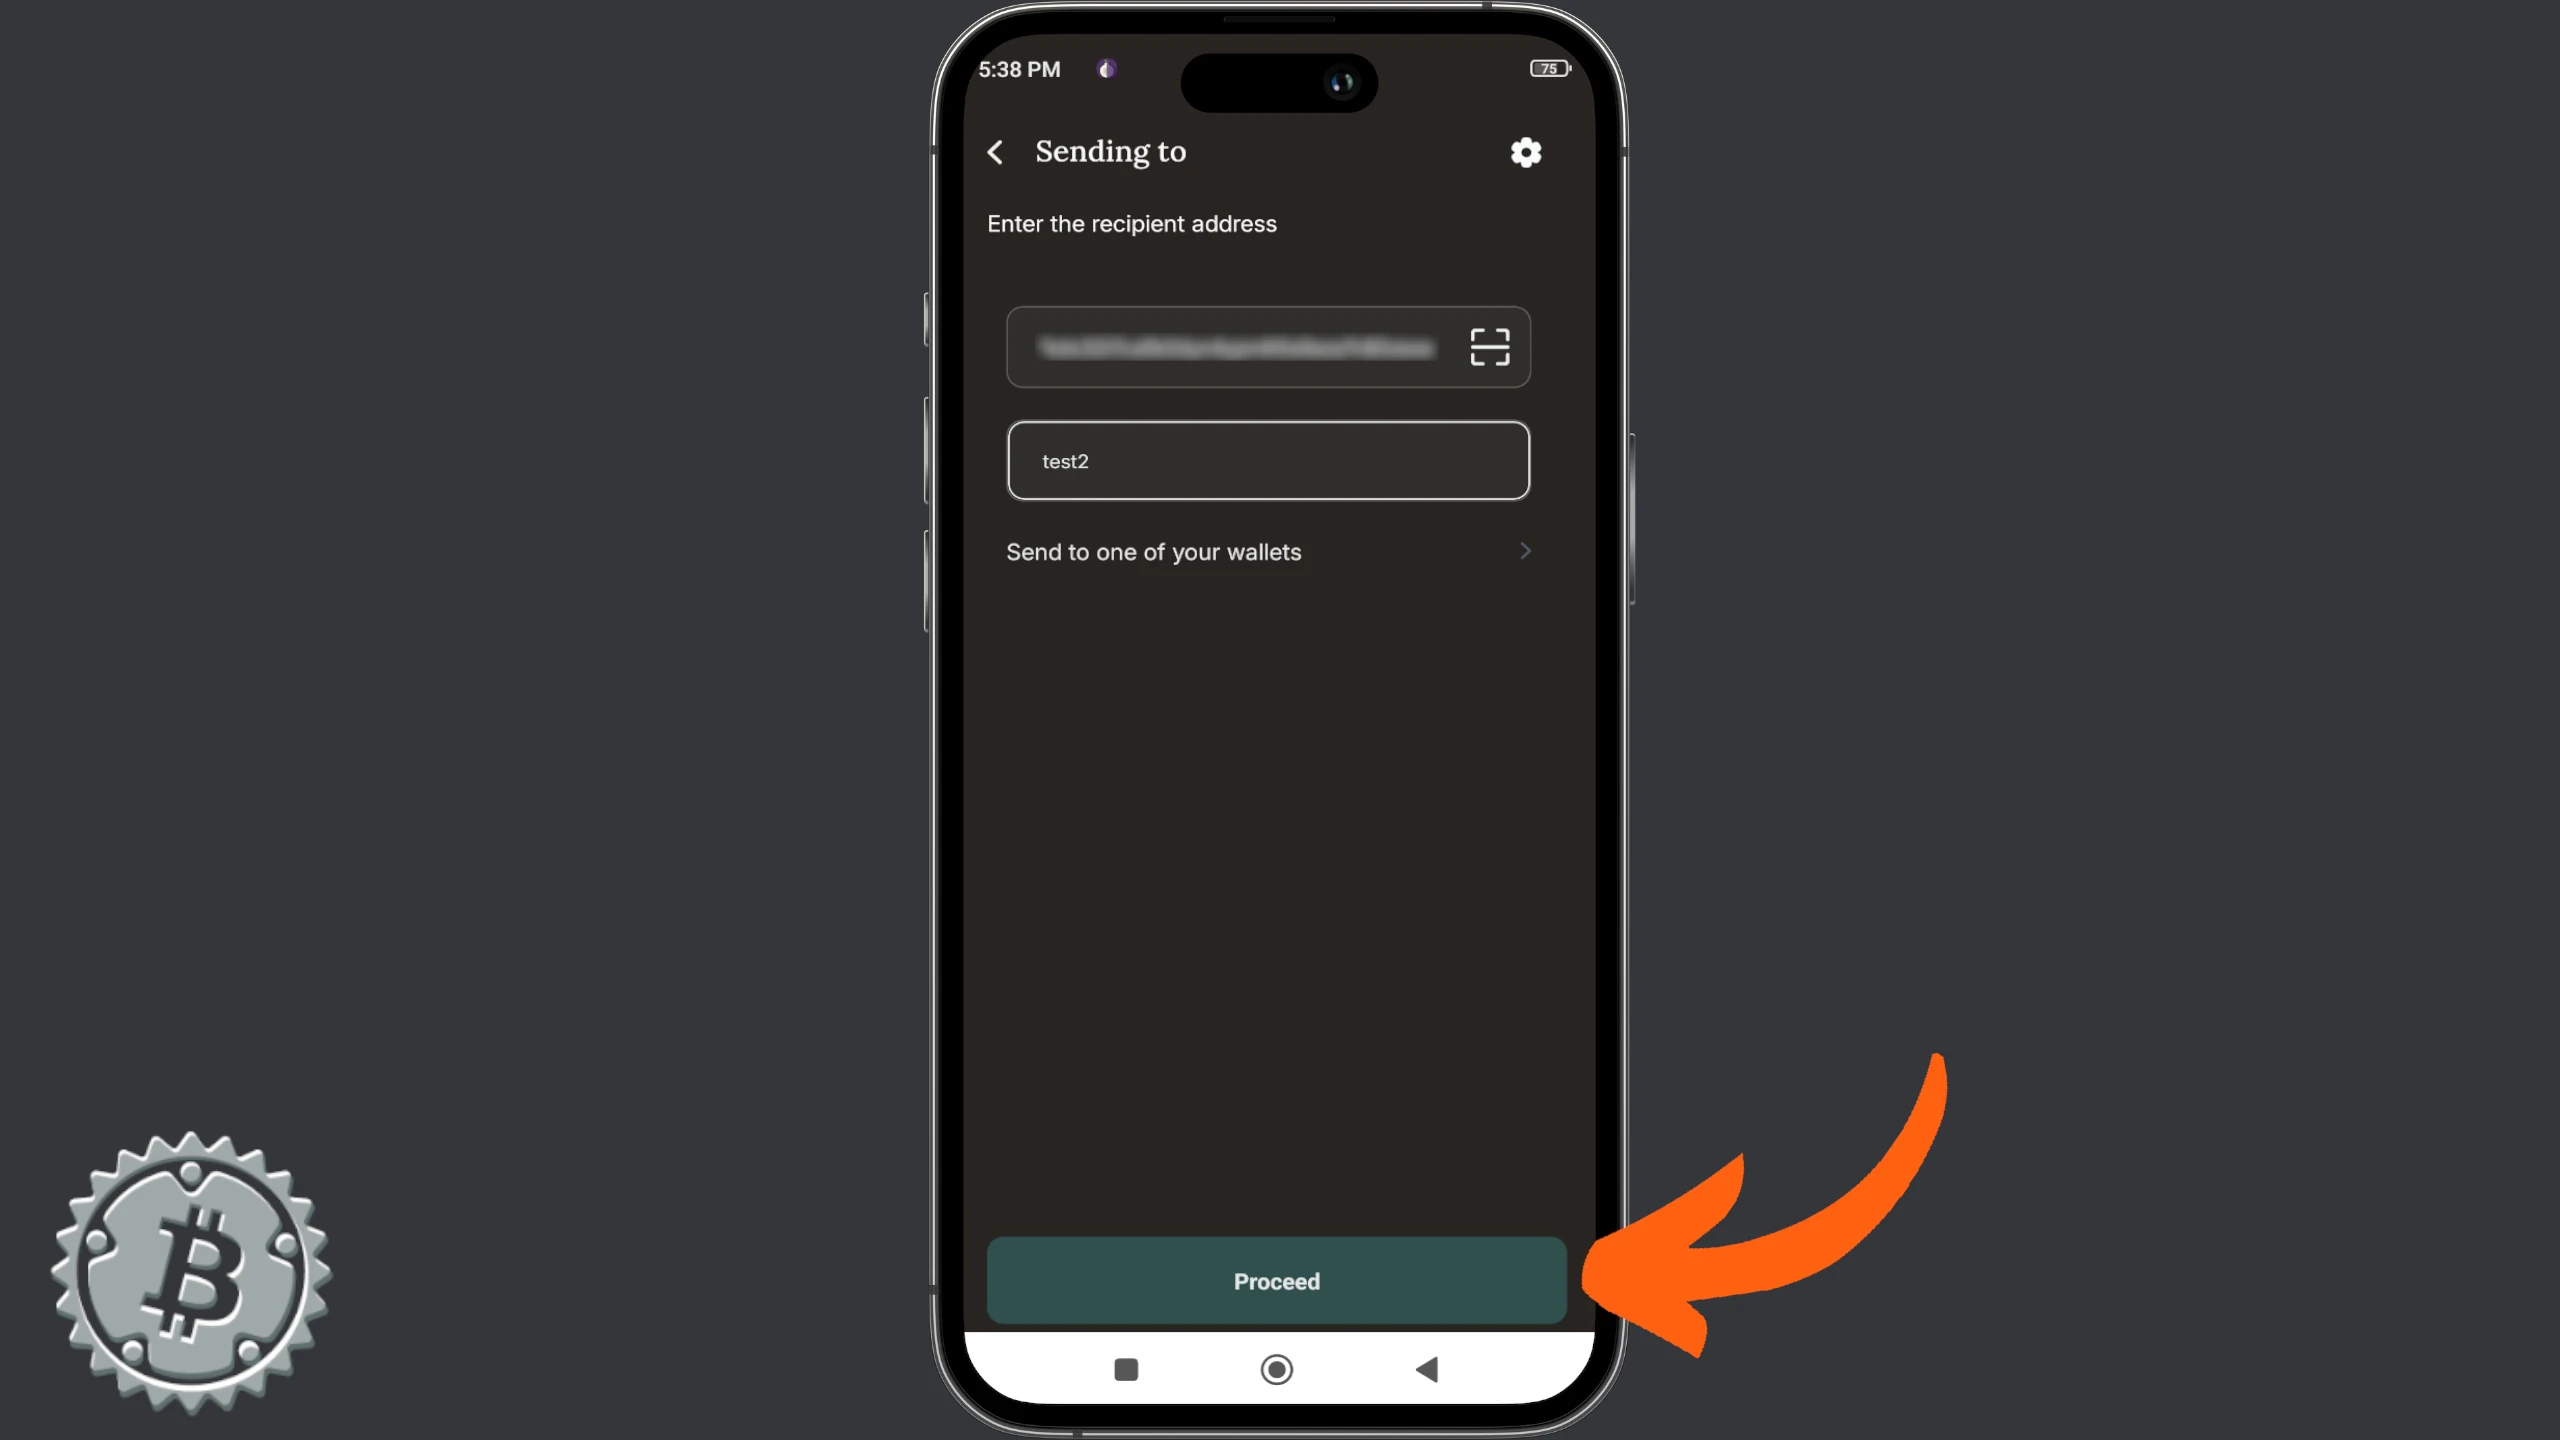
You can select coins by ticking them, clicking the appropriate command. When done, click Send.

Bitcoin Keeper takes you directly to the Send menu, where you can build the transaction with the selected UTXOs.
Hardware wallet
Each of the software wallets seen in this guide can be the watch-only interface for your hardware wallet. This means coin control for an offline signing device is done with the steps seen so far.
General recommendations
Coin control is a very effective practice for selecting your transaction inputs. Manual selection is even more efficient if, when receiving your funds, you have labeled the origin of your satoshis well. If you want to master this technique, I recommend the tutorial:
https://planb.network/tutorials/privacy/on-chain/utxo-labelling-d997f80f-8a96-45b5-8a4e-a3e1b7788c52